Dual-boot Your Arduino

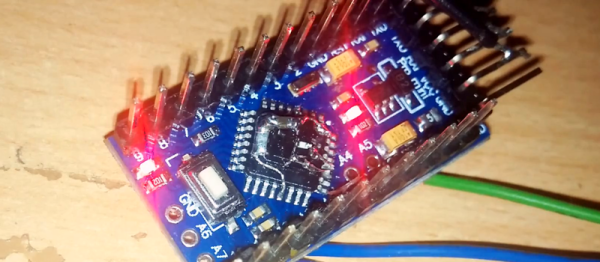
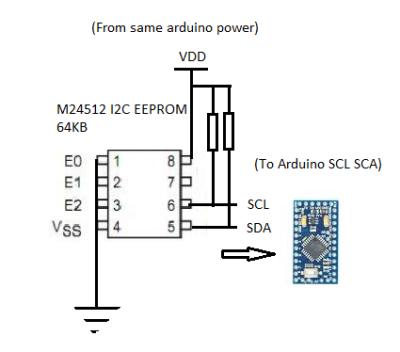
There was a time, not so long ago, when all the cool kids were dual-booting their computers: one side running Linux for hacking and another running Windows for gaming. We know, we were there. But why the heck would you ever want to dual-boot an Arduino? We’re still scratching our heads about the application, but we know a cool hack when we see one; [Vinod] soldered the tiny surface-mount EEPROM on top of the already small AVR chip! (Check the video below.)

aAside from tiny-soldering skills, [Vinod] wrote his own custom bootloader for the AVR-based Arduino. With just enough memory to back up the AVR’s flash, the bootloader can shuffle the existing program out to the EEPROM while flashing the new program in. For more details, read the source.

While you might think that writing a bootloader is deep juju (it can be), [Vinod]’s simple bootloader application is written in C, using a style that should be familiar to anyone who has done work with an Arduino. It could certainly be optimized for size, but probably not for readability (and tweakability).

Why would you ever want to dual boot an Arduino? Maybe to be able to run testing and stable code on the same device? You could do the same thing over WiFi with an ESP8266. But maybe you don’t have WiFi available? Whatever, we like the hack and ‘because you can’ is a good enough excuse for us. If you do have a use in mind, post up in the comments!

Continue reading “Dual-boot Your Arduino”

Encrypted USB Bootloader For AVRs

It probably doesn’t matter much for the hacker who sleeps with a bag of various microcontroller flash programmers under the pillow, but for an end-user to apply a firmware upgrade, convenience is king. These days that means using USB, and there are a few good AVR USB bootloaders out there.

But [Dmitry Grinberg] wanted more: the ability to encrypt the ROM images and verify that they haven’t been tampered with or otherwise messed up in transit. Combined with the USB requirement, that meant writing his own bootloader and PC-side tools. His bootloader will take unencrypted uploads if it doesn’t have a password, but if it’s compiled with a key, it will only accept (correctly) encrypted hex files.

Since the bootloader, including the USB firmware, is on the hefty side at 3.3 kB, [Dmitry] included hooks to re-use the bootloader’s USB code from within the target application. So if you were going to use V-USB in your program anyway, it doesn’t actually take up that much extra space. It’s a cute trick, but it ties the bootloader and user program together in a way that gives us the willies, without specifically knowing why. Perhaps we can debate this in the comments.

If you need an AVR USB bootloader, but you don’t need the encryption, we like Micronucleus. But if you need to deliver updates to users without them being able to modify (or screw up) the code in the middle, give [Dmitry]’s setup a try.

Arduinos (and Other AVRs) Write To Own Flash

In this post on the Arduino.cc forums and this blog post, [Majek] announced that he had fooled the AVR microcontroller inside and Arduino into writing user data into its own flash memory during runtime. Wow!

[Majek] has pulled off a very neat hack here. Normally, an AVR microcontroller can’t write to its own flash memory except when it’s in bootloader mode, and you’re stuck using EEPROM when you want to save non-volatile data. But EEPROM is scarce, relative to flash.

Now, under normal circumstances, writing into the flash program memory can get you into trouble. Indeed, the AVR has protections to prevent code that’s not hosted in the bootloader memory block from writing to flash. But of course, the bootloader has to be able to program the chip, so there’s got to be a way in.

The trick is that [Majek] has carefully modified the Arduino’s Optiboot bootloader so that it exposes a flash-write (SPM) command at a known location, so that he can then use this function from outside the bootloader. The AVR doesn’t prevent the SPM from proceeding, because it’s being called from within the bootloader memory, and all is well.

The modified version of the Optiboot bootloader is available on [Majek]’s Github.  If you want to see how he did it, here are the diffs. A particularly nice touch is that this is all wrapped up in easy-to-write code with a working demo. So next time you’ve filled up the EEPROM, you can reach for this hack and log your data into flash program memory.

Thanks [Koepel] for the tip!

Injecting SD Card Bootloaders

[Frank] has a Ultimaker2 and wanted to install a new bootloader for the microcontroller without having physical access to the circuitry. That means installing a new bootloader for the ATMega2560 without an In System Programmer, and as is usual on AVRs, the bootloader can only be edited with an ISP. Additionally, modifying the bootloader in any way runs the risk of corruption and a bricked circuit. That’s okay, because [Frank] knows how to do it, and he’s here to show you how.

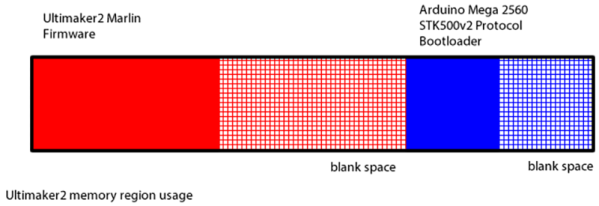
You can think of the memory layout of the ATMega in the Ultimaker as being split in half, with the printer firmware in the first half and the bootloader in the second half. There’s extra space in both halves, and that’s something that comes in very useful. When the circuit powers up, it jumps to the bootloader, does it’s thing, then jumps to the very beginning of the application code – a vector table – that starts up the actual firmware.

[Frank]’s trick to adding on to the bootloader is to place the SD card bootloader in the space normally reserved for applications, not where you would expect to find a bootloader. This code is accessed by the stock bootloader jumping into a modified vector table at the beginning of the application data that points to new executable code. That code is the actual SD card bootloader, but because it is in the application part of the memory, it can’t perform Flash writing or erasing. To fix that, a tiny bit of code is tacked onto the end of the bootloader for performing Flash writes and jumps back to the application part of memory.

Using The Second Microcontroller On An Arduino

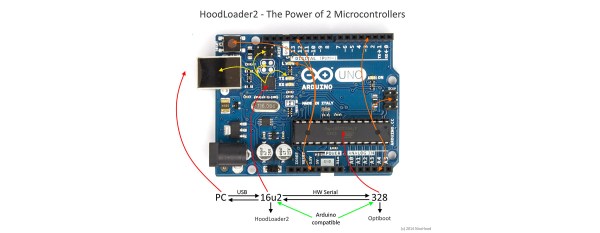
While newer Arduinos and Arduino compatibles (including the Hackaday.io Trinket Pro. Superliminal Advertising!) either have a chip capable of USB or rely on a V-USB implementation, the old fogies of the Arduino world, the Uno and Mega, actually have two chips. An ATMega16u2 takes care of the USB connection, while the standard ‘328 or ‘2560 takes care of all ~duino tasks. Wouldn’t it be great is you could also use the ’16u2 on the Uno or Mega for some additional functionality to your Arduino sketch? That’s now a reality. [Nico] has been working on the HoodLoader2 for a while now, and the current version give you the option of reprogramming the ’16u2 with custom sketches, and use seven I/O pins on this previously overlooked chip.

Unlike the previous HoodLoader, this version is a real bootloader for the ’16u2 that replaces the DFU bootloader with a CDC bootloader and USB serial function. This allows for new USB functions like HID keyboard, mouse, media keys, and a gamepad, the addition of extra sensors or LEDs, and anything else you can do with a normal ‘duino.

Setup is simple enough, only requiring a connection between the ‘328 ISP header and the pins on the ’16u2 header. There are already a few samples of what this new firmware for the ’16u2 can do over on [Nico]’s blog, but we’ll expect the number of example projects using this new bootloader to explode over the coming months. If you’re ever in an Arduino Demoscene contest with an Arduino and you’re looking for more pins and code space, now you know where to look.

Programming An Arduino Over WiFi With The ESP8266

A lot of people have used ESP8266 to add inexpensive WiFi connectivity to their projects, but [Oscar] decided to take it one step further and program an Arduino over WiFi with the ESP8266. [Oscar] wrote a server script in Python that communicates with firmware running on the Arduino. The Arduino connects to the server on startup and listens for a “reboot” command.

When the command is received, the processor resets and enters the bootloader. The python script begins streaming a hex file over WiFi to the ESP8226, which relays it to the Arduino’s bootloader. Once the hex file is streamed, the microcontroller seamlessly starts executing the firmware. This method can be used with any AVR running a stk500-compatible bootloader.

[Oscar]’s writeup is in Spanish, but fortunately the comments in his Python and Arduino code are in English. Check out the video (in English) after the break where [Oscar] demonstrates his bootloading setup.

Continue reading “Programming An Arduino Over WiFi With The ESP8266”

10th Anniversary Trinket Pro Now In The Hackaday Store

Black solder mask and proudly sporting the Jolly Wrencher? The 10th Anniversary Trinket Pro boards just hit the Hackaday Store.

These were actually the suggestion of [Phil Torrone]. He founded Hackaday way back in 2004 and is now CEO of Adafruit Industries. Shortly after I asked him to record a remembrance of his time at Hackaday for the anniversary party he suggested these boards (normally blue and missing our logo) as a limited-edition for the event. It took just two weeks for them to crank out 585 of them.

I’m most likely biased for many reasons. Obviously I like putting the skull and wrenches on everything, and black solder mask is just cool. I also adore the ATmega328 (my 8-bit go-to chip for prototyping) and am especially fond of this form factor as it makes for super simple on-the-go firmware coding.

Once we sell 560 of them they will never return. We’re betting that Adafruit will have an even better minuscule breakout board for our 25th Anniversary. Do you think quantum computing will have trickled down to the single-chip prototyping stage by then?

Update: We’ve updated shipping rates on the store. Orders over $25 in the USA now have free shipping. International shipping is free for orders over $50. We will continue to try and reduce shipping rates as much as possible. We’re new to this so stay tuned!