MIT’s Knitted Keyboard Is Quite A Flexible MIDI Controller

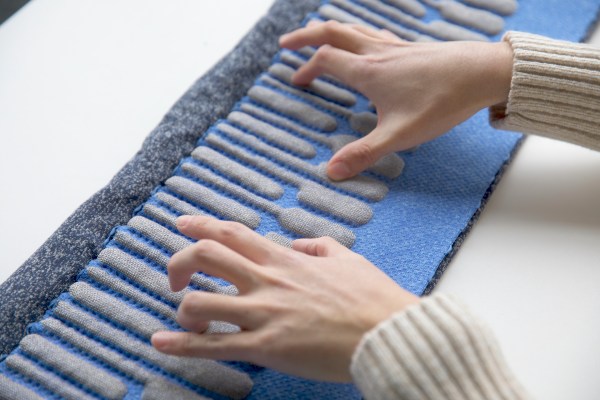
There are only so many ways to make noise on standard instruments such as acoustic pianos. Their rigidity and inputs just don’t allow for a super-wide range of expression. On the other hand, if you knit your interface together, the possibilities are nearly endless. MIT’s new and improved knitted keyboard is an instrument like none other — it responds to touch, pressure, and continuous proximity, meaning that you can play it like a keyboard, a theremin, and something that is somewhere in between the two. Because it’s a MIDI interface, it can ultimately sound like any instrument you’ve got available in software.

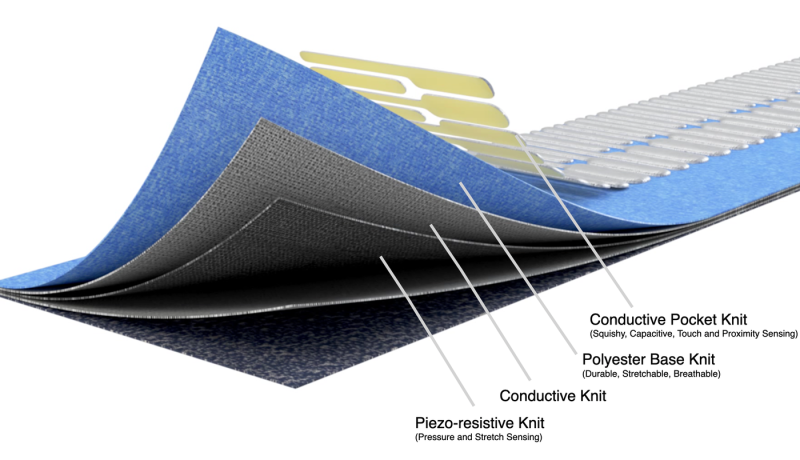
The silver keys of this five-octave interface are made of conductive yarn, and the blue background is regular polyester yarn. Underneath that is a conductive knit layer to complete the key circuits, and a piezo-resistive knit layer that responds to pressure and stretch. It runs on a Teensy 4.0 and uses five MPR121 proximity/touch controllers, one per octave.

The really exciting thing about this keyboard is its musical (and physical) versatility. As you might expect, the keyboard takes discrete inputs from keystrokes, but it also takes continuous input from hovering and waving via the proximity sensors, and goes even further by taking physical input from squeezing, pulling, stretching, and twisting the conductive yarns that make up the keys. This means it takes aftertouch (pressure applied after initial contact) into account —  something that isn’t possible with most regular instruments. And since this keyboard is mostly yarn and fabric, you can roll it up and take it anywhere, or wrap it around your neck for a varied soundscape.

If you’re looking for more detail, check out the paper for the previous version (PDF), which also used thermochromic yarn to show different colors for various modes of play using a heating element. With the new version, [Irmandy Wicaksono] and team sought to improve the sensing modalities, knitted aesthetics, and the overall tactility of the keyboard. We love both versions! Be sure to check it out after the break.

Want to play around with capacitive touch sensors without leaving the house for parts? Make your own from paper and aluminum foil.

Continue reading “MIT’s Knitted Keyboard Is Quite A Flexible MIDI Controller”

Polyphony On A Tiny Scale

Older readers may remember the Stylophone, a small battery powered electric organ using conductive PCB pads and a stylus to create notes. The simple multivibrators in those instruments made them monophonic, but here in 2021 we can do better than that! [Sjm4306] has gone the extra mile with a PCB organ, by making a capacitive-touch instrument that boasts four-note polyphony.

At its heart is an ATmega328p whose software sports four tone generators that each emerge on a different pin. These are summed using a set of 100 Ω resistors and fed to a tiny speaker. Power comes from a CR2032 lithium cell, and he notes that a higher voltage delivers more volume.

The full story is detailed in the video below the break, along with a bit of four-note polyphonic action. We’re guessing that this instrument would sound sensational when hooked up to a reverb unit.

Continue reading “Polyphony On A Tiny Scale”

Hacker Has Robot Give Yubikey The Finger

[Bertrand Fan] is not a fan of the tiny, hard-to-actuate button on the average Yubikey. Before all that is 2020 occurred, [Bert] had the little 2FA nano-donglette plugged into a spare USB port on the side of their laptop so that it was always available wherever the laptop traveled. Now that working from home is the norm, [Bert] has the laptop off to the side, far out of reach.

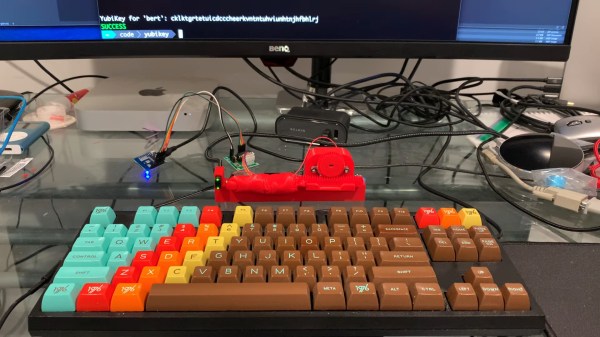
A USB-C extension cable certainly made it more accessible, but did nothing for the actuation fail rate of the tiny button. Fed up by inconvenience and looking for a lockdown project, [Bert] decided to make a button-pressing robot finger that’s driven by a spare key on their groovy TKL keyboard.

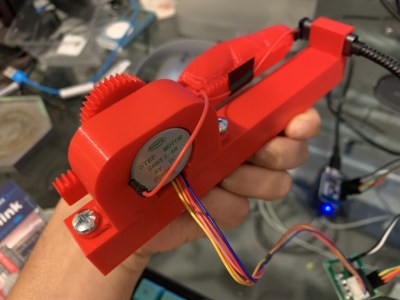
It runs on a Wemos D1 mini and uses a small stepper motor to push a 3D-printed finger along a rack-and-pinion actuator. Since the Yubikey requires capacitive touch, [Bert] added a screw to the finger tip that’s wired to ground. Now all [Bert] has to do is press a decidedly cooler key to make the finger press the button for him. Check out a brief demo after the break.

If this security flaw makes you uncomfortable, perhaps this 2FA launch console is more to your liking. And as we saw recently, if you don’t like the cost of Yubikeys, you can roll your own 2FA device with a blue pill.

Continue reading “Hacker Has Robot Give Yubikey The Finger”

It’s Time For Watch Clocks To Make A Comeback

Along with all the colorful, geometric influence of Memphis design everywhere, giant wristwatch clocks were one of our favorite things about the 80s. We always wanted one, and frankly, we still do. Evidently, so did [Kothe]. But instead of some splashy Swatch-esque style, [Kothe] went the nerdy route by building a giant Casio F-91W to hang on the wall.

Not only does it look fantastic, it has the full functionality of the original from the alarm to the stopwatch to the backlit screen. Well, everything but the water resistance. The case is 3D-printed, as are the buckle and the buttons. [Kothe] might have printed the straps, but they were too big for the bed. Instead, they are made of laser-cut foam and engraved with all the details.

Inside there’s a 7″ touch display, a real-time clock module, and an Arduino Mega to make everything tick. To make each of the printed buttons work, [Kothe] cleverly extended a touch sensor module’s input pad with some copper tape. We think this could only be more awesome if it were modeled after one of Casio’s calculator watches, but that might be asking too much. Take a few seconds to watch the demo after the break.

Prefer your clocks less clock-like? Get a handle on the inner workings of this slot machine-based stunner.

Continue reading “It’s Time For Watch Clocks To Make A Comeback”

Robo Pony Greets Hackerspace Visitors

Robotic animal companions were once all the rage, though their limited personalities and annoying sound effects often relegated them to the bin fairly quickly. This makes them all the more ripe for hacking. [David Bynoe] had a Baby Butterscotch that was in need of a new home, and he decided to put the pony to work at his local hackerspace.

The Baby Butterscotch pony is a charming beast in stock form, yet highly menacing once its skin is removed. Mounted to a plaque, the pony has three PIR sensors that detect movement. These sensors are used to allow the pony to act as a door greeter, waking up when people enter the hackerspace and following them around the room. The additional hardware interfaces with the pony’s stock electronics by using floating capacitors and relays to activate the original capacitive touch sensors. The final piece is finished with a coat of gold paint and some RGB eyes to complete the look.

It’s a fun project that gives Vancouver Hack Space a little personality, and we’re sure it’s enjoyed by the members. We’ve seen other companion toy hacks before, with the Furby always being a ripe target for projects. Video after the break.

Continue reading “Robo Pony Greets Hackerspace Visitors”

Upgrading A MIDI Controller With An FPGA

While the “M” in MIDI stands for “musical”, it’s possible to use this standard for other things as well. [s-ol] has been working on a VJ setup (mixing video instead of music) using various potentiometer-based hardware and MIDI to interface everything together. After becoming frustrated with drift in the potentiometers, he set out to outfit the entire rig with custom-built encoders.

[s-ol] designed the rotary-encoder based boards around an FPGA. It monitors the encoder for changes, controls eight RGB LEDs per knob, and even does capacitive touch sensing on the aluminum knob itself. The FPGA communicates via SPI with an Arduino master controller which communicates to a PC using a serial interface. This is [s-ol]’s first time diving into an FPGA project and it looks like he hit it out of the park!.

Even if you’re not mixing video or music, these encoders might be useful to any project where a standard analog potentiometer isn’t accurate or precise enough, or if you just need something that can dial into a specific value quickly. Potentiometers fall short in many different ways, but if you don’t want to replace them you might modify potentiometers to suit your purposes.

Continue reading “Upgrading A MIDI Controller With An FPGA”

Divide To Conquer Capacitive Touch Problems

Back in the day, all of your music was on a shelf (or in milk crates) and the act of choosing what to listen to was a tangible one. [Michael Teeuw] appreciates the power of having music on demand, but misses that physical aspect when it comes time to “put something on”. His solution is a hardware controller that he calls MusicCubes.

Music cube makes selection using RFID, and touching to the right raises the volume level

This is a multi-part project, but the most recent rework is what catches our eye. The system uses cubes with RFID tags in them for each album. This part of the controller works like a charm, just set the cube in a recessed part of the controller — like Superman’s crystals in his fortress of solitude — and the system knows you’ve made your decision. But the touch controls for volume didn’t work as well. Occasionally they would read a false touch, which ends up muting the system after an hour or so. His investigations led to the discovery that the capacitive touch plates themselves needed to be smaller.

Before resorting to a hardware fix, [Michael] tried to filter out the false positives in software. This was only somewhat successful so his next attempt was to cut the large touch pads into four plates, and only react when two plates register a press at one time.

He’s using an MPR121 capacitive touch sensor which has inputs for up to 12-keys so it was no problem to make this change work with the existing hardware. Surprisingly, once he had four pads for each sensor the false-positives completely stopped. The system is now rock-solid without the need to filter for two of this sub-pads being activated at once. Has anyone else experienced problems with large plates as the touch sensors? Can this be filtered easily or is [Michael’s] solution the common way to proceed? Share your own capacitive touch sensor tips in the comments below!

Want to get a look at the entire project? Start with step one, which includes a table of contents for the other build logs.