Eradicating Mosquitoes From Your Backyard — With Seltzer?

Q: What do you call 8000 dead mosquitoes in a Mason jar?

A: A good start. And [Dan Rojas]’s low-tech mosquito trap accomplished the feat in two nights with nothing fancier than a fan and a bottle of seltzer.

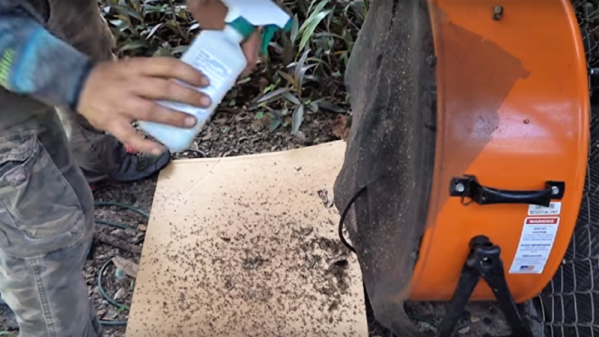
We know what you’re thinking: Where’s the hack? Why not at least use a laser sentry gun to zap skeeters on the fly? We agree that [Dan]’s mosquito trap, consisting of a powerful fan to create suction and a piece of window screen to catch the hapless bloodsuckers, is decidedly low-tech. But you can’t argue with results. Unless he’s fudging the numbers, a half-full Mason jar of parasite cadavers is pretty impressive. And you have to love the simplicity of the attractant he’s using. Mosquitoes are attracted to the CO2 exhaled by tasty mammals, but rather than do something elaborate with a paintball gun cartridge or the like, [Dan] simply cracks a bottle of seltzer and lets it outgas. Dead simple, and wickedly effective. The trapped bugs quickly desiccate in the strong air stream, aided by a few spritzes of isopropyl alcohol before cleaning the screen, which leaves them safely edible to frogs and insects.

Simple, cheap, and effective. Sounds like a great hack to us. And it’s really just a brute-force implementation of this mosquito-killing billboard for areas prone to Zika.

Continue reading “Eradicating Mosquitoes From Your Backyard — With Seltzer?”

3D Printed Rockets Are A Gas

We’ve probably all made matchstick rockets as kids. And around here anything that even vaguely looks like a rocket will get some imaginary flight time. But [austiwawa] is making some really cool 3D printed rockets that use common CO2 cartridges as a propellant. You can see them in action in the video below.

You might think just sticking a CO2 cylinder in a 3D printed jacket isn’t such a big deal, but [austiwawa] really went the extra mile. He read up on how to make the rocket stable (by manipulating the center of gravity versus the center of pressure) and explains what he had to do to get the rockets flying like you’d expect.

In addition, the launch tube is pretty interesting. A 3D printed part holds a sharp point and a spring. You lock the spring and when released it punches a clean hole in the propellant casing. The actual tube is a long piece of PVC pipe. From the video, it looks like these little rockets fly pretty high.

Judging from the video, the rocket body and launcher came from TinkerCAD. The way [austiwawa] put the fins on was both simple and clever.

Of course, you could also use Coke and propane, if you like. We’ve also seen some pretty cool setups with compressed air. Check out the rockets in action after the break,

Continue reading “3D Printed Rockets Are A Gas”

Thermoelectric Dry Ice Generator Does Not Work (Yet)

[Pabr] is trying to make dry ice the hard way by building a thermoelectric dry ice generator. The project is a well planned round trip through thermodynamics and cryogenics with a hard landing on the icy grounds of trial and error.

[Pabr’s] four stage Peltier element on a heatsink.
While dry ice can be obtained with simpler methods, for example by venting gaseous CO2 from fire extinguishers and collecting the forming CO2 flakes, [pabr’s] method is indeed attractive as a more compact solid-state solution. The setup employs a four stage Peltier element, which uses four Peltier stages to achieve a high temperature differential.

With sufficient cooling on the high-temperature side of the element, it should be well capable of achieving temperatures below -78.5 °C, the sublimation temperature of CO2. So far, [pabr] has built three different setups to expose small amounts of CO2 to the cold of the Peltier element, hoping to observe the formation of little dry ice flakes.

Continue reading “Thermoelectric Dry Ice Generator Does Not Work (Yet)”

Reflow Soldering Improved With Carbon Dioxide

co2_reflow-oven

This is exactly what it looks like. [Oleg] calls it soldering in inert atmosphere, but it’s just a toaster oven reflow hack dropped into a container full of carbon dioxide.

Why go to this trouble? It’s all about solder wetting. This is the ability of the molten solder paste to flow into all of the tinned areas of a board. [Oleg] talks about the shelf life of hot air leveled PCB tinning, which is about six months. After this the tin has oxidized. It will certainly not be as bad as bare copper would have, but it can lead to bad solder joints if your PCBs are more than about six months off the production line. This is one of the reasons to use solder flux. The acid eats away at the oxidized layer, exposing tin that will have better wetting.

But there is another way. Soldering in the absence of oxygen will also help the wetting process. CO2 is heavier than air, so placing the reflow oven in a plastic container will allow you to purge air from the space. CO2 canisters are cheap and easy to acquire. If you keg your own homebrew beer you already own one!

If you’ve got everything but the reflow oven just look around for a few examples of how to build your own.

Force Carbonating Root Beer With Dry Ice

[Paul] is sick and tired of his homemade root beer being flat. He analyzed the problem with his carbonation techniques and ended up with a method of force carbonating beverages using dry ice.

He starts of by discussing the various methods that are used to carbonate beverages. There’s the old yeast and sugar trick that takes place inside of a sealed bottle. But this takes time, and if you don’t calculate the mixture correctly you could have over or under carbonated bottles (or exploding bottles in the case of glass beer bottling). [Paul] himself has tried the dry ice in a cooler full of root beer method. The problem is that the cooler isn’t pressurized so the carbonation level is very low. You need to have cold temperatures, high pressure, and the presence of carbon dioxide all at the same time in order to achieve high levels of carbonation.

His solution is to use a 60 PSI safety valve. He drilled a hole in a plastic bottle cap to receive the valve. He then drops a few chunks of dry ice in and seals it up. The valve will automatically release the gas as the pressure builds past the 60 PSI mark. What he ends up with is a highly carbonated beverage in a matter of minutes.

If you don’t mind spending some cash you can use an adjustable pressure regulator. This way you can carbonate just about anything.

[Thanks Steven]

Incredible Home Made Low Cost CO2 Laser

[LokisMischief] wrote in to the tip line to let us know about this incredible home made CO2 laser. This thing is a complete DIY beauty, from the PVC cooling jacket to the toolbox based controller.  The whole thing is essentially built from DIY parts,  hand blown glass for the laser tube, plumbing store mirror mounts,  a PVC cooling jacket with a caulked glass viewing window, and a neon sign transformer with a variac to control output. Even the optics are completely DIY, a hand drilled gold mirror and a NaCL window made from a polished chunk of  icecream salt! [ThunderSqueak] says the control box only cost 60 bucks, and the rest of the parts don’t look too terribly expensive.

We could only find one video of the setup in the variac section of the site, and it was just a test the amp meter in the controller (no lasing anything at all).  [ThunderSqueak] does make a note on the to do list about doing a good laser-y demonstration video, which we are looking forward to.

If you want more DIY CO2 laser action check out this other one or some plans for one.

Beer Chilling In The Name Of Science

We’ve all been there. The day is done and it’s time for a cold one but you neglected to put more beer in the fridge after imbibing the last bottle the night before. You could chuck it in the freezer and revisit your attempt at refreshment in an hour. But if you need a malty beverage right now there’s no faster route than a beer chiller.

This particular beer chilling device is [Michael’s] entry in DEFCON 19’s Beer Chilling Contraption Contest. It can take a pint of beer from 90 degrees down to 45 degrees in just four seconds. Of course there’s a fair amount of setup time before you’re ready to use it. The device is a pipe within a pipe. The inner pipe houses the beer and the pipe surrounding it provides a containment area for a chilling liquid. [Michael] chose to use liquid carbon dioxide as a coolant because of it’s boiling temperature when under pressure. That is to say, the hottest part of the CO2 liquid is around the walls of the center pipe. By carefully dialing in the pressure of that outer chamber, the CO2 will boil away into gas as it cools the beer, making room for more liquid CO2 to contact the pipe and continue the cooling process.