New Teensy 4.1 Arrives With 100 Mbps Ethernet, High-Speed USB, 8 MB Flash

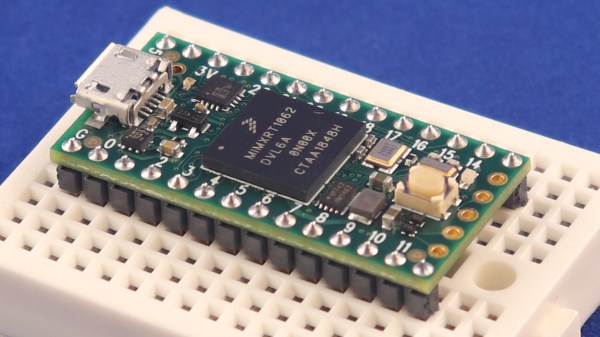
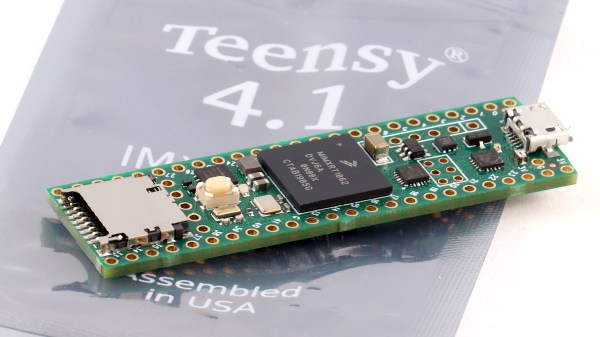
It was only last August that PJRC released Teensy 4.0. At that time, the 4.0 became the fastest microcontroller development board on the planet, a title it still holds as of this writing — or, well, not exactly. Today the Teensy 4.1 has been released, and using the same 600 MHz ARM Cortex M7 under the hood, is now also the fastest microcontroller board. What the 4.1 brings to the table is more peripherals, memory, and GPIOs. While Teensy 4.0 used the same small form factor as the 3.2, Teensy 4.1 uses the larger board size of the 3.5/3.6 to expose the extra goodies.

The now slightly older Teensy 4.0 — released on August 7th of last year — is priced at $19.95, with the new 4.1 version offered at $26.85. It seems that the 4.1 isn’t intended as a replacement for the 4.0, as they serve different segments of the market. If you’re looking for an ultra-fast affordable microcontroller board that lives up to its Teensy name, the 4.0 fits the bill. On the other hand, if you need the additional peripherals broken out and can afford the space of the larger board, the not-as-teensy-sized 4.1 is for you. How big is it? The sample board I measured was 61 x 18 mm (2.4 x 0. 7″), not counting the small protrusion of the micro-usb jack on one end.

Let’s have a look at all the fun stuff PJRC was able to pack into this space. Continue reading “New Teensy 4.1 Arrives With 100 Mbps Ethernet, High-Speed USB, 8 MB Flash”

New Teensy 4.0 Blows Away Benchmarks, Implements Self-Recovery, Returns To Smaller Form

Paul Stoffregen did it again: the Teensy 4.0 has been released. The latest in the Teensy microcontroller development board line, the 4.0 returns to the smaller form-factor last seen with the 3.2, as opposed to the larger 3.5 and 3.6 boards.

Don’t let the smaller size fool you; the 4.0 is based on an ARM Cortex M7 running at 600 MHz (!), the fastest microcontroller you can get in 2019, and testing on real-world examples shows it executing code more than five times faster than the Teensy 3.6, and fifteen times faster than the Teensy 3.2. Of course, the new board is also packed with periperals, including two 480 Mbps USB ports, 3 digital audio interfaces, 3 CAN busses, and multiple SPI/I2C/serial interfaces backed with integrated FIFOs. Programming? Easy: there’s an add-on to the Arduino IDE called Teensyduino that “just works”. And it rings up at an MSRP of just $19.95; a welcomed price point, but not unexpected for a microcontroller breakout board.

The board launches today, but I had a chance to test drive a couple of them in one of the East Coast Hackaday labs over the past few days. So, let’s have a closer look.

Continue reading “New Teensy 4.0 Blows Away Benchmarks, Implements Self-Recovery, Returns To Smaller Form”

Bringing FPGA Development To The Masses

The Field Programmable Gate Array (FPGA) is one of the most exciting tools in the modern hacker’s arsenal. If you can master the FPGA, you can create hardware devices that not only morph and change based on your current needs, but can power through repetitive tasks at phenomenal rates. The only problem is, working with FPGAs can be a bit intimidating for newbies. One could argue that the technology is waiting on its “Arduino” moment; the introduction of a cheap development board coupled with easy to use software that brings FPGA hacking into the mainstream.

If everything goes according to plan, the wait might soon be over. [Ryan Jacobs] believes his project WebFPGA is the easiest and fastest way to get your hands dirty with this incredible technology. Outwardly the hardware could pass for an Arduino Nano clone, with a bunch of GPIO pins and a couple of LEDs on a small breadboard-friendly PCB. Certainly a no-frills presentation. It’s the software side is where things get interesting: all you need to develop for this FPGA is a modern web browser.

Currently Chrome, Opera, and Edge are supported, even if they’re running on relatively low-end computers. [Ryan] says this makes it much easier and cheaper to roll out FPGA classes in schools, as students can do everything with their existing Chromebooks. As the video after the break shows, you can even get away with using a sufficiently powerful smartphone to do some FPGA hacking on the go.

So what’s the trick? Essentially the heavy-lifting is done remotely: all of the synthesis is performed in their cloud backend, with the final bitstream delivered to the user for installation through WebUSB. If you’re more comfortable on the command line, [Ryan] says they’re currently working on tools which will allow you to perform all the necessary interactions with their cloud service without the browser.

The more critical Hackaday reader will likely be concerned about lock-in. What happens if you buy one of these development boards without a license for the service, or worse, what happens if WebFPGA goes belly-up down the road? To that end, [Ryan] makes it clear that their hardware is completely compatible with existing offline FPGA development tools such as the open source IceStorm.

We’ve seen considerable interest in low-cost FPGA development platforms, with readers perhaps recalling the excitement surrounding the fire sale of the Pano Logic thin clients. Despite efforts to make developing for these systems even easier, it’s hard to imagine the bar getting much lower than what WebFPGA is shooting for. Their Kickstarter campaign is close to crossing the finish line, and we’re very interested to see where the product goes from here.

Continue reading “Bringing FPGA Development To The Masses”

FemtoBeacon Is A Tiny ESP32 Coin-Shaped Dev Board

Our single board microcontroller platforms have become smaller over the years, from the relatively large classic Arduino and Beagleboard form factors of a decade ago to the postage stamp sized Feather and ESP boards of today. But just how small can they go? With current components, [Femtoduino] think they’ve cracked it, delivering an ESP32-based board with WiFi and Bluetooth, and an LDO regulator for 5 V operation in a circular footprint that’s only 9 mm in diameter.

There are some compromises from such a paucity of real-estate, of which perhaps the most obvious is a lack of space to make I/O lines available. It has SPI, a UART, and a couple of I/O lines, and aside from an onboard RGB LED that’s it. But SPI is versatile well beyond its number of lines, and even with so little there is much that can be done. Another potential compromise comes from the antenna, a Molex surface-mount component, which is an inevitable consequence of a 9 mm circular board.

There has to come a point at which a microcontroller platform becomes so small as to be unusable, but it’s clear that there is a little further for this envelope to be pushed. We’d love to see what other designers do in response to this board.

Save Some Steps With This Arduino Rapid Design Board

We’re all familiar with the wide variety of Arduino development boards available these days, and we see project after project wired up on a Nano or an Uno. Not that there’s anything wrong with that, of course, but there comes a point where some hobbyists want to move beyond plugging wires into header sockets and build the microcontroller right into their project. That’s when one generally learns that development boards do a lot more than break the microcontroller lines out to headers, and that rolling your own design means including all that supporting circuitry.

To make that transition easier, [Sean Hodgins] has come up with a simple Arduino-compatible module that can be soldered right to a PCB. Dubbed the “HCC Mod” for the plated half-circle castellations that allows for easy soldering, the module is based on the Atmel SAMD21 microcontroller. With 16 GPIO lines, six ADCs, an onboard 3.3 V regulator, and a reset button, the module has everything needed to get started — just design a PCB with the right pad layout, solder it on, and surround it with your circuitry. Programming is done in the familiar Arduino IDE so you can get up and running quickly. [Sean] has a Kickstarter going for the modules, but he’s also releasing it as open source so you’re free to solder up your own like he does in the video below.

It’s certainly not the first dev module that can be directly soldered to a PCB, but we like the design and can see how it would simplify designs. [Sean] as shown us a lot of builds before, like this army of neural net robots, so he’ll no doubt put these modules to good use.

Continue reading “Save Some Steps With This Arduino Rapid Design Board”

Introduce Yourself To A PocketBeagle With BaconBits

The PocketBeagle single-board computer is now a few months old, and growing fast like its biological namesake. An affordable and available offering in the field of embedded Linux computing, many of us picked one up as an impulse buy. For some, the sheer breadth of possibilities can be paralyzing. (“What do I do first?”) Perhaps a development board can serve as a starting point for training this young puppy? Enter the BaconBits cape.

When paired with a PocketBeagle, everything necessary to start learning embedded computing is on hand. It covers the simple basics of buttons for digital input, potentiometer for analog input, LEDs for visible output. Then grow beyond the basics with an accelerometer for I²C communication and 7-segment displays accessible via SPI. Those digging into system internals will appreciate the USB-to-serial bridge that connects to PocketBeagle’s serial console. This low-level communication will be required if any experimentation manages to (accidentally or deliberately) stop PocketBeagle’s standard USB network communication channels.

BaconBits were introduced in conjunction with the E-ALE (embedded apprentice Linux engineer) training program for use in hands-on modules. The inaugural E-ALE session at SCaLE 16X this past weekend had to deal with some last-minute hiccups, but the course material is informative and we’re confident it’ll be refined into a smooth operation in the near future. While paying for the class will receive built hardware and in-person tutorials to use it, all information – from instructor slides to the BaconBits design – is available on Github. Some of us will choose to learn by reading the slides, others will want their own BaconBits for independent experimentation. And of course E-ALE is not the only way to learn more about PocketBeagle. Whichever way people choose to go, the embedded Linux ecosystem will grow, and we like the sound of that!

Build One, Get Two: CPLD And STM32 Development On A Single Board

Programmable logic devices have claimed their place in the hobbyist world, with more and more projects showing up that feature either a CPLD or their bigger sibling, the FPGA. That place is rightfully earned — creating your own, custom digital circuitry not only adds flexibility, but opens up a whole new world of opportunities. However, this new realm can be overwhelming and scary at the same time. A great way to ease into this is combining the programmable logic with a general purpose MCU system that you already know and are comfortable with. [Just4Fun] did just that with the CPLD Fun Board, a development board connecting an Arduino compatible STM32F103 Cortex-M3 controller to an Altera MAX II CPLD.

The PCB itself has some standard development board equipment routed to the CPLD: LEDs, buttons, a seven-segment display, and additional GPIO. The rest of the CPLD’s pins are going straight to the STM32 and its SPI, I2C and UART pins. Let’s say you want to create your own SPI device. With the CPLD Fun Board, you can utilize all the pre-existing libraries on the STM32 and fully focus on the programmable logic part. Better yet, every connection from MCU to CPLD has its own pin header connection to attach your favorite measurement device for debugging. And in case you’re wondering — yes, you can attach external hardware to those connectors by setting either MCU or CPLD pins to Hi-Z.

The downside of all this is the need for proprietary design software and a dedicated programmer for the CPLD, which sadly is the everyday reality with programmable logic devices. [Just4Fun] did a great job though writing up a detailed step-by-step tutorial about setting up the environment and getting started with the board, but there are also other tutorials on getting started with CPLDs out there, in case you crave more.