DIY Arduino Watch

We first thought [Alexis Ospitia]’s watch was a sports watch made with an Arduino, but it’s actually a sporty watch made with an Arduino. This explains the watch’s strange ability to tell you the current temperature and humidity.

The core of the watch is an Arduino Mini. To make it good for time telling, a real-time clock module was added. A DHT11 monitors the temperature and humidity. A charge circuit and lithium battery provide power. Finally, the watch displays the date, time, and other data with an LCD from a Nokia 5110. We can tell you the last part that’s going to break on this.

Even if you think the watch is a bit chunky, the tutorial is very slick. [Alexis] has taken the trouble to individually draw and describe each portion of the watch’s construction. He explains each pin, what they do, and provides a Fritzing drawing of the wires to the Arduino. The code is provided; to program the watch a USB-to-serial module must be used.

For the housing he made a box from a thin gauge aluminum sheet and attached leather straps to the assembly. The final construction is cool looking in a techno-punk way, and is fairly compact. One might even say sporty.

Warm Up Your Small Talk With A Thermometer Scarf

Just how cold is it out there? This giant thermometer scarf is a fantastic entry-level wearables project. It’s sure to strike up conversations that move past the topic of weather.

The scarf is built around a FLORA, a Neopixel ring that represents the bulb, and a short length of Neopixels to show the temperature in Fahrenheit and Celsius. Temperature sensing is done with a poorly documented DHT11 that gave [caitlinsdad] the fits until he found Adafruit’s library for them.To make the scarf, [caitlinsdad] used a nice cozy micro-fleece. He built a pocket for the electronics and padded it with polyester fiber fill to diffuse the LEDs. This makes the lights blur and run together, resembling a mercury thermometer.

Once it was up and running, [caitlinsdad] figured out the temperature scale based on the DHT11 readings and marked it out on the scarf with a permanent marker. [caitlinsdad] has a few mods in mind for this project. For instance, it would be easy to add haptic feedback to keep you from being exposed for too long. Another wearable in the same spirit is this hat that has a sunblock reminder system.

Continue reading “Warm Up Your Small Talk With A Thermometer Scarf”

A Smart Clothes Dryer

dryer6 Here’s a question that will rack your brain: does your clothes dryer stop when the clothes are dry? It seems if you have a machine that guzzles power for one single purpose, you’d like it to stop when its job is done, or for the sake of convenience, keep going until the clothes are dry. Temperature and humidity sensors are cheap, and if you don’t have an auto sensing clothes dryer, a DIY smart clothes dryer seems both efficient and convenient. [Editor from the future: link rot, seems to be here now.]

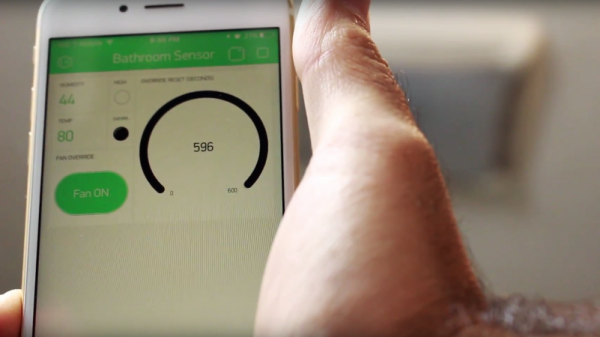
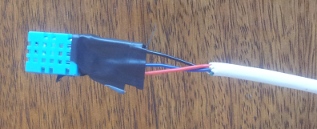
[Andy] figured when clothes are dry, they stop emitting moisture. Based on that premise, he could monitor the operation of a clothes dryer and either shut off the machine or send a message that it’s time to take the clothes out. It’s a simple enough idea, and with an Arduino and a DHT11 temperature and humidity sensor, it was pretty easy to put together.

The clothes dryer used for this experiment was a self-ventilating model that doesn’t vent to the outside. Instead, it condenses the water in your towels and jeans into a tub to be emptied by hand later. This might introduce a little error into tests, but [Andy] did come up with a way to mount the temperature sensor without modifying his dryer in any way. From the initial data, the ventless dryer might be introducing a little experimental error, but it’s still too good of an idea to not try out with a traditional dryer that vents to the outside. Here’s the code should you want to try this yourself.

Sensor Array Tries To Outdo The Other Guys

The team over at the Louisville Hackerspace LVL1 is not going to be outdone when it comes to collecting environmental data. They put together this Frankenstein of sensor boards that lets you collect a heap of data showing what is going on around it.

At the center-left a small Arduino clone is responsible for collecting the data. Data storage is not talked about on their write-up, but if that’s an ATmega328 chip you should be able to work out an easy way to store data on the 1k of internal EEPROM. If that’s not enough, there is an I2C bus included on the board making it easy to add a compatible EEPROM.

The sensor on the bottom left should look familiar. It’s a DHT11 temperature and humidity sensor we’ve seen popping up in projects lately. But wait, there’s also a TMP102 temperature sensor; but that’s not the end of it. A BMP085 pressure sensor also includes a third temperature sensing option. Want to see when the lights go on in the room? There’s a CdS sensor and a TSL230R Lux sensor for that. An op-amp circuit can measure the sound level in the room via one of the Arduino’s ADC pins. And finally, an RTC board is used for time stamping the data.

Obviously this is overkill, and we’re sure it’s meant as a test platform for various sensors. All of them have been mounted on the protoboard and wired up using the point-to-point soldering method.