Speeding Up Your Projects With Direct Memory Access

Here’s the thing about coding. When you’re working on embedded projects, it’s quite easy to run into hardware limitations, and quite suddenly, too. You find yourself desperately trying to find a way to speed things up, only… there are no clock cycles to spare. It’s at this point that you might reach for the magic of direct memory access (DMA). [Larry] is here to advocate for its use.

DMA isn’t just for the embedded world; it was once a big deal on computers, too. It’s just rarer these days due to security concerns and all that. Whichever platform you’re on, though, it’s a valuable tool to have in your arsenal. As [Larry] explains, DMA is a great way to move data from memory location to memory location, or from memory to peripherals and back, without involving the CPU. Basically, a special subsystem handles trucking data from A to B while the CPU gets on with whatever other calculations it had to do. It’s often a little more complicated in practice, but that’s what [Larry] takes pleasure in explaining.

Indeed, back before I was a Hackaday writer, I was no stranger to DMA techniques myself—and I got my project published here! I put it to good use in speeding up an LCD library for the Arduino Due. It was the perfect application for DMA—my main code could handle updating the graphics buffer as needed, while the DMA subsystem handled trucking the buffer out to the LCD quicksmart.

If you’re struggling with updating a screen or LED strings, or you need to do something fancy with sound, DMA might just be the ticket. Meanwhile, if you’ve got your own speedy DMA tricks up your sleeve, don’t hesitate to let us know!

Book8088 Slows Down To Join The Demoscene

As obsolete as the original IBM Model 5150 PC may appear, it’s pretty much the proverbial giant’s shoulders upon which we all stand today. That makes the machine worth celebrating, so much so that we now have machines like the Book8088, a diminutive clamshell-style machine made from period-correct PC chips; sort of a “netbook that never was.”

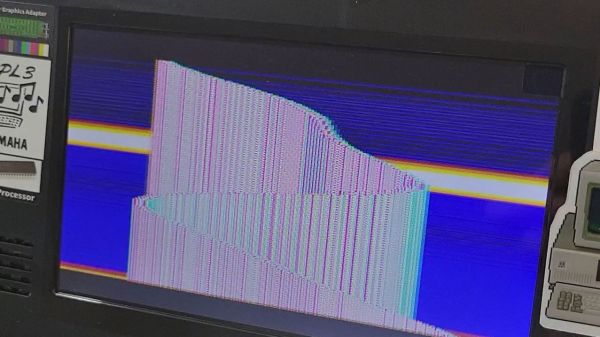
But the Book8088 only approximates the original specs of the IBM PC, making some clever hardware hacks necessary to run some of the more specialized software that has since been developed to really stretch the limits of the architecture. [GloriousCow]’s first steps were to replace the Book8088’s CPU, an NEC V20, with an actual 8088, and the display controller with a CGA-accurate Motorola MC6845. Neither of these quite did the trick, though, at least not on the demanding 8088MPH demo, which makes assumptions about CPU speed based on the quirky DRAM refresh scheme used in the original IBM PC.

Knowing this, [GloriousCow] embarked on a bodge-fest aimed at convincing the demo that the slightly overclocked Book8088 was really just a 4.77-MHz machine with a CGA adapter. This involved cutting a trace on the DMA controller and reconnecting it to the machine’s PIO timer chip, with the help of a 74LS74 flip-flop, a chip that made an appearance in the 5150 but was omitted from the Book8088. Thankfully, the netbook has plenty of room for these mods, and with the addition of a little bit of assembly code, the netbook was able to convince 8088MPH that it was running on the correct hardware.

We thoroughly enjoyed this trip down the DMA/DRAM rabbit hole. The work isn’t finished yet, though — the throttled netbook still won’t run the Area 5150 demo yet. Given [GloriousCow]’s recent Rust-based cycle-accurate PC emulation, we feel pretty good that this will come to pass soon enough.

Accurate Cycle Counting On RP2040 MicroPython

The RP2040 is a gorgeous little chip with a well-defined datasheet and a fantastic price tag. Two SDKs are even offered: one based on C and the other MicroPython. More experienced MCU wranglers will likely reach for the C variant, but Python does bring a certain speed when banging out a quick project or proof of concept. Perhaps that’s why [Jeremy Bentham] ported his RP2040-based vehicle speedometer to MicroPython.

The two things that make that difficult are that MicroPython tries to be pretty generic, which means some hackery is needed to talk to the low-level hardware, and that MicroPython doesn’t have a reputation for accurate cycle counting. In this case, the low-level hardware is the PWM peripheral. He details the underlying mechanism in more detail in the C version. On the RP2040, the PWM module can count pulse edges on an input. However, you must start and stop it accurately to calculate the amount of time captured. From there, it’s just edges divided by time. For this, the DMA system is pulled in. A DMA request can be triggered once the PWM counter rolls over. The other PWM channel acts as a timer, and when the timer expires, the DMA request turns off the counter. This works great for fast signals but is inaccurate for slow signals (below 1kHz). So, a reciprocal or time-interval system is included, where the time between edges is captured instead of counting the number of edges in a period,

What’s interesting here is how the hardware details are wrapped neatly into pico_devices.py. The uctypes module from MicroPython allows access to MMIO devices such as DMA and PWM. The code is available on GitHub. Of course, [Jeremy] is no stranger to hacking around on the RP2040, as he has previously rolled his own WiFi driver for the Pico W.

Bust Out That Old Analog Scope For Some Velociraster Fun!

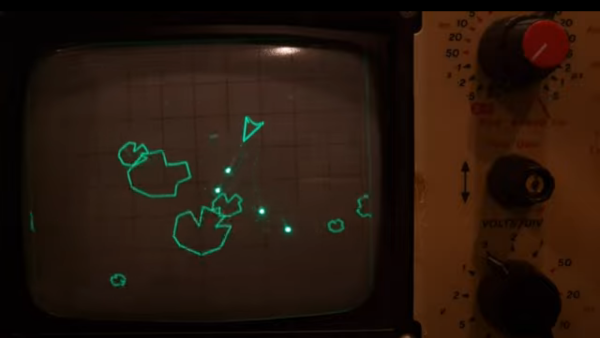
[Oli Wright] is back again with another installation of CRT shenanigans. This time, the target is the humble analog oscilloscope, specifically a Farnell DTV12-14 12 MHz dual-channel unit, which features a handy X-Y mode. The result is the Velociraster, a simple (in hardware terms) Raspberry Pi Pico based display driver.

Using a Pico to drive a pair of AD767 12-bit DACs, the outputs of which drive the two ‘scope input channels directly, this breadboard and pile-of-wires hack can produce some seriously impressive results. On the software side of things, the design is a now a familiar show, with core0 running the application’s high-level processing, and core1 acting in parallel as the rendering engine, determining static DAC codes to be pushed out to the DACs using the DMA and the PIO.

Continue reading “Bust Out That Old Analog Scope For Some Velociraster Fun!”

Generating PAL Video With A Heavily Overclocked Pi Pico

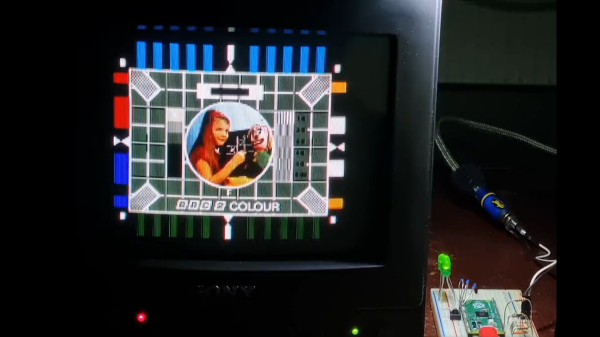
Barely a week goes by without another hack blessing the RP2040 with a further interfacing superpower. This time it’s the turn of the humble PAL standard composite video interface. As many of us of at least a certain vintage will be familiar with, the Phase Alternate Line (PAL to friends) standard was used mainly in Europe (not France, they used SECAM like Russia, China, and co) and Australasia, and is a little different from the much earlier NTSC standard those in the US may fondly recollect. Anyway, [Fred] stresses that this hack isn’t for the faint-hearted, as the RP2040 needs one heck of an overclock (up to 312 MHz, some 241% over stock) to be able to pull off the needed amount of processing grunt. This is much more than yet another PIO hack.

The dual cores of the RP2040 are really being pushed here. The software is split into high and low-level functions, with the first core running rendering the various still images and video demos into a framebuffer. The second core runs in parallel and deals with all the nitty-gritty of formatting the frame buffer into a PAL-encoded signal, which is then sucked out by the DMA and pushed to the outside world via the PIO. There may be a few opportunities for speeding the code up even more, but [Fred] has clearly already done a huge amount of work there, just to get it working at all. The PIO code itself is very simple but is instructive as a good example of how to use multiple chained DMA channels to push data through the PIO at the fastest possible rate.

Continue reading “Generating PAL Video With A Heavily Overclocked Pi Pico”

RP2040 DMA Hack Makes Another ‘CPU Core’

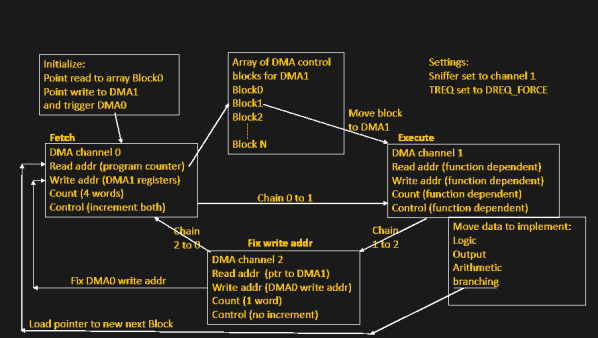
[Bruce Land] of Cornell University will be a familiar name to many Hackaday readers, searching the site for ‘ECE4760′ will bring up many interesting topics around embedded programming. Every year [Bruce] releases yet more of the students’ work out into the wild to our great delight. This RP2040-based project is a bit more abstract than some previous work and shows yet another implementation of an older hack to utilise the DMA hardware of the RP2040 as another CPU core. While the primary focus of the RP2040 DMA subsystem is moving data between memory spaces, with minimal CPU intervention, the DMA control blocks have some fairly complex behaviour. This allows for a Turing-complete CPU to be implemented purely with the DMA hardware and a sprinkling of memory.

The method ties up three of the twelve DMA channels, and is estimated to have a similar performance to ‘an Arduino’ but [Bruce] doesn’t specify which one of the varied models that could be. But who cares anyway? Programming the CPU is a matter of leveraging the behaviour of the hardware, which is all memory mapped and targetable by the DMA. For example, the CPU can waggle GPIO pins by using the DMA to write values to the peripheral address space. The basic flow can be seen in the image above. DMA0 is used as the program counter, which points DMA1 to an array of DMA control blocks, a sequence of which codes for some of the ‘opcodes’ of the CPU model. DMA0 chains to (hands over control to) DMA1 which reads the control blocks and configures itself accordingly. DMA1 performs whatever data move is programmed, chains to DMA2, which in turn reprograms the DMA0 program counter to point to the next block in the list to be executed by DMA1.

Continue reading “RP2040 DMA Hack Makes Another ‘CPU Core’”

Direct Memory Access: Data Transfer Without Micro-Management

In the most simple computer system architecture, all control lies with the CPU (Central Processing Unit). This means not only the execution of commands that affect the CPU’s internal register or cache state, but also the transferring of any bytes from memory to to devices, such as storage and interfaces like serial, USB or Ethernet ports. This approach is called ‘Programmed Input/Output’, or PIO, and was used extensively into the early 1990s for for example PATA storage devices, including ATA-1, ATA-2 and CompactFlash.

Obviously, if the CPU has to handle each memory transfer, this begins to impact system performance significantly. For each memory transfer request, the CPU has to interrupt other work it was doing, set up the transfer and execute it, and restore its previous state before it can continue. As storage and external interfaces began to get faster and faster, this became less acceptable. Instead of PIO taking up a few percent of the CPU’s cycles, a big transfer could take up most cycles, making the system grind to a halt until the transfer completed.

DMA (Direct Memory Access) frees the CPU from these menial tasks. With DMA, peripheral devices do not have to ask the CPU to fetch some data for them, but can do it themselves. Unfortunately, this means multiple systems vying for the same memory pool’s content, which can cause problems. So let’s look at how DMA works, with an eye to figuring out how it can work for us.
Continue reading “Direct Memory Access: Data Transfer Without Micro-Management”