Tracking Wasted Time With A Ferrofluid Clock

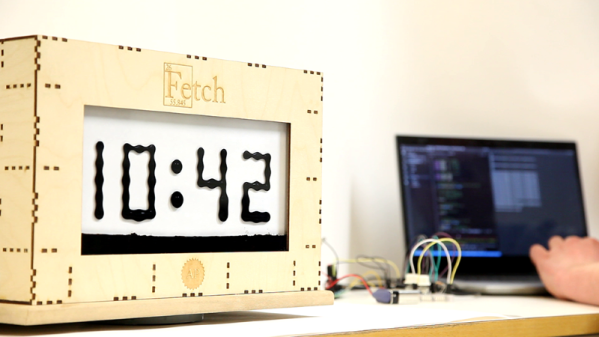
We know this project is supposed to be about developing a fine-looking ferrofluid clock, and not about the value of procrastination. But after watching the video below, see if you don’t think that procrastination has taken these two students further than expected.

We first ran into [Simen] and [Amund] several months ago when they launched their ferrofluid project in a fit of “There’s got to be more to life than studying.” It seemed then that building a good-looking, functional ferrofluid display would be a temporary distraction, but the problems posed proved to be far deeper and thornier than either of the electrical engineering students expected. The idea is simple: contain a magnetic fluid between two transparent panels and create pixels using an array of electromagnets to move dots of the fluid around. The implementation, however, was another matter, with the ferrofluid itself proved to be the biggest obstacle. All the formulas they tried seemed to coagulate or degrade over time and tended to stain the glass. While the degradation was never fully sorted, they managed to work around the staining by careful cleaning of the glass and using a saturated brine solution to fill the container.

Backed by 252 electromagnets and drivers on ten custom PCBs, the video below shows the (mostly) finished panel in action as a clock. We’re impressed by the smoothness of the movements of each pixel, even if there’s a bit of drooping at the bottom thanks to gravity. As for the future of the project, that’s unclear since [Simen] is headed off for a NASA internship. We’re not sure if that was despite or because of this procrastination-driven project, but we congratulate him either way and look forward to hearing more from both of them in the future.

Continue reading “Tracking Wasted Time With A Ferrofluid Clock”

Solenoid Engine Adds Three “Pistons”

The earliest piston engines typically had only one cylinder, and at best, produced horsepower measured in single digits. But once you have a working engine, it’s a relatively short step to adding cylinders and increasing the power output. [Emiel] made a similar upgrade to one of his engines recently, upgrading it from one cylinder to four. But this isn’t an internal combustion engine, it gets its power from electric solenoids.

We featured his single-cylinder build about a month ago, and since then he’s been busy with this impressive upgrade. The new engine features four cylinders arranged in a V4 pattern. Of course, this greatly increases the mechanical complexity. To start, he had to machine a crankshaft to connect all four “pistons” to a shared output shaft. He also had to build a set of cams in order to time the firing of the cylinders properly, so they don’t work against one another.

The build is just as polished and impressive as the last, which is saying a lot. [Emiel] has a quality machine shop and built the entire motor from scratch, including winding the solenoids, machining the connecting rods and shafts, and building a very picturesque wooden base for the entire contraption to sit on. It’s definitely worth checking out.

Continue reading “Solenoid Engine Adds Three “Pistons””

Build Your Own Solenoid Engine

A solenoid engine is a curiosity of the electrical world. By all measures, using electricity to rotate something can be done almost any other way with greater efficiency and less hassle. But there’s just something riveting about watching a solenoid engine work. If you want to build one of your own and see for yourself, [Emiel] aka [The Practical Engineer] has a great how-to.

For this build though he used a few tools that some of us may not have on hand, such as a lathe and a drill press. The lathe was used to make the plastic spool to hold the wire, and also to help wind the wire onto the spool itself rather than doing it by hand. He also milled the wood mounts and metal bearings as well, and the quality of the work really shows through in the final product. The final touch is the transistor which controls power flow to the engine.

If you don’t have all of the machine tools [Emiel] used it’s not impossible to find substitute parts if you want to build your own. It’s an impressive display piece, or possibly even functional if you want your build to have a certain steampunk aesthetic (without the steam). You can even add more pistons to your build if you need extra power.

Continue reading “Build Your Own Solenoid Engine”

Voice Chess Uses Phone, Arduino, And An Electromagnet

[Diyguypt] may be an altruist to provide the means for people who can’t manipulate chess pieces to play the game. Or he may just have his hands too busy with food and drink to play. Either way, his voice command chessboard appears to work, although it has a lot of moving parts both figuratively and literally. You can check out the video below to see how it works.

The speech part is handled by an Android phone and uses Google’s voice services, so if you don’t want Google listening to your latest opening gambit, you’ll want to pass this one up. The phone uses an app that talks to the Arduino via Bluetooth, which means the Arduino needs a Bluetooth module.

Continue reading “Voice Chess Uses Phone, Arduino, And An Electromagnet”

Ferrofluid Display Fuels The Fun, And The Procrastination

When deadlines loom and your future is on the line, do what top college students through the ages have always done: procrastinate! [Simen] and [Amund] did that in grand style by starting a YouTube channel, delightfully and aptly named “Applied Procrastination”, wherein they plan to avoid their responsibilities as long as possible in favor of making a large-scale ferrofluidic display panel. (Video, embedded below.)

We suppose we should encourage them to hit the books, but honestly they look like they’re having much more fun and learning more than they would in class. The idea isn’t new; we’ve seen ferrofluid clocks before, after all. [Amund] and [Simen] have grander plans for their display, but they’re wisely starting small with basic experiments. They had an early great idea to use a double-pane window as a tank for their display, but coatings on the inside of the glass and the aluminum frame conspired to cloud the display. They also did some tests to make sure they can control 252 electromagnets safely. They did manage to get a small test display working, but really the bulk of the video is just them playing with magnets and ferrofluid. And again, we’re OK with that.

It looks like this is going to be an interesting project, with hopefully regular updates to the channel now that summer break is upon us. Unless they find something else to do, of course.

Continue reading “Ferrofluid Display Fuels The Fun, And The Procrastination”

The Surprising Tech Of A Cheap Toaster

How complicated can a toaster be? You can get a cheap one for way under $10 that is little more than a hot wire. However, there are a few little complications. First, consumer products need to be safe — lawsuits are expensive. Second, there has to be some mechanism to hold the toast down until it is done. If you can buy one for $10 you can bet it isn’t some super toast processor running Linux in there.

[Technology Connections] tore one down for you so you don’t have to. The circuitry is simple, and who knew there was a dedicated IC for toaster control? However, the real engineering is in the lowly little handle you pull down to start the toasting.

Continue reading “The Surprising Tech Of A Cheap Toaster”

Old Meets New In 3D Printed Telegraph

We often think of 3D printing as a way to create specific components in our builds, everything from some hard-to-find little sprocket to a custom enclosure. More and more of the projects that grace the pages of Hackaday utilize at least a few 3D printed parts, even if the overall build itself is not something we’d necessarily consider a “printed” project. It’s the natural progression of a technology which at one time was expensive and complex becoming increasingly available to the maker and hacker.

But occasionally we see 3D printing used not to create new devices, but recreate old ones. A perfect example is the almost entirely 3D printed telegraph system created by [Matt]. Projects like this help bring antiquated technology back to a modern audience, and can be an excellent educational tool. Showing someone a diagram of how the telegraph worked is one thing, but being able to run off a copy on your 3D printer and putting a working model in their hands is quite another.

[Matt] acknowledges that he’s hardly the first person to 3D print a telegraph key, but says that he’d never seen the complete system done before. The key is perhaps the component most people are familiar with from film and old images, but alone it’s really nothing more than a momentary switch. To actually put it to use, you need a telegraph sounder on the receiving end to “play” the messages.

The sounder is a somewhat more complex device than the key, and uses an electromagnet to pull down a lever and produce an audible clicking noise. In the most basic case, the coil is directly connected to the key, but in a modern twist [Matt] has added a MOSFET into the circuit so the electromagnet is triggered locally within the sounder. This prevents sparks from eroding the contacts in the key, and alleviates problems associated with current loss over long wire runs.

We’ve previously seen 3D printing used to revive vintage games which are no longer available such as “The Amazing Dr. Nim”, and how modern techniques such as additive manufacturing can help put World War II aircraft back in the air. While there was never much question that 3D printing would be a big part of our future, it would seem to be taking a fairly active role in preserving our past as well.