Hackaday Prize Entry: Helping Millions See Clearly

Slit lamps are prohibitively expensive in the third world areas of India where they are most needed. An invention that’s been around for over a hundred years, the slit lamp is a simple-in-concept way to see and diagnose a large array of ocular issues.

Since they are relatively old by technological standards, the principles behind them have become more and more understood as time has gone on. While a nice lab version with a corneal microscope is certainly better, innovations in manufacturing have brought the theoretical minimum cost of the device way down, or at least that’s what [Kewal Chand Swami] hopes.

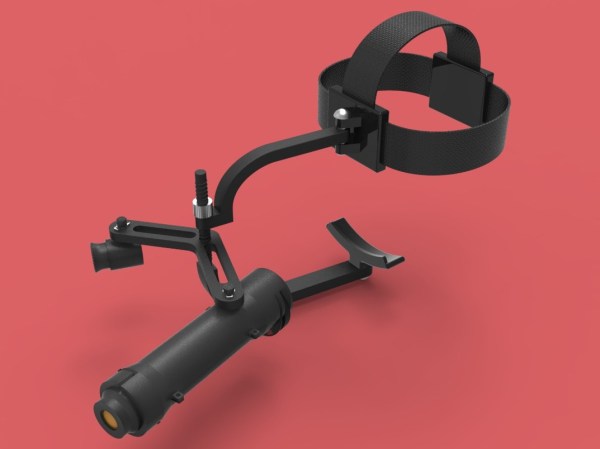
His design aims for portability and cost reduction. It must be able to travel to remote locations and it must be significantly cheaper than the lab versions. It uses off-the-shelf lenses in a 3D printed housing with a simple LED torch, the kind you can buy for a dollar at the check-out stand.

The assembly slides onto the user’s head and is held there with straps. The doctor can adjust where the slit the lamp shines and also look through a microscope to diagnose the issue. Hopefully devices like this will see similar community support to the prosthetic projects we’ve covered.

How To Set Up And Run A Makerspace

A bunch of people who share a large workshop and meet on a regular basis to do projects and get some input. A place where kids can learn to build robots instead of becoming robots. A little community-driven factory, or just a lair for hackers. The world needs more of these spaces, and every hackerspace, makerspace or fab lab has its very own way of making it work. Nevertheless, when and if problems and challenges show up – they are always the same – almost stereotypically, so avoid some of the pitfalls and make use of the learnings from almost a decade of makerspacing to get it just right. Let’s take a look at just what it takes to get one of these spaces up and running well.

Continue reading “How To Set Up And Run A Makerspace”

Workbench Eye Candy From Around The World

The workbench. We’re always looking for ways to make the most out of the tools we have, planning our next equipment purchase, all the while dealing with the (sometimes limited) space we’re allotted. Well, before you go off and build your perfect electronics lab, this forum thread on the EEVblog should be your first stop for some extended drooling research.

You’ll find a great discussion about everything from workbench height, size, organization, shelf depth, and lighting, with tons of photos to go with it. You’ll also get a chance to peek at how other people have set up their labs. (Warning, the thread is over 1000 posts long, so you might want to go grab a snack.)

We should stop for a moment and give a special note to those of you who are just beginning in electronics. You do not need to have a fancy setup to get started. Most of these well equipped labs is the result of being in the industry for years and years. Trust us when we say, you can get started in electronics with nothing more than your kitchen table, a few tools, and a few parts. All of us started that way. So don’t let anything you see here dissuade you from jumping in. As proof, we’ve seen some amazingly professional work being done with the most bare-bones of tools (and conversely, we seen some head-scratching projects by people with +$10,000 of dollars of equipment on their desk.)

Here’s some links that you might find handy when setting up a lab. [Kenneth Finnegan] has a great blog post on how his lab is equipped. And [Dave Jones] of the EEVblog has a video covering the basics. One of the beautiful things about getting started in electronics is that used and vintage equipment can really stretch your dollars when setting up a lab. So if you’re looking into some vintage gear, head on over to the Emperor of Test Equipment. Of course no thread about workbenches would be complete with out a mention of Jim Williams’ desk. We’ll leave the discussion about workbench cleanliness for the comments.

Ask HackADay: Organization?!

Several people have been asking a similar question to,

“How do you at Hackaday keep track of and organize all your equipment?”
-[Jeff Allen] and others.

We have a variety of resources to help you keep track of your tools, equipment, parts, and supplies! Follow us after the jump for some tips for keeping your workspace clean and tidy. Continue reading “Ask HackADay: Organization?!”

Turn Your Playstation 3 Into Linux-based Lab Equipment

In a two-part series called “PS3 Fab-to-lab” on IBM’s awesome developerWorks website, [Lewin] explains how to use the Cell Broadband Engine in a PS3 to create an audio-bandwidth spectrum analyzer and function generator. The set up consists of Yellow Dog Linux, an NTSC television, and an external USB sound card to provide the inputs of the spectrum analyzer and the outputs of the function generator. The sound card driver is written to simply capture or send the info in question (audio range only) and the NTSC television as the graphical interface. This hack involves a lot of coding with hardly any example code provided. The article is more of a guide than anything. If anyone gets this working, let us know!

[via Digg]

[photo: Malcom Tredinnick]