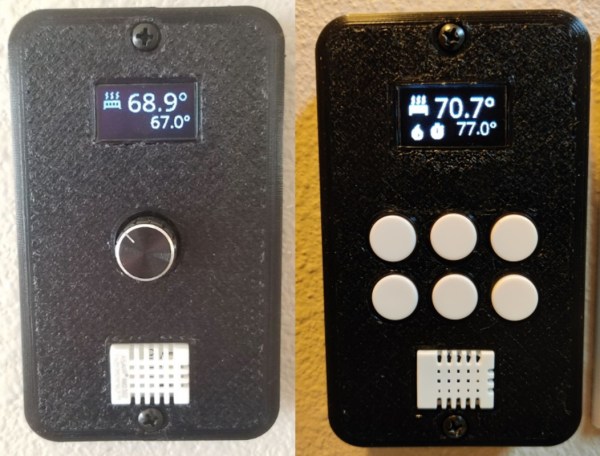
Water Monitor Measures The Cost Of Your Shower Thinking Time

The shower is one of the top thinking places for many of us, but can get a bit out of hand with water wastage and utility bills if you go down a deep rabbit hole. To be more mindful of his water usage in the shower, [GreatScott!] created a power sipping water monitor that lives there.

The device is built around a cheap 1/2″ brass water flow rate sensor connected to his shower hose, which outputs pulses as a small wheel passes an internal hall effect sensor. The datasheet didn’t contain any spec for pulses/volume, so [GreatScott!] had to experimentally determine this by filling a one-liter container with water and counting the pulses. He found that the pulse count per liter was dependent on the flow rate, so he narrowed down the variables and just determined the average count at his shower’s pressure and flow rate.

The sensor is connected to a battery-powered ESP8266 housed inside a sealed 3D-printed enclosure in the shower. To reduce power usage to a minimum, a flow switch was added in series with the flow meter, which only switches on the ESP8266 when water starts flowing. A latching circuit keeps the ESP powered after the water stops, giving it enough time to transmit the data before shutting down. This type of circuit is very handy for any battery-powered project connected to an external switch or sensor.

It is programmed with ESPHome and outputs the data to a local Home Assistant server, so no data is saved on someone else’s server.

Continue reading “Water Monitor Measures The Cost Of Your Shower Thinking Time”

An opened plastic project box with electronics inside

Smoking Meat Finds Natural Home In The Cloud

Did you know that backyard barbecues now come with WiFi? It should be no surprise, given the pervasiveness of cloud-enabled appliances throughout the home. However [Carl] wasn’t ready to part with his reliable but oh-so-analog BBQ smoker, so instead he created an affordable WiFi-based temperature monitor that rivals its commercial counterparts.

Accurate temperature measurement is essential to smoking meat from both a taste and safety standpoint. In this project, two Maverick ET-732/733 thermistor probes take care of the actual temperature monitoring. One probe is skewered into meat itself, and the other measures the ambient ‘pit’ temperature. Combined, these two gauges ensure that the meat is smoked for exactly the right length of time. [Carl] mentions that adding an extra temperature sensor is trivial for larger setups, but he’s getting by just fine with two data points.

Naturally an ESP8266 does most of the heavy lifting in bridging the gap between smoke and cloud. At the core of this project is utility and practicality – temperature statistics can be viewed on any device with a web browser. Being able to study the temperature trends in this way also makes it easier to predict cooking times. Electronic alerts are also used to notify the chef if the temperature is too hot or cold (among other things). The entire contraption is housed in a smart looking project box that contains an LCD and rotary encoder for configuration.

If this has piqued your culinary interest, check out the extensive documentation recipe over on GitHub and the project Wiki.  We also recommend checking out this project that takes automated meat smoking to the next level.

Hackaday Prize 2022: Soviet Geiger Counter Gets WiFi

[Marek] has an impressive collection of old Soviet-style Geiger counters. These are handy tools to have in some specific situations, but for most of us they would be curiosities. Even so, they need some help from the modern world to work well, and [Marek] has come up with some pretty creative ways of bringing them into the 21st century. This version, for example, adds WiFi capabilities.

This build is based on the STS-5 Geiger tube but the real heavy lifting is handled by an ESP8266 which also provides a wireless network connection. There are some limitations to using an ESP8266 to control a time-sensitive device like a Geiger tube, especially the lack of local storage, but [Marek] solves this problem by including a real-time clock and locally caching data until a network connection is re-established. Future plans for the device include adding temperature and atmospheric temperature sensors.

Eventually this Geiger counter will be installed in a watertight enclosure outside so [Marek] can keep an eye on the background radiation of his neighborhood. Previously he was doing this with another build, but that one only had access to the network over an Ethernet cable, so this one is quite an upgrade.

You Can Build A Giant 7-Segment Display Of Your Very Own

Sometimes you need to display a number nice and large, making it easily readable at a good distance. [Lewis] has just the thing for that: a big expandable 7-segment display.

The build is modular, allowing it to be extended from 2 to 10 digits and beyond. The digits themselves are made of 3D-printed parts assembled onto acrylic. These can then be ganged up in a wooden frame for displaying larger numbers with more digits. Individual elements are lit by addressable LEDs, and the project can be built using an Arduino Nano or an ESP8266 for control. The latter opens up possibilities for controlling the screen over WiFi, which could prove useful.

[Lewis] has built his own version for a local swim club, where it will be used as a laptimer. Other applications could be as a scoreboard in various sports, or to confuse your neighbours by displaying random numbers in your front yard.

We’ve seen a similar build from [Ivan Miranda] that served well as a workshop clock, too. Video after the break.

Continue reading “You Can Build A Giant 7-Segment Display Of Your Very Own”

Washington, DC Finally Gets Its Own PCB Metro Map

There was a time, not so long ago, when folks who wanted to make their own custom PCBs would have found themselves in the market for a bucket of acid and a second-hand laser printer. These days, all you have to do is click a few buttons in your EDA program of choice and send the files off for fabrication. It’s easy, cheap, and nobody ends up with chemical burns.

This has obviously had a transformative effect on the electronics hobby — when you can place traces on a PCB like an artist using a brush, it’s only a matter of time before you get projects like [Logan Arkema]’s DCTransistor. This open source board uses carefully arranged RGB LEDs to recreate the Washington Metropolitan Area Transit Authority (WMATA) metro map, and thanks to an ESP8266 connected to their API, can display the positions of trains in real-time.

If you’re getting a sense of déjà vu here, it’s not just in your head. We’ve seen similar maps created for other major metropolitan areas, and [Logan] certainly isn’t trying to take credit for the idea. In fact, he was a bit surprised to find that nobody had ever made one for the DC area — so he decided to take on the challenge himself. He reasoned it would be a good way to hone his PCB design skills and become more comfortable with embedded development. We’d say the end result proves his theory correct, and makes one more city that can boast about its IoT cartography.

Looking to hang a DCTransistor on your own wall? [Logan] says he’ll be dropping the board design files and schematics into the project’s GitHub repository soon, and he also plans on selling pre-made boards in the near future.

We covered this London “tube” map back in 2020, and were impressed by the attention to detail that went into similar displays for Tokyo, Singapore, and the San Francisco Bay Area a year later. Perhaps it’s time to map out your own hometown in LEDs?

Hackable OSHW CardClock Demands Attention

When examining a project, it’s easy to be jaded by a raw parts list. When the main component is an ESP8266, we might say “oh, another 8266 project. yawn!” But we’re certain that when you take a look at [Will Fox]’s Foxie CardClock, it’ll surely grab your attention.

As if all those beautiful LEDs weren’t enough, the rest of the device’s specifications are quite impressive. The core components might be common, but what often separates such projects is the software. With Over The Air updates supported via ArduinoOTA, updates are a snap. A light sensor helps to keep all those LEDs at a sane level, and a once-per-minute synchronization via NTP keeps the time accurate. Even if power is lost, a super-capacitor can hold the time accurate for up to two days with the built in RTC module. There’s even provisions for setting the time using the buttons on the front panel should you want to keep the gadget offline.

The entire project is open source, with the hardware released under the CERN Open Hardware Licence Version 2 and the firmware source code distributed as GPLv3. Users are encouraged to hack and modify the design, and all the information you need to build one of your own is available in the project’s GitHub repository. [Will] also offers a pre-assembled version of the clock for just $45 USD, but unfortunately it seems to be out of stock at the time of this writing.

If credit card sized hacks are your chosen area of interest, you will appreciate this crystal radio made from an actual Credit Card. Thanks to [Abe] for submitting the Tip!

Farm Data Relay System: Combine LoRa And 2.4 Ghz Networks Without WiFi Routers And Cloud Dependence

Setting up a wireless sensor network over a wide area can quickly become costly, and making everything communicate smoothly can be a massive headache, especially when you’re combining short range Wi-Fi with long range LoRa. To simplify this, [Timm Bogner] created Farm Data Relay System which simplifies the process of combining LoRa, 2.4Ghz modules and serial communications in various topologies over wide areas.

The FDRS uses a combination of ESP32/8266 sensor nodes for short range, and LoRa nodes for long range. The ESP nodes use Espressif’s connectionless ESP-NOW peer-to-peer protocol on which allow multiple ESP boards to communicate directly without the need for a Wi-Fi router. The ESP modules can have one of 3 roles, nodes, repeaters or gateways, and gateways and repeaters share the same code. Nodes take sensor inputs, and are configured to each have a unique READING_ID.

Relays just retransmit ESP-NOW packets to extend the network range, while gateways convert packets between ESP-NOW, MQTT over Wi-Fi, LoRa or serial messages as required. Repeaters and gateways each have a unique UNIT_MAC for addressing. The code that handles communication for the ESP devices is simple and well documented, so you only need to set a few configuration values, and then can focus your efforts on the code required for your specific application.

The hub of the system is a Raspberry Pi running Node-RED which acts as the final MQTT gateway and connects to the ESP MQTT gateways. This means that all the action happens in the local network, without being dependent on an internet connection and cloud service. However, it can still send and receive data over the internet using MQTT or any other protocol as required. Node-RED makes it particularly easy to build custom automations and interfaces.

In the video after the break, Andreas Spiess, the man with the Swiss accent, who also has a hand in the project, goes over all the features, setup and caveats.

Continue reading “Farm Data Relay System: Combine LoRa And 2.4 Ghz Networks Without WiFi Routers And Cloud Dependence”