Unique Flat-Screen Display Put To Use In CRT Game Boy

The cathode-ray tube ruled the display world from the earliest days of TV until only comparatively recently, when flat-screen technology began to take over. CRTs just kept getting bigger over that time until they reached a limit beyond which the tubes got just too bulky to be practical.

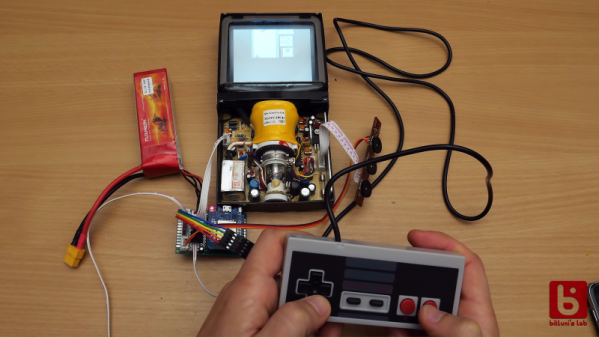
But there was action at the low end of the CRT market, too. Tiny CRTs popped up in all sorts of products, from camcorders to the famous Sony Watchman. One nifty CRT from this group, a flat(tish) tube from a video intercom system, ended up in [bitluni]’s lab, where he’s in the process of turning it into a retro Game Boy clone with a CRT display. The display, which once showed the video from a door-mounted camera, was a gift from a viewer. Date codes on the display show it’s a surprisingly recent device; were monochrome TFT displays that hard to come by in 2007? Regardless, it’s a neat design, with the electron gun shooting upward toward a curved phosphor screen. With a little Google-assisted reverse engineering, [Bitluni] was able to track done the video connections needed to use his retro game console, which uses an ESP32 that outputs composite video. He harvested the intercom speaker for game audio, added a temporary Nintendo gamepad, and soon he was playing Tetris in glorious monochrome on the flat screen.

The video below is only the first in a series where the prototype will be stuffed into one nice tidy package. It certainly still needs some tweaking, but it’s off to a great start. We can’t wait to see the finished product.

Continue reading “Unique Flat-Screen Display Put To Use In CRT Game Boy”

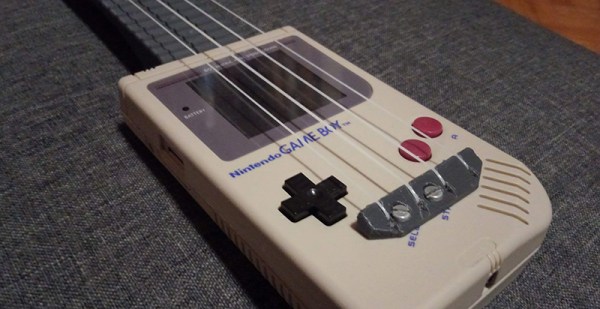
This Ukulele Does Chiptunes, And Not Just Because It’s Made Out Of A Game Boy

When you think about singer-songwriters, the name Bob Dylan might come to your mind. You might think about Jeff Buckley, you might think about Hank Williams, Springsteen, David Bowie, or Prince. You’d be wrong. The greatest singer-songwriter of all time is Tiny Tim, the guy who looks like Weird Al traveled in time and did a cameo in Baker-era Doctor Who. Tiny Tim had the voice of an angel, because Mammon and Belial were angels too, I guess. Tiny Tim is also the inspiration behind the current resurgence of the ukulele, the one thing keeping the stringed instrument industry alive today.

Even though Tiny Tim passed in 1996, he would have loved to see this project that brings the ukulele into the late 20th century. It’s a Game Boy, DMG-01, transformed into a playable musical instrument. It’s a functional uke, but it also has electronics to turn this into a chiptune machine.

The first goal of this project was to build a functional ukulele out of a Game Boy case. This was simple enough — the neck was 3D printed, the bridge was screwed in, and the case of the Game Boy was reinforced with some PCB material. So far, this is nothing new; you can get a model for a 3D printed ukulele on Thingiverse.

The second goal of this project was to make this ukulele into a chiptune machine. This means designing a pickup for the strings, and since these are nylon you’re not going to do a magnetic pickup on a ukulele. The first solution was an IR reflectance sensor, which worked but had too high of a power draw. The better solution was a standard flex pressure sensor, which worked well enough. This signal is distorted into a square wave that gives a surprisingly Game Boy-like sound. You can check out the video demo below.

Continue reading “This Ukulele Does Chiptunes, And Not Just Because It’s Made Out Of A Game Boy”

Hackaday Links Column Banner

Hackaday Links: June 24, 2018

What do you do if you’re laying out a PCB, and you need to jump over a trace, but don’t want to use a via? The usual trick is using a zero Ohm resistor to make a bridge over a PCB trace. Zero Ohm resistors — otherwise known as ‘wire’ — are a handy tool for PCB designers who have backed themselves into a corner and don’t mind putting another reel on the pick and place machine. Here’s a new product from Keystone that is basically wire on a tape and reel. It’s designed to jump traces on a PCB where SMD zero ohm resistors and through-hole jumpers aren’t possible. I suppose you could also use it as a test point. They’re designed for high current applications, but before we get to that, let’s consider how much power is dissipated into a zero ohm resistor.

By the way, as of this writing, Mouser is showing 1,595 for Keystone’s 5100TR PCB jumpers in stock. They come on a reel of 1,000, and a full reel will cost you $280. This is significantly more expensive than any SMD zero ohm resistor, and it means someone bought four hundred of them. The electronic components industry is weird and you will never understand it.

There’s a new product from ODROID, and you want it. The ODROID-GO is a Game Boy and Sega Master System emulator running on an ESP-32, has a fantastic injection molded case, and looks phenomenal.  You can buy it now for $32. Does this sound familiar? Yes, a few months ago, the PocketSprite was released. The PocketSprite is the tiniest Game Boy ever, and a project [Sprite_TM] introduced to the world at the 2016 Hackaday Superconference.

This week, the speaker schedules for two awesome cons were announced. The first is HOPE, at the Hotel Penn on July 20th. Highlights of this year? [Mitch Altman] is talking about DSP, [Chelsea Manning] will be on stage, someone is talking about HAARP (have fun with the conspiracy theorists), and someone is presenting an argument that [Snowden] is an ideological turd. The speaker schedule for DEF CON was also announced. The main takeaway: god bless the CFP board for reigning in all the blockchain talks, the Nintendo Switch was broken wide open this year, but there’s only a talk on the 3DS, and there’s more than enough talks on election hacking, even though that was a success of propaganda instead of balaclava-wearing hackers.

The C.H.I.P. is no more, or at least that’s the rumor we’re running with until we get some official confirmation. When it was introduced, the C.H.I.P. was a Linux system on a chip with complete register documentation. It appears the end of C.H.I.P. is upon us, but have no fear: there’s a community building the PocketC.H.I.P., or the C.H.I.PBeagle. It’s a single board computer based around the OSD3358 from Octavo, the same system found in the PocketBeagle. Source in KiCAD, and people are working on it. Thanks [smerrett79] for the tip.

This Thermal Printer Has Serious Game

[Dhole], like the fox, isn’t the first to connect his computer to a Game Boy printer but he has done a remarkable job of documenting the process so well that anyone can follow. The operation is described well enough that it isn’t necessary to scrutinize his code, so don’t be put off if C and Rust are not your first choices. The whole thing is written like a story in three chapters.

The first chapter is about hacking a link cable between two Game Boys. First, he explains the necessity and process of setting the speed of his microcontroller, a NUCLEO-F411RE development board by STMicroelectronics. Once the rate is set, he builds a sniffer by observing the traffic on the cable and listens in on two Game Boys playing Tetris in competition mode. We can’t help but think that some 8-bit cheating would be possible if Tetris thought your opponent instantly had a screen overflowing with tetrominoes. Spying on a couple of Game Boys meant that no undue stress was put on the printer.

Chapter two built on the first chapter by using the protocol to understand how the printer expects to be spoken to. There is plenty of documentation about this already, and it is thoughtfully referenced. It becomes possible to convince a Game Boy that the connected microcontroller is a printer so it will oblige by sending an image. Since there isn’t a reason to wait for printing hardware, the transfer is nearly instantaneous. In the image above, you can see a picture of [Dhole] taken by a Game Boy camera.

The final chapter, now that all the protocols are understood, is also the climax where the computer and microcontroller convince the printer they are a Game Boy that wants to print an image. In the finale, we get another lesson about measuring controller frequency without an oscilloscope. If you are looking for the hack, there it is. There is a handful of success in the form of old receipts with superimposed grayscale images since virgin thermal printer paper by Nintendo costs as much as a used printer.

This story had a happy ending but grab your reading glasses for the smallest Game Boy and here’s someone who wrote their own Game Boy color game.

Investigating The World’s Rarest Game Boy

Early last year, a very unique Game Boy Color showed up on Chinese shopping site Taobao. Rather than the rather anemic-looking display of the original GBC, this version was modified with a modern IPS LCD. Even in the pictures shown on the product page, it was clear the display on this unit was far more advanced than anything Nintendo ever packed into a Game Boy. The retro gaming community went wild, and soon the site was overwhelmed with orders. The majority of the sales were canceled by the seller, and it’s believed as few as 75 of these hacked GBCs were actually shipped out.

Thanks to one of his viewers, [Colin] was able to get his hands on one of these extremely rare customized handhelds. Clearly a man after our own heart, his first inclination was to tear the thing apart and see how they built it. While he had a fairly good idea of how they managed this hybrid of modern and classic technology, there were a couple of surprises inside.

The device has a completely stock main board, and as such works and plays like a normal GBC. But upon flipping the main board over, [Colin] found a nest of thin magnet wire connecting the new display controller to individual buttons on the front panel. As he later confirmed when he reassembled the system, this allows the user to adjust the display’s brightness by holding “Select” and using the directional pad.

As for the screen itself, the big surprise was that it’s clearly pulled out of a relatively recent smartphone. The screen is physically much larger than the opening in the GBC’s front panel, but through some software trickery the image is displayed only in the area that’s visible to the player. [Colin] managed to get a hold of a few contacts “in the know” who confirmed to him that both the hardware and software for the display controller were specifically created for this application, and are unlikely to be duplicated by anyone else.

Considering most of the Game Boy hacks we cover are about somebody jamming modern hardware into them, it’s an interesting change of pace to see a group that was so adamant about retaining as much original hardware as possible while still managing to improve the user experience.

[Thanks to Doc Oct for the tip]

Continue reading “Investigating The World’s Rarest Game Boy”

Repairing A Sunburned Game Boy Screen

The original Game Boy is a classic. Sure, it had no backlight, but there is something special about playing on that classic green screen. Unfortunately, some of these older systems are suffering a terrible fate — screen burn. Game Boy’s played best with lots of light — especially out in the sun. But that same sun did terrible things to the screen. A black splotch in the center of the LCD is the telltale sign of a burned Game Boy. You might think that screen replacement is the only option, but [The Retro Future] shows us how to repair this issue.

A reflective LCD is a layer cake made up of polarizers, two panes of glass, and a reflector. The burns often seen on Game Boy screens usually are in the polarizer and the optically clear glue which attaches the plastic polarizer to the glass. We’re guessing these burns happen when someone leaves their Game Boy out in the sun. Between the sun rays directly striking the top polarizer and the rays bounced back from the reflector at the rear of the screen, that poor polarizer doesn’t stand a chance.

Repairing the burn is a delicate operation, as one false move could crack the thin LCD glass. The first step is to carefully peel off the burned polarizer. This leaves a mess of dried glue, which can be scraped off or dissolved with alcohol. A new linear polarizer can then be placed on the front of the screen. [The Retro Future] chose not to glue the polarizer, but we’re betting some UV cure LOCA (Liquid Optically Clear Adhesive) from a cell phone screen protector would do the trick.

If you love the look of the classic Game Boy, but want to play just about any classic game, grab a Raspberry Pi zero, and build a retro Pi Boy.

Continue reading “Repairing A Sunburned Game Boy Screen”

Pi Handheld With A Mindblowing Enclosure

The Raspberry Pi is possibly the world’s most popular emulation platform these days. While it was never intended to serve this purpose, the fact remains that a small, compact computer with flexible I/O is ideally suited to it. We’ve featured a multitude of builds over the years using a Pi in a mobile form factor to take games on the go. [Michael]’s build, however, offers a lot more than a few Nintendo ROMs and some buttons from eBay. It’s a tour de force in enclosure design.

The build starts with the electronics. In 2017 it’s no longer necessary to cobble together five different accessory boards to handle the controls, battery charging, and display. Boards like Kite’s Super All In One exist, handling everything necessary for a handheld game console. With this as a starting point, he then set out to recreate Nintendo’s classic Game Boy, with a few tweaks to form and function.

It’s a textbook example of smart planning, design, and execution. We are taken through the process of creating the initial CAD drawings, then combining 3D printed parts with wood and carbon fibre for a look that is more akin to a high-end piece of hi-fi gear than anything related to gaming. The attention to detail is superb and the write-up makes it look easy, while [Michael] shares tips on how to safely cut carbon fibre to make your own buttons.

The final results are stunning, and it’s a great example of why a fine piece of wood is always a classy way to go for an enclosure. For another great example, try this walnut keyboard, or check out the roots of the Raspberry Pi Game Boy movement.