ESP32 Brings Air Purifier Online With Home Assistant

A lot of hackers are rightfully concerned about the privacy issues that surround many of today’s “smart” gadgets, but it’s hard to argue that the ability to remotely control devices around your home isn’t convenient. Enter self-hosted, open source projects like Home Assistant. This provides the framework for building out a home automation system without having your soul information sold, but as you might expect, you’re going to have to put some effort in to get the most of it.

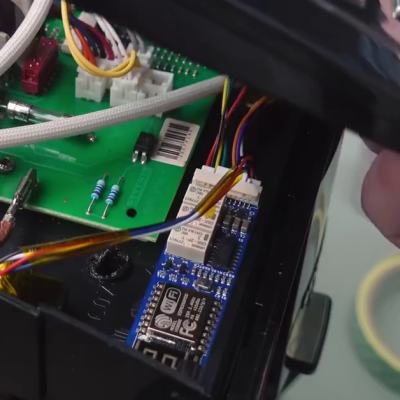
For example, take a look at this Phillips AC4014 air purifier that [Anton] connected to Home Assistant by way of an ESP32. Rather than getting too bogged down in reverse engineering the purifier’s surprisingly complex internal electronics, he took the easy way out and wired a couple of relays across the power and fan speed buttons; this allows the device to be easily controlled by the microcontroller, without impacting the functionality of the original controls.

But since those front panel controls still work, that meant [Anton] needed a way for the ESP32 to detect the device’s status and report that to Home Assistant so everything stayed in sync. So he looked around on the PCB for a trace that got powered up when the air purifier was up and running, which he connected to a pin of the microcontroller through a transistor. This let’s the firmware determine if the machine is running or not just by checking if the appropriate pin has gone high.

Speaking of the firmware, [Anton] decided to use ESPHome rather than trying to write his own code from scratch. This project allows you to rapidly add new devices to Home Assistant by providing the firmware with a relatively simple YAML configuration file, which he’s provided as an example. In fact, he’s provided quite a lot of examples with this project, down to an annotated image of the PCB that shows where to tap your wires into. He’s done quite a service for anyone who’s got this same model of air purifier.

This unit doesn’t appear to have any capability of actually checking the quality of the air in the room, but we’ve recently seen a low-cost IKEA product that can do exactly that. Even better, it can be easily modified to report its findings over the network using the ESP8266.

Photo of an automated plant watering system attached to four potted plants.

Automation Allows You To Leaf Your Plants Alone

The greatest threat to a potted plant stems from its owner’s forgetfulness, but [Sasa Karanovic] has created an automation system that will keep his plants from getting too thirsty. Over the past year [Sasa] has been documenting an elegant system for monitoring and watering plants which has now blossomed into a fully automated solution.

If you haven’t seen the earlier stages of the project, they’re definitely worth checking out. The short version is that [Sasa] has developed a watering system that uses I2C to communicate with soil moisture, temperature, and light sensors as well as to control solenoids that allow for individual plants to be watered as needed. An ESP32 serves as a bridge, allowing for the sensors to be read and the water to be dispensed via an HTTP interface.

In this final part, [Sasa] integrates his watering system into a home automation system. He uses a MySQL database to store logs of sensor data and watering activity, and n8n to automate measurement and watering. If something isn’t quite right, the system will even send him a Telegram notification that something is amiss.

If you think automation might be the best way to save your plants from a slow death, [Sasa] has kindly shared his excellent work on GitHub. Even if you don’t have a green thumb, this is still a great example of how to develop a home automation solution from scratch. If you’re more interested in television than gardening, check out [Sasa]’s approach to replacing a remote control with a web interface!

Continue reading “Automation Allows You To Leaf Your Plants Alone”

Automating Pool Monitoring And Chemical Dosing

Anyone who has had a backyard pool will know that it only takes a little lapsed attention to turn the whole thing green. For those sick of having to stay on top of things, the idea of automating pool care may be attractive. This project from [Discreet Mayor] hopes to do just that.

Data is graphed for easy analysis using Grafana.

The project uses a TI SimpleLink wireless-enabled microcontroller to run the show, which allows data to be offloaded to a base station for graphing with Grafana. The system can monitor pH levels as well as ORP (oxidation/reduction potential) levels using probes attached via BNC connectors. Based on these readings, the device can dose chlorine into the pool as needed using a peristaltic pump driven by a TI DRV8426 stepper motor driver.

We’d want to keep a close eye on the system for some time, making sure it wasn’t over or underdosing the pool with chemicals. However, that’s easy enough to do when all the data is logged neatly in a web-accessible graph.

We’ve seen other hackers implement similar controls to their own pools, too. If you’ve been working on your own home automation projects, be sure to drop us a line.

Picture of the automatic blind controller and three servo motors, all in their enclosures, displayed on a table.

Automated Window Blinds Using MQTT And Home Assistant

Finnish software engineer [Toni] is on a quest to modernize his 1991 house, and his latest project was to automate the window blinds and control them using Home Assistant. Unless your blinds have built-in motors, most of the effort of such a project centers around how to integrate and attach the motor — and as [Toni] points out, there are tons of different blinds with all kinds of operating mechanisms. But once you solve that issue, half the battle is over.

These particular blinds require less than one turn of the control rod to go from fully open to fully closed, and [Toni] selects a 270-degree range-of-motion, 20 kg*cm torque servo motor to drive them. He really wanted to install the motor inside the window, but it just wouldn’t fit. Instead, each servo motor is mounted in a custom 3D-printed case installed on the window frame just below the operating rod. An ESP8266-based controller box is installed above the window, hidden behind curtains, and operates all three servos.

On the software side of things, the project is coded in C++ and uploaded using the Ardiono IDE. The blinds communicate to [Toni]’s Home Assistant network using MQTT. All the software is available on the project’s GitHub repository, and the 3D-printed case design is posted on Thingiverse. Even though your blinds may be of a completely different design, we think many parts of [Toni]’s project are still useful — do check out this project if you’re thinking about doing something similar. The notion of motorized window blinds has been around for a some time — we covered one project way back in 2013 and another in 2016. If you have added automation to your window blinds, let us know how it went down in the comments section.

Continue reading “Automated Window Blinds Using MQTT And Home Assistant”

Home Automation Terminal With Cyberpunk Style

The OLKB-Terminal designed by [Jeff Eberl] doesn’t have a battery, can’t fold up (even if it seems like it could), and is only portable in the sense that you can literally pick it up and move it somewhere else. So arguably it’s not really a cyberdeck per se, but it certainly does look the part. If you need to be furiously typing out lines of code in a dimly lit near-future hacker’s den, this should do you nicely.

[Jeff] has provided everything you’d need to recreate this slick little machine on your own, though he does warn that some of the hardware decisions were based simply on what he had on-hand at the time, and that better or cheaper options may exist. So for example if you don’t want to use the Raspberry Pi 4, you can easily swap it out for some other single-board computer. Though if you want to change something better integrated, like the LCD panel, it will probably require modifications to the 3D printed components.

The rear electronics tray offers plenty of room for expansion.

The slim mechanical keyboard that [Jeff] used for the OLKB-Terminal, which in some ways set the tone for the whole design, is actually a completely separate open source project from [Victor Lucachi]. The VOID30 is a 3D printed, 30% handwired ortholinear keyboard that runs the popular QMK firmware on an Arduino Pro Micro. He’s implemented a couple tweaks, namely using a USB-C equipped Arduino clone, but otherwise it’s the same as upstream. So if you’re not in the market for a little bedside cyberpunk terminal but love its sleek keyboard, you’re in luck.

Software wise, [Jeff] has the OLKB-Terminal hooked into his larger Home Assistant system. This gives him an attractive status display of the whole network, and with just a tap on the terminal’s seven inch touch screen, he’s able to directly control devices around the home. That said, at the end of the day it’s just a Raspberry Pi, so it could really run whatever you want.

While cyberdeck builds might be all the rage right now, we do appreciate projects that bring those same design tenets to the desktop. From the gorgeous faux-retro designs of [Oriol Ferrer MesiĆ ] to modernized pieces of vintage hardware, truly personal computers that can be easily upgraded and repaired don’t have to be limited to something you can lug around with a guitar strap.

Samsung Shuttering Original SmartThings Hubs

Samsung is causing much angst among its SmartThings customers by shutting down support for its original SmartThings home automation hub as of the end of June. These are network-connected home automation routers providing Zigbee and Z-Wave connectivity to your sensors and actuators. It’s not entirely unreasonable for manufacturers to replace aging hardware with new models. But in this case the original hubs, otherwise fully functional and up to the task, have intentionally been bricked.

Users were offered a chance to upgrade to a newer version of the hub at a discount. But the hardware isn’t being made by Samsung anymore, after they redirected their SmartThings group to focus entirely on software. With this new dedication to software, you’d be forgiven for thinking the team implemented a seamless transition plan for its loyal user base — customers who supported and built up a thriving community since the young Colorado-based SmartThings company bootstrapped itself by a successful Kickstarter campaign in 2012. Instead, Samsung seems to leave many of those users in the lurch.

There is no upgrade path for switching to a new hub, meaning that the user has to manually reconnect each sensor in the house which often involves a cryptic sequence of button presses and flashing lights (the modern equivalent of setting the time on your VCR). Soon after you re-pair all your devices, you will discover that the level of software customization and tools that you’ve relied upon for home automation has, or is about to, disappear. They’ve replaced the original SmartThings app with a new in-house app, which by all accounts significantly dumbs down the features and isn’t being well-received by the community. Another very popular tool called Groovy IDE, which allowed users to add support for third-party devices and complex automation tasks, is about to be discontinued, as well.

Continue reading “Samsung Shuttering Original SmartThings Hubs”

Control An IRL Home From Minecraft

Minecraft seems to be a game in which anything is possible, both in the virtual world and in the real one. As a sandbox-style game, we’ve seen all kinds of things implemented in it including arithmetic logic units and microcontroller emulators. On the other end of reality we’ve also seen a lot of projects in which real-world interfaces impact the virtual world in some way. As a game, the lines between these two worlds often seem to blur, and that’s no different for this project that allows for control of a smart home from within the game itself.

The project is called HomeAssistantMC and is built with Forge. The mod interfaces directly with a Minecraft game. From within the game, players can create a model of their home complete with light switches and other control interfaces. A WebSocket API listens to the game for changes to these devices, and interfaces with real-world controllers which control the home in real life. The game uses special state blocks to handle the control, and the entire control system can be configured in-game once all of the appropriate software has been installed.

For anyone willing to experiment with this software, all of the code for this project is available on its GitHub page. One of the other interesting things about this project is the ability to use other creations within Minecraft for home automation. For example, building logic gates allows for nuanced control of the home automation setup with creations we’ve already seen in Minecraft before. And, if you really want to go deep into the weeds, you could even build a complete 6502 processor from within the game as well.