An LM386 Oscillator Thanks To Tungsten Under Glass

Once ubiquitous, the incandescent light bulb has become something of a lucerna non grata lately. Banned from home lighting, long gone from flashlights, and laughed out of existence by automotive engineers, you have to go a long way these days to find something that still uses a tungsten filament.

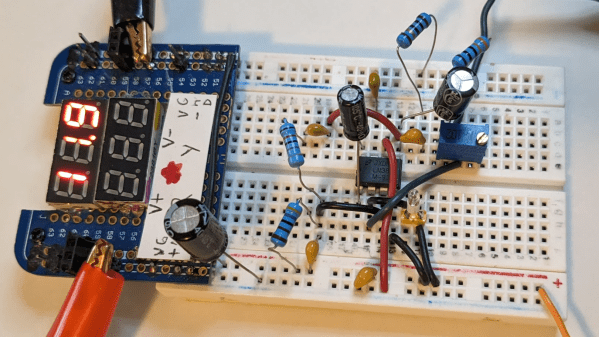
Strangely enough, this lamp-stabilized LM386 Wien bridge oscillator is one place where an incandescent bulb makes an appearance. The Wien bridge itself goes back to the 1890s when it was developed for impedance measurements, and its use in the feedback circuits of vacuum tube oscillators dates back to the 1930s. The incandescent bulb is used in the negative feedback path as an automatic gain control; the tungsten filament’s initial low resistance makes for high gain to kick off oscillation, after which it heats up and lowers the resistance to stabilize the oscillation.

For [Grug Huler], this was one of those “just for funsies” projects stemming from a data sheet example circuit showing a bulb-stabilized LM386 audio oscillator. He actually found it difficult to source the specified lamp — there’s that anti-tungsten bias again — but still managed to cobble together a working audio oscillator. The first pass actually came in pretty close to spec — 1.18 kHz compared to the predicted 1.07 kHz — and the scope showed a very nice-looking sine wave. We were honestly a bit surprised that the FFT analysis showed as many harmonics as it did, but all things considered, the oscillator performed pretty well, especially after a little more tweaking. And no, the light bulb never actually lights up.

Thanks to [Grug] for going down this particular rabbit hole and sharing what he learned. We love builds like this that unearth seemingly obsolete circuits and bring them back to life with modern components. OK, calling the LM386 a modern component might be stretching things a bit, but it is [Elliot]’s favorite chip for a reason.

Continue reading “An LM386 Oscillator Thanks To Tungsten Under Glass”

This Vintage Alphanumeric Display Was Huge, Hot, Heavy, And Expensive

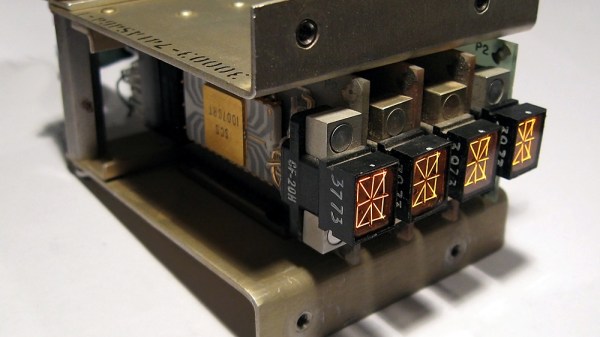
It’s easy to take display technology for granted nowadays, but the ability to display data in a human-readable way was not always easy. This is demonstrated well by the Pinlite 30003 Alphanumeric Display Module, a four-character display that was pure luxury for its time.

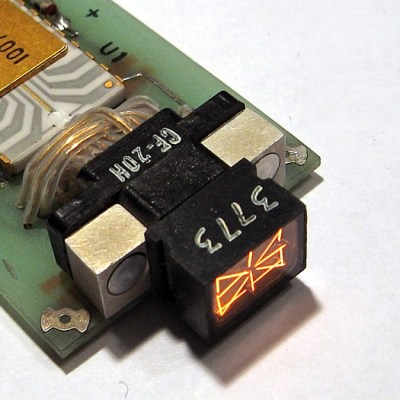
Each display is a rectangular vacuum tube containing 17 incandescent light filaments.

Not only were the 17 segments that make up each display capable of showing any letter or number, but they were even daylight-readable! Each of those 17 segments is an incandescent lamp filament, which is how the required brightness was achieved. The sturdy module shown here holds four such displays, each of which is on its own pluggable board with a dedicated character decoder chip directly behind it.

As [AnubisTTL] points out, the resulting unit is bulky, has terrible character spacing, and was no doubt very costly. By today’s standards, it is almost unimaginably heavy, hot, and impractical. But before high-brightness LEDs were a thing, a daylight-readable alphanumeric character display was really something special. It would absolutely have been worth the money and effort to the right people.

Before small and efficient displays were commonplace, the solution to the problem of how to display data efficiently and in an easy-to-read format took a lot of really unusual (and clever) turns as engineers worked around the limitations of the time. This resulted in oddities like the SD-11 Sphericular Display, which is mostly empty space on the inside. Another great example is the Eidophor, a projector from before projectors were even a thing.

Putting LEDs In Motorcyle Tail Light Shows How Trivial Becomes Tough

[Maarten Tromp]’s replacement of his motorcycle’s tail light with LED equivalents is a great example of something that every hacker learns sooner or later: interfacing to and working around existing parts can turn a trivial-seeming task into a much bigger job than expected. The more one has to work within the constraints of an existing system, the more opportunities there are for roadblocks and surprise issues to stall progress, and this project is a great example of that.

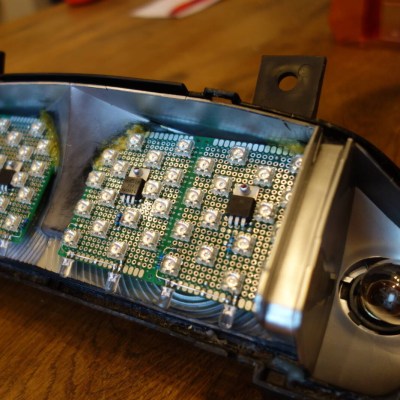
[Maarten]’s 1999 Honda ST1100 Pan European motorcycle had no aftermarket options for an LED rear light assembly, and he wasn’t too keen on just installing a generic module to replace the original. Instead, he resolved to purchase and disassemble a used factory assembly, and replace the incandescent lamps with some equivalent LEDs. Replacing bulbs with LEDs sounds easy, but doing the job right took [Maarten] almost two weeks in the end.

Problems started early with simple things like how to open up the light assembly itself. The unit isn’t user-serviceable and isn’t intended to be opened, and the parts are sealed shut with a waxy substance. Fortunately, heat does the trick. Another early hitch was the curved base of the light assembly, which made mounting flat perfboard or veroboard a challenge. In the end, [Maarten] settled on a triangular grid of high-brightness LEDs,  driven with LM317 regulators configured as constant-current supplies, mounted on some protoboard cut to fit the unique curve of the assembly. The result accepts the wide voltage range of the motorcycle’s battery (from 10.5 V to 14.5 V) and can still function even if some individual LEDs stop working.

The project has one more example of how working around existing hardware can be a pain. [Maarten] had originally intended to swap out the turn signal lamps for LEDs as well, but there is a glitch. The motorcycle’s turn signal relay will do a fast blink pattern if burnt-out turn signal lamps are detected. Since LEDs consume considerably less current than the original bulbs, the relay will remain stuck in the fault condition. There are a few different ways around this, but it’s a problem for another day. For now, the tail light LED replacement is a success.

Working around existing hardware frequently brings unexpected challenges, but when safety systems (such as lights on a vehicle) are involved, it’s extra-important to make sure things are done right.

Over-Engineered Incandescent Numerical Display Shows Great Workmanship

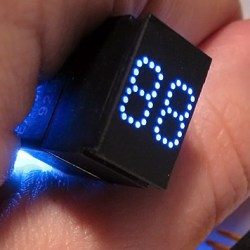
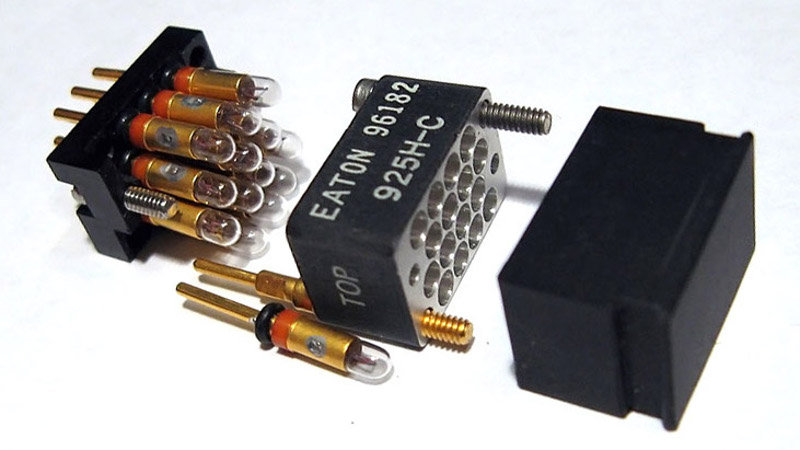
Back before LED technology came into its own, displays used incandescent bulbs. These vintage incandescent displays weren’t necessarily big; the Eaton 925H-C fiber optic display, for example, has numbers barely 7 mm tall and packs two of them into a tiny area. Of course, the depth of the display module itself is huge by today’s standards; those components have got to go somewhere, after all.

This particular device is, in [Industrial Alchemy]’s words, “[d]ripping with the spending excess that only a bottomless military budget can provide… the Eaton 925H-C may not be a practical device, but it is certainly an impressive one.”

The way the display works is this: individual incandescent bulbs light up fiber optic light guides, which terminate on the face of the display in small dots to make up a numerical display. With only fourteen bulbs, the dots we see here clearly aren’t individually addressable; the two digits are most likely broken up into seven segments each, with three dots making up each segment.

No expense seems spared in the design and manufacture of these displays. Even the incandescent lamps have individual shock absorbers.

The sheer amount of workmanship in these displays is remarkable, and their design makes them easy to retrofit with LED technology instead of replacing the tiny incandescent lamps. In a stark contrast to all of the machined aluminum and gold plated contacts seen here in the Eaton 925H-C, take a look at this Soviet-era seven-segment incandescent display whose construction is far less sophisticated, but shows off its own clever engineering. We’ve also seen more modern DIY takes on the concept, using LED light sources and cured UV resin light pipes to get that vintage look to the displays.

Retrotechtacular: The Nernst Lamp

After dominating the illumination market for more than a century, it’s easy to think of the glowing filament of the standard incandescent lamp as the only way people found to turn electricity into light. But plenty of fertile minds turned out alternative designs, one of which is the fascinating Nernst lamp, which we’d previously never heard of.

If the name sounds familiar, it’s likely through exposure to [Walther Nernst]’s equation for electrochemistry, or for his “New Heat Theorem” which eventually became the Third Law of Thermodynamics. Pal of [Einstein] and eventual Nobel laureate, [Nernst] was also a bit of a tinkerer, and he came up with a design for an incandescent lamp in 1897 that was twice as efficient as carbon-filament lamps. The video below, from the Edison Tech Center, details the design, which used a ceramic “glower rod” that would incandesce when current flowed through it. The glower, though, was not conductive until it was quite hot, so separate heater coils that gave the glower a start on the process were included; these were switched off by a relay built into the base of the lamp once the glower started conducting.

It’s a complicated design, but its efficiency, coupled with a better light spectrum and the fact that it didn’t need a vacuum bulb since the glower wouldn’t oxidize like a carbon or tungsten filament, gave it certain advantages that let it stake out a decent share of the early market for electric illumination. It was even the light source for one of the first facsimile machines. We find it a very clever use of what were at the time exotic materials, and wonder if this could have lead to something like vacuum tubes without the vacuum.

Continue reading “Retrotechtacular: The Nernst Lamp”

A Daylight-Readable Bar Graph Display In The 70s Wasn’t Cheap

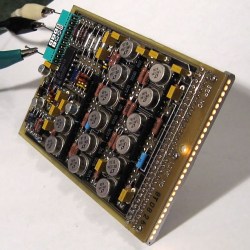
The driver board with display attached; the row of lamps is visible on the right hand side.

LEDs weren’t always an easy solution to displays and indicators. The fine folks at [Industrial Alchemy] shared pictures of a device that shows what kind of effort and cost went into making a high brightness bar graph display in the 70s, back when LEDs were both expensive and not particularly bright. There are no strange materials or methods involved in making the display daylight-readable, but it’s a peek at how solving problems we take for granted today sometimes took a lot of expense and effort.

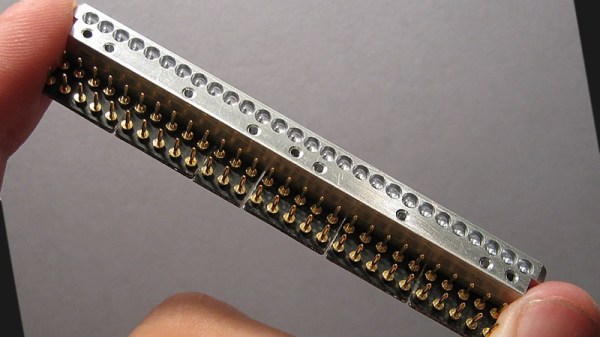
The display is a row of 28 small incandescent bulbs, mounted in a PCB and housed in a machined aluminum frame. Holes through which to view the bulbs are on both the top and front of the metal housing, which allows the unit to be mounted in different orientations. It was made as a swappable module, its 56 machined gold pins mate to sockets on the driver board. The driver board itself consists of 14 LM119 dual comparators, each of which controls two bulbs on the display.

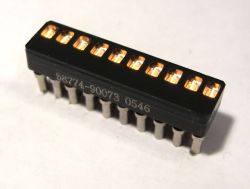
An example of a Wamco minitron bar graph display. Each window contains an incandescent filament. [Source: industrialalchemy.org]
[Industrial Alchemy] believes that the display unit itself may have been a bit of a hack in its own way. Based on the pin spacing and dimensions of the driver board, they feel that it was probably designed to host a row of modular units known as the Wamco minitron bar graph display. An example is pictured here; they resembled DIP chips and could be stacked side-by-side to make a display of any length. Each window contained an incandescent filament in a reflective well, and each light could be individually controlled.

These minitron bar graph units could only be viewed from the top, and were apparently high in cost and low in availability. Getting around these limitations may have been worth creating this compatible unit despite the work involved.

Display technology has taken many different turns over the years, and you can see examples of many of them in one place in the Circus Clock, which tells the time with a different technology for each digit: a nixie, a numitron, a 7-segment thyratron tube, a VFD, an LED dot display, and a rear projection display.

Soviet-Era 7-Segment Display, Built Like A Tank

In a way, all 7-segment displays are alike; at least from the outside looking in. On the inside it can be quite another story, and that’s certainly the case with the construction of this Soviet-era 7-segment numerical display. From the outside it may look a bit sturdier than usual, but it’s still instantly recognizable for what it is. On the inside is an unusual mixture of incandescent bulbs and plastic light guides.

The black-coated blocks of plastic on the left (shown from the rear) act as light guides. The holes are for nesting the incandescent bulbs. Note the puzzle-like arrangement of the uniquely shaped pieces.

The rear of the display is a PCB with a vaguely hexagonal pattern of low-voltage incandescent bulbs, and each bulb mates to one segment of the display. The display segments themselves are solid blocks of plastic, one for each bulb, and each a separate piece. These are painted black, with the only paint-free areas being a thin segment at the top for the display, and a hole in the back for the mating bulb.

The result is that each plastic piece acts as a light guide, ensuring that a lit bulb on the PCB results in one of the seven thin segments on the face being lit as well. An interesting thing is that the black paint is the only thing preventing unwanted light from showing out the front, or leaking from one segment to another; usually some kind of baffle is used for this purpose in displays from this era.

More curiously, each plastic segment is a unique shape apparently unrelated to its function. We think this was probably done to ensure foolproof assembly; it forms a puzzle that can only fit together one way. The result is a compact and remarkably sturdy unit that shows how older and rugged tech isn’t necessarily bulky. Another example of small display tech from the Soviet era is this tiny 7-segment display of a completely different manufacture, which was usually used with an integrated bubble lens to magnify the minuscule display.