Extreme Espresso, Part 2: An Inductive Water Level Sensor

[Mark Smith] must really, really like his coffee, at least judging by how much effort he’s put into tricking out his espresso machine.

This inductive water tank sensor is part of a series of innovations [Mark] has added to his high-end Rancilio Silvia machine — we assume there are those that would quibble with that characterization, but 800 bucks is a lot to spend for a coffee maker in our books. We recently featured a host of mods he made to the machine as part of the “Espresso Connect” project, which includes a cool Nixie tube bar graph to indicate the water level in the machine. That display is driven by this sensor, the details of which [Mark] has now shared. The sensor straddles the wall of the 1.7-liter water tank, so no penetrations are needed. Inside the tanks is a track that guides a copper and PETG float that’s sealed with food-safe epoxy resin.

Directly adjacent to the float track on the outside of the tank is a long PCB with a couple of long, sinuous traces. These connect to an LX3302A inductive sensor IC, which reads the position of the copper slug inside the float. That simplifies the process greatly; [Mark] goes into great detail about the design and calibration of the sensor board, as well as hooking it into the Raspberry Pi Zero that lies at the heart of “Espresso Connect’. Altogether, the mods make for a precisely measured dose of espresso, as seen in the video below.

We’d say this was maybe a bit far to go for the perfect cup of coffee, but we sure respect the effort. And we think this inductive sensor method has a lot of non-caffeinated applications that probably bear exploration.

Continue reading “Extreme Espresso, Part 2: An Inductive Water Level Sensor”

Wire Loop And Amplifier Solve Audio Problem For The Hearing Impaired

Imagine being asked to provide sound reinforcement for a meeting that occurs in a large room, where anyone can be the speaker, and in a situation where microphones would hinder the flow of the meeting. Throw in a couple of attendees who have hearing disabilities, and you’ve got quite a challenge to make sure everyone gets heard.

Such a situation faced [David Schneider] at his Quaker meetinghouse, which he ended up solving with this home-brew audio induction loop system. The worship style of conservative sects of the Religious Society of Friends, as the Quakers are formally known, is “silent worship”, where congregants sit together in silence until someone feels moved to share something. Anyone can speak at any time from anywhere in the room, leading to the audio problem.

Rooms mics and a low power FM transmitter didn’t work because those using radio as aids to hearing the service felt awkward, so [David] decided to take advantage of a feature in the hearing aids worn by some members: telecoils. These are inductive receivers built into some hearing aids to send sound directly to them using magnetic fields generated by a loop in the listening area. [David]’s loop ended up being 240 meters of 20-gauge copper wire in the attic above the meeting room. The impedance ended up close to 8 ohms, perfect for feeding directly from the speaker terminals of an old stereo amplifier. Pumping 160 Watts into the coil allows the hearing-aid wearers below hear the service now.

There’s still work to be done on the input side to improve audio quality, but [David]’s solution is elegant in that it helps those who need it most using technology they already have. And perhaps those who need but don’t yet have hearing aids can roll their own.

Wireless LEDs Aren’t A First, But You Can Make Your Own

Wireless LEDs. That’s what [Scotty Allen] found in Japan, and if you find something you just have to replicate it.

[Scotty] found these wireless LEDs in a display stand for model makers and gunpla. Because you don’t want to run wires, drill holes, and deal with fiber optics when illuminating plastic models, model companies have come up with wireless LEDs. Just glue them on, and they’ll blink. It requires a base station, but these are wireless LEDs.

After buying a few of these LEDs and sourcing a base station, [Scotty] found the LEDs were three components carefully soldered together: an inductor, two caps, and the LED itself. The base station is simply two coils and are effectively a wireless phone charger. Oh, some experimentation revealed that if you put one of these wireless LEDs on a wireless phone charger it’ll light up.

The next step is of course replication, so [Scotty] headed out to Akihabara and grabbed some wire, resistors, and LEDs. The wire was wrapped into a coil, a LED soldered on, and everything worked. This is by no means the first DIY wireless LED, as with so many technologies this too hit fashion first and you could buy press-on nails with embedded wireless LEDs for years now. Check out the video below.

Continue reading “Wireless LEDs Aren’t A First, But You Can Make Your Own”

Line Following Robot Without The Lines

Line-following robots are a great intro to robotics in general, since the materials and skills needed to build a good one aren’t too advanced. It turns out that line-following robots are more than just a learning tool, too. They’re pretty useful in industry, but most of them don’t follow visible marked lines. Some, like this inductive guided robot from [Randall] make use of wires to determine their paths.

Some of the benefits of inductive guidance over physical lines are that the wires can be hidden in floors, so if something like an automated forklift is using them at a warehouse there will be less trip hazard and less maintenance of the guides. They also support multiple paths, so no complicated track switching has to take place. [Randall]’s robot is a small demonstration of a larger system he built as a technician for an autonomous guided vehicle system. His video goes into the details of how they work, more of their advantages and disadvantages, and a few other things.

While inductive guided robots have been used for decades now, they’re starting to be replaced by robots with local positioning systems and computer vision. We’ve recently seen robots that are built to utilize these forms of navigation as well.

Continue reading “Line Following Robot Without The Lines”

A Table From Beyond Infinity

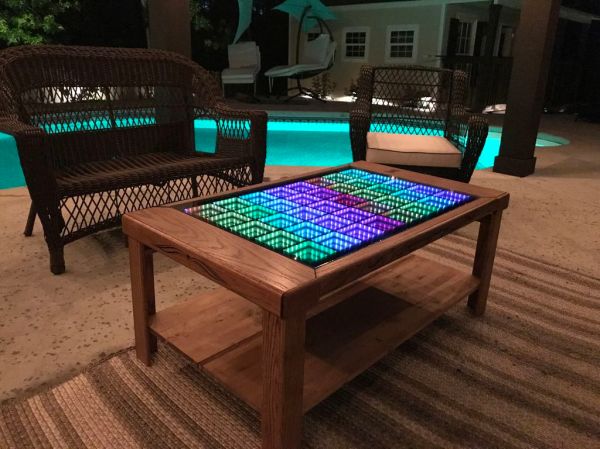
Infinity mirrors are some far-out table mods and make a great centerpiece. Instructables user [bongoboy23] took a couple steps beyond infinity when designing this incredible table tailor-made for our modern age.

Poplar and pine wood make up the framing, and red oak — stained and engraved — make for a chic exterior. Programmed with Arduino and run on a Teensy 3.1, the tabletop has 960 LEDs in forty sections. There are, four USB ports hidden behind sliding panels, as well as a two-port AC outlet and an inductive charging pad and circuit.  A hidden Adafruit TFT touchscreen display allows the user to control the table’s functions. Control is limited to changing lighting functions, but Pac-Man, Snake, and text features are still to come!

Weighing in at $850, it’s not a cheap build, but it looks amazing.

Continue reading “A Table From Beyond Infinity”

Custom Wireless Headphone Charging Station

wirelessHeadphoneChargingStation

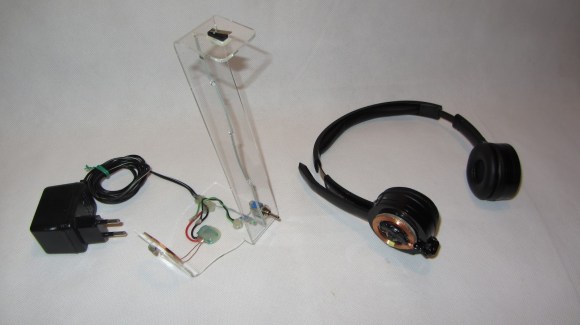
We’ve come to expect quite a lot of convenience from our technology, to the point where repeatedly plugging in a device for recharging can seem tedious. Hackaday regular [Valentin Ameres] decided to ditch the plugs and built his own wireless headphone charger. We’ve seen [Valentin’s] work before, and one thing’s for certain: this guy loves his laser cutter. And he should, considering it’s churned out key components for a gorgeous Arc Reactor replica and his Airsoft Turret. [Valentin] fired it up yet again to carve the charging stand out of acrylic, then used a small torch and the edge of a table to bend the stand into shape.

He sourced the needed coils online and soldered the receiving coil to a spare miniUSB plug. These components are glued onto a laser-cut acrylic attachment, which fits against the side of the headphone and is held in place by plugging directly into the earpiece’s miniUSB jack. The headphones rest on the laser-cut charging stand, which has an extrusion of acrylic on one side that holds the emitter coil in position against the receiver coil. [Valentin] also added a simple momentary switch at the top of the stand to activate both the emitter coil and a status LED when pressed by the headphones.

Stick around for a video of the build below, and check out some other headphone hacks, like adding a Bluetooth upgrade or making a custom pair out of construction earmuffs.

Continue reading “Custom Wireless Headphone Charging Station”

Adding LEDs To An Engagement Ring

ring

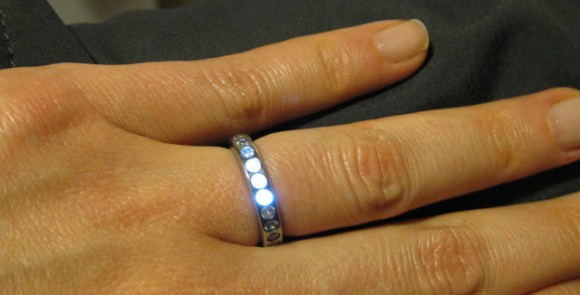
Once upon a time, a nerd met a girl. Things happen as they do, and eventually [Ben] wanted to create the be-all, end-all engagement ring. (here’s a cache) It’s a simple titanium affair with 23 stones around the perimeter. What makes this ring so cool, though, is that it lights up whenever [Ben] and his girl are holding hands.

The metalworking portion of the build was about as easy as you would expect machining titanium to be. After the ring was cut off its bar stock, [Ben] brought it over to a mill where 23 holes for each of the stones were drilled. The stones were affixed to the ring with  jewelers epoxy and the entire ring was buffed to an amazing shine.

The electronics are where this project really shines. Putting a battery of capacitor inside a ring is nigh impossible, so [Ben] decided to power the LEDs with an inductive charging circuit. A coil of wire wound around kapton tape serves as the inductor and a small SMD capacitor powers three very bright and very tiny LEDs.

The inductive charging unit itself is a masterpiece of hackery; [Ben] wanted the ring to light up whenever he and his ladyfriend were holding hands. To do this, [Ben]’s inductive charger is also a wearable device: a large coil of wire is the charger’s transformer and was would to fit around [Ben]’s wrist. The entire charging circuit can be easily hidden under a jacket sleeve, making for a nearly magical light-up ring.

An awesome piece of work, and one of the best jewelry builds we’ve seen in a long time. You can see the inductive coupling and shining LEDs in the video below.

Continue reading “Adding LEDs To An Engagement Ring”