Automated Chamber Passes Just The Right Gas

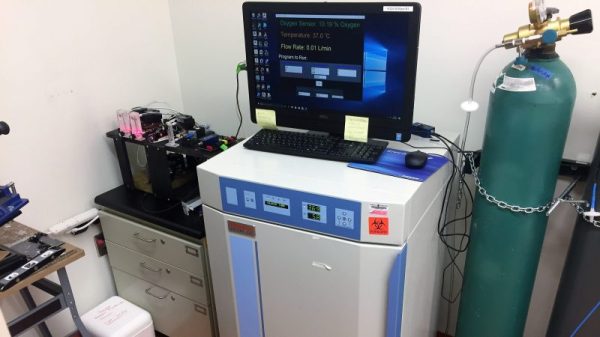
It sounds like an overly complicated method a supervillain would use to slowly and painfully eliminate enemies — a chamber with variable oxygen concentration. This automated environmental chamber isn’t for torturing suave MI6 agents, though; rather, it enables cancer research more-or-less on the cheap.

Tasked with building something to let his lab simulate the variable oxygen microenvironments found in some kinds of tumors, [RyanM415] first chose a standard lab incubator as a chamber to mix room air with bottled nitrogen. With a requirement to quickly vary the oxygen concentration from the normal 21% down to zero, he found that the large incubator took far too long to equilibrate, and so he switched to a small acrylic box. Equipped with a mixing fan, the smaller chamber quickly adjusts to setpoints, with an oxygen sensor providing feedback and controlling the gas valves via a pair of Arduinos. It’s quite a contraption, with floating ball flowmeters and stepper-actuated variable gas valves, but the results are impressive. If it weren’t for the $2000 oxygen sensor, [RyanM145] would have brought the whole project in for $500, but at least the lab can use the sensor elsewhere.

Modern biology and chemistry labs are target-rich environments for hacked instrumentation. From DIY incubators to cheap electrophoresis rigs, we’ve got you covered.

Continue reading “Automated Chamber Passes Just The Right Gas”

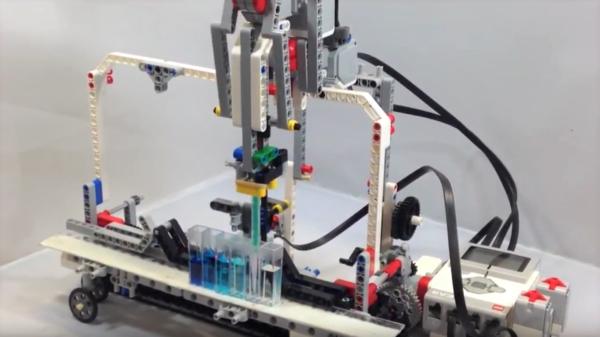
LEGO Liquid Handler And Big Biology

A career as a lab biologist can take many forms, but the general public seems to see it as a lone, lab-coated researcher sitting at a bench, setting up a series of in vitro experiments by hand in small tubes or streaking out a little yeast on an agar plate. That’s not inaccurate at all – all of us lab rats have done time with a manual pipettor while trying to keep track of which tube in the ice bucket gets which solution. It’s tedious stuff.

But because biology experiments generally scale well, and because more data often leads to better conclusions, life science processes can quickly grow beyond what can be handled manually. I’ve seen this time and again in my 25 years in science, from my crude grad school attempts to miniaturize my assays and automate data collection to the multi-million dollar robotic systems I built in my career in the pharmaceutical industry. Biology can get pretty big in a hurry. Continue reading “LEGO Liquid Handler And Big Biology”

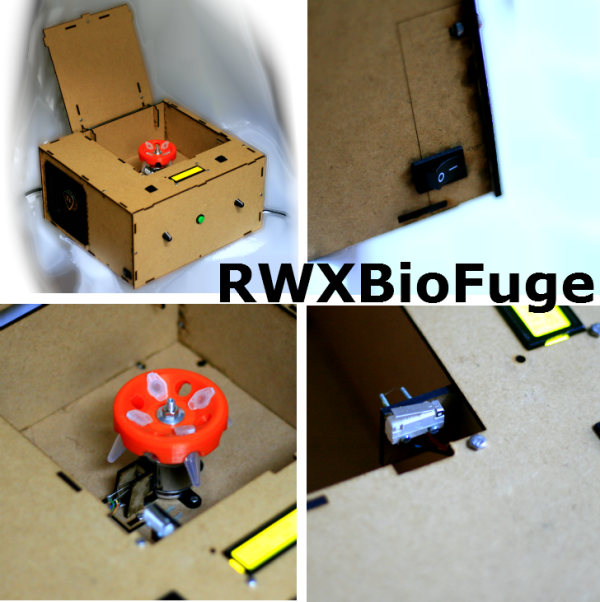
RWXBioFuge collage v0.1

Take Your Samples For A Spin With The RWXBioFuge

We have a confession to make: we love centrifuges. We’ve used all shapes and sizes, for spinning bags of whole blood into separate components to extracting DNA, and everything in between. Unfortunately, these lab staples are too expensive for many DIY-biologists unless they buy them used or build them themselves. [Pieter van Boheemen] was inspired by other DIY centrifuges and decided to make his own, which he named the RWXBioFuge.

[Pieter] designed the RWXBioFuge using Sketchup, OpenSCAD, and InkScape. It features a Thermaltake SMART M850W ATX power supply, an R/C helicopter Electronic Speed Controller (ESC), and brushless outrunner motor. For user output it utilizes a 16×2 LCD character display with an I2C interface.The frame is laser-cut from 3mm MDF while the 3D-printed PLA rotor was designed with OpenSCAD.

An Arduino handles the processing side of things. [Pieter] used an Arduino Ethernet – allowing a web interface to control the centrifuge’s settings and operation from a distance. We can see this being useful in testing out the centrifuge for any rotor/motor balance issues, especially since [Pieter] states that it can be configured to run >10,000 rpm. We wouldn’t want to be in the room if pieces start flying off any centrifuge at that speed!  However, we feel that when everything’s said and done, you should have a centrifuge you can trust by your side when you’re at your lab bench.

While there are similarities to the Openfuge, the larger RWXBioFuge has rotor capacities of eight to twenty 1.5-2.0ml microcentrifuge tubes. Due to the power supply, it is not portable and a bit more expensive, but not incredibly so. There are some small touches about this centrifuge that we really like. The open lid detector is always a welcome safety feature. The “Short” button is very handy for quick 5-10 second spins.

A current version of the RWXBioFuge is being used at the Waag Society’s Open Wetlab. [Pieter’s] planned upgrades for the next version include a magnetic lid lock, different rotor sizes, an accelerometer to detect an improperly balanced rotor, and optimizing the power supply, ESC, and motor setup. You can never have enough centrifuges in a lab, and we are looking forward to seeing this project’s progress!

Check out a few more pictures of the RWXBioFuge after the break.

Continue reading “Take Your Samples For A Spin With The RWXBioFuge”

Nice Looking DIY Magnetic Stirrer

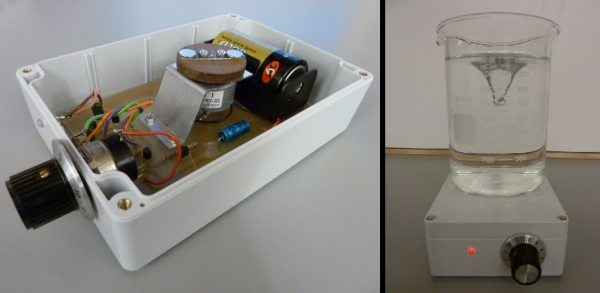
DIY Magnetic Stirrer Looks Professional

Stirrers are used in chemistry and biology labs to mix containers full of liquids. Magnetic stirrers are often preferred over the mechanical types because they are more sterile, easier to clean and have no external moving parts. Magnetic stirrers quickly rotate a magnet below the glass beaker containing the liquids that need mixing. The magnetic field travels effortlessly through the glass and reacts against a small magnetic cylinder called the stir bar. The spinning stir bar mixes the contents and is the only part of the mixer that touches the liquids.

[Malcolm] built his own magnetic stirrer. Unlike some DIY stirrers out on the ‘web, this one gets an “A” for aesthetics. It’s clean white lines allow it to look right at home in the professional laboratory. The graduated knob looks good and is functional too as the the potentiometer it is attached to allows multiple mixing speeds. Surprisingly, a D-size battery is all that is needed to power the stirrer. Most of the parts required for this project can be found in your spare parts bin. [Malcolm] has written some excellent instructions on how he made the stirrer including a parts list and schematics.

Want to make a magnetic stirrer but aren’t into chemistry or biology? No worries… I pity the fool who don’t build one of these….

OpenFuge: An Open-source Centrifuge

openFuge

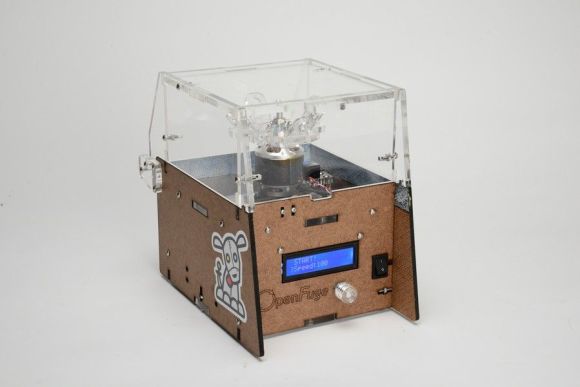
Biohackers, fire up your laser cutters. [CopabX] has developed OpenFuge: a (relatively) low-cost, open-source centrifuge from powerful hobby electronic components. If you thought the VCR centrifuge wasn’t impressive, trolls be damned— OpenFuge can crank out 9000 RPM and claims it’s capable of an impressive 6000 G’s. [CopabX] also worked in adjustable speed and power, setting time durations, and an LCD to display live RPM and countdown stats.

And it’s portable. Four 18650 lithium cells plug into the back, making this centrifuge a truly unique little build. The muscle comes from a DC outrunner brushless motor similar to the ones that can blast you around on a skateboard but with one key difference; an emphasis on RPMs over torque. We’re not sure exactly which motor is pictured, but one suggestion on the bill of materials boasts a 6000 KV rating, and despite inevitable losses, that’s blazing fast at nearly 15V.

You’ll want to see the demonstration video after the break, but also make time to swing by Thingiverse for schematics and recommended parts.

Continue reading “OpenFuge: An Open-source Centrifuge”

VCR Centrifuge

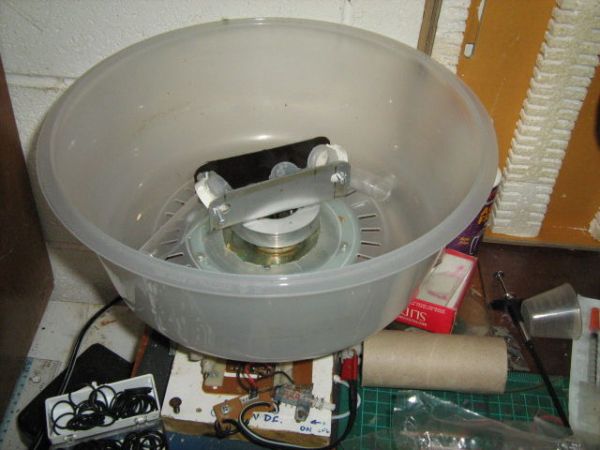
VCR’s practically scream “tear me open!” with all those shiny, moving parts and a minimal risk that you’re going to damage a piece of equipment that someone actually cares about. Once you’ve broken in, why not hack it into a centrifuge like [Kymyst]? Separating water from the denser stuff doesn’t require lab-grade equipment. As [Kymyst] explains: you can get a force of 10 G just spinning something around your head. By harvesting some belt drives from a few VCR’s, however, he built this safer, arm-preserving motor-driven device.

[Kymst] dissected the video head rotor and cassette motor drive down to a bare minimum of parts which were reassembled in a stack. A bored-out old CD was attached beneath the rotor while a large plastic bowl was bolted onto the CD. The bowl–here a microwave cooking cover–acts as a protective barrier against the tubes spinning inside. The tube carriers consist of plastic irrigation tubing fitted with a homemade trunnion, which [Kymyst] fashioned from some self-tapping screws and a piece of PVC. At 250 rpm, this centrifuge reaches around 6 G and best of all, gives a VCR something to do again. Take a look at his guide and make your own, particularly if your hackerspace has a bio lab.

[Fran’s] PCB Etching Techniques

frantronics-pcb-tutorials

We think that anyone who’s done at-home PCB fabrication will appreciate the tidiness that [Fran] maintains throughout her etching process. She recently posted a three-part video tutorial which showcases her techniques. As you can see in the screenshot above, her habits reek of top-notch laboratory skills.

Regular readers can probably guess what circuit she’s etching. It’s the test boards for her LVDC reverse engineering. She is using the toner transfer method, but in a bit different way than most home-etchers do. She uses the blue transfer paper made for the job, but before transferring it to the copper clad she uses a light box (kind of like the X-ray film viewer at the doctor’s office) to inspect for any gaps where toner did not adhere. From there she uses a heat press to apply the resist. This is a heck of a lot easier than using a clothes iron, but of course you’ve got to have one of these things on hand to do it this way.

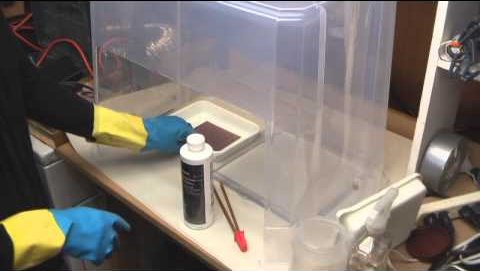
The second part of the tutorial is embedded after the break. We chose this segment because it shows off how [Fran] built her own chemical hood. It’s a clear plastic storage container lying upside down. A work window has been cut out of the front side, and a 4-inch exhaust hose added to the top. [Fran’s] lab has a high volume low velocity fan to which it connects to whisk the fumes outside.

Continue reading “[Fran’s] PCB Etching Techniques”