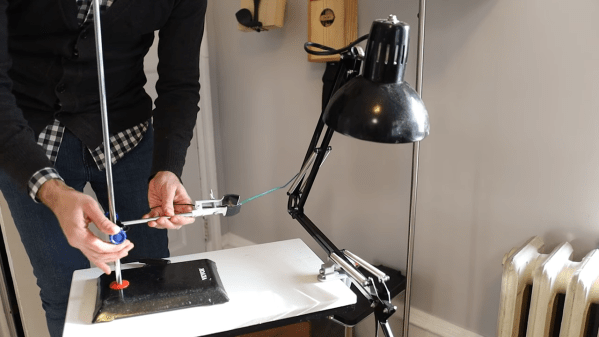
Proper Mag Lev Controller Makes Snail Lamp Much Cooler

Magnetic levitation has not quite revolutionized the world of transit the way some of us might have hoped. It has, however, proven useful to [mrdiytechmagic], who has put the technology to grand use in making his levitating snail lamp.

The build is actually relatively complicated compared to some levitating toys you might have seen before. It uses a number of coils to produce a magnetic field to levitate the 3D printed plastic snail which contains the lighting element itself.

The actively controlled levitation base uses a magnetic sensor to detect the changing field as the snail moves above it. It then varies the current going to the various coils to keep the snail balanced and in place. Power is transmitted with a further larger coil, much as in a wireless phone charger. This is picked up by a circuit in the snail, and used to power the LEDs inside.

It might not have been our first choice, but having seen it in action, we can’t deny a levitating 3D printed snail is pretty impressive. If you’d prefer something slightly more befitting such a high-tech looking presentation, perhaps a hovering SpaceX Starship would be more your speed.

Continue reading “Proper Mag Lev Controller Makes Snail Lamp Much Cooler”

Build Your Own RGB Fill Light For Photography

Photography is all about light, and capturing it for posterity. As any experienced photographer will tell you, getting the right lighting is key to getting a good shot. To help in that regard, you might like to have a fill light. If you follow [tobychui]’s example, you can build your own!

Colors!

The build relies on addressable WS2812B LEDs as the core of the design. While they’re not necessarily the fanciest LEDs for balanced light output, they are RGB LEDs, so they can put out a ton of different colors for different stylistic effects. The LEDs are under the command of a Wemos D1, which provides a WiFI connection for wireless control of the light.

[tobychui] did a nice job of building a PCB for the project, including heatsinking to keep the array of 49 LEDs nice and cool. The whole assembly is all put together inside a 3D printed housing to keep it neat and tidy. Control is either via onboard buttons or over the WiFi connection.

Files are on GitHub if you’re seeking inspiration or want to duplicate the build for yourself. We’ve seen some other similar builds before, too. Meanwhile, if you’re cooking up your own rad photography hacks, don’t hesitate to let us know!

Cheap DIY Microscope Lamp Makes Tiny Macro Shots Look Great

For optical microscopes, light is everything. If you don’t have a good amount of light passing through or bouncing off your sample, you’ve got nothing for your eyeballs or a camera to pick up. To aid in this regard, [Halogenek] whipped up a nifty microscope lamp with some LEDs.

The build uses a neat arch-shaped PCB with a hole in the middle for the microscope’s optics to pass through. Surrounding this are the LEDs, which provide a circle of light focused on the sample, akin to the ring lights so favored by today’s online influencers. The LEDs are powered via USB C, so the lamp can be run off of any garden-variety phone charger you might have lying around.

[Halogenek] reports that the lamp has proven useful for extreme macro shots of PCBs. It’s an easy build to replicate or redesign your own way if you’re doing similar work.

Microscopes are super useful, and there are all kinds of hacks you can do to make them perform better in your quest for science. Meanwhile, if you’ve been jazzing up your own lab hardware, let us know—we’d love to hear about it!

Print Your Own Brain Lamp From MRI Data

MRIs generally fall somewhere on the scale from boring to stressful depending on why you’re having one and how claustrophobic you get. Regardless, they’re a wonderful diagnostic tool and they’ve saved thousands if not millions of lives over the years. In a fun use of the technology, [mandalaFractals] has shown us how to make a 3D-printed brain lamp using an MRI scan of the head.

The build starts with an off-the-shelf lamp base and a smart LED bulb as the light source, though you could swap those out as desired for something like a microcontroller, a USB power supply, and addressable LEDs if you were so inclined. The software package Slicer is then used to take an MRI brain scan and turn it into something that you can actually 3D print. It’ll take some cleaning up to remove artifacts and hollow it out, but it’s straightforward enough to get a decent brain model out of the data. Alternatively, you can use someone else’s if you don’t have your own scan. Then, all you have to do is print it in a couple of halves, and pop it on the lamp base, and you’re done!

It’s a pretty neat build. Who wouldn’t love telling their friends that their new brain lamp was an accurate representation of their own grey noodles, after all? It could be a fun gift next time Halloween rolls around, too!

Meanwhile, if you’ve got your own MRI hacks that you’ve been cooking up, don’t hesitate to let us know!

Minimalist LED Lamp Is Circular Beauty Incarnate

Lamps used to be things built to provide light with specific purpose, whether as reading lamps, desk lamps, or bedside table lamps. Now we just build them for the vibes, as with this minimalist LED lamp from [andrei.erdei].

The build uses a 3D-printed frame printed in opaque grey, with a diffuser element printed in a more translucent white. This is key to allowing the LED to nicely glow through the lamp without ugly distracting hotspots spoiling the effect. The lamp mounts 36 WS2812B LEDs in strip form. These are controlled from an Arduino Nano running the FastLED library for lightweight and easy control of the addressable LEDs. Smooth rainbow animations are made easy by the use of the HSV color space, which is more suitable for this job than the RGB color space you may otherwise be more familiar with.

[andrei.erdei] does a great job of explaining the build, including the assembly, electronics, and code aspects. The latter could serve as a particularly good resource if you’re just starting out on your own builds in the blinky, glowable space. Video after the break.

Continue reading “Minimalist LED Lamp Is Circular Beauty Incarnate”

Tensioning 3D Prints For Lightweight, Strong Parts

Desktop 3D printers have come a long way over the past decade. They’re now affordable for almost anyone, capable of printing in many diverse materials, and offer a level of rapid prototyping and development not feasible with other methods. That said, the fact that they are largely limited to printing different formulations of plastic means there are inherent physical limitations to what the machines are capable of, largely because they print almost exclusively in plastic. But augmenting prints with other building techniques, like this method for adding tensioning systems to 3D printed trusses can save weight and make otherwise unremarkable prints incredibly strong.

The build from [Jón Schone] of Proper Printing consists of printed modular sections of truss which can be connected together to make structural components of arbitrary length. To add strength to them without weight, a series of Kevlar threads are strung from one end of the truss to the other on the interior, and then tensioned by twisting the threads at one end. Similar to building with prestressed concrete, this method allows for stronger parts, longer spans, less building material, and lighter weight components. The latter of which is especially important here, because this method is planned for use to eventually build a 3D printer where the components need to be light and strong. In this build it’s being used to make a desk lamp with a hinged joint.

For other innovative 3D printer builds, [Jón] has plenty of interesting designs ranging from this dual extrusion system to this 3D printed wheel for a full-size passenger vehicle. There’s all kinds of interesting stuff going on at that channel and we’ll be on the edge of our seats waiting to see the 3D printer he builds using this tensioned truss system.

Continue reading “Tensioning 3D Prints For Lightweight, Strong Parts”

Open-Source LAMP Instrument Aimed At Clinicians And Biohackers Alike

Over the last few years, we’ve all been given a valuable lesson in both the promise and limitations of advanced molecular biology methods for clinical diagnostics. Polymerase chain reaction (PCR) was held up as the “gold standard” of COVID-19 testing, but the cost, complexity, and need for advanced instrumentation and operators with specialized training made PCR difficult to scale to the levels demanded by a pandemic.

There are other diagnostic methods, of course, some of which don’t have all the baggage of PCR. RT-LAMP, or reverse transcriptase loop-mediated amplification, is one method with a lot of promise, especially when it can be done on a cheap open-source instrument like qLAMP. For about 50€, qLAMP makes amplification and detection of nucleic acids, like the RNA genome of the SARS-CoV-2 virus, a benchtop operation that can be performed by anyone. LAMP is an isothermal process; it can be done at one single temperature, meaning that no bulky thermal cycler is required. Detection is via the fluorescent dye SYTO 9, which layers into the base pairs inside the amplified DNA strands, using a 470-nm LED for excitation and a photodiode with a filter to detect the emission. Heating is provided by a PCB heater and a 3D-printed aluminum block that holds tubes for eight separate reactions. Everything lives in a 3D-printed case, including the ESP32 which takes care of all the housekeeping and data analysis duties.

With the proper test kits, which cost just a couple of bucks each, qLAMP would be useful for diagnosing a wide range of diseases, and under less-than-ideal conditions. It could also be a boon to biohackers, who could use it for their own citizen science efforts. We saw a LAMP setup at the height of the pandemic that used the Mark 1 eyeball as a detector; this one is far more quantitative.