A Raspberry Pi Grimoire For The Command Line Wizard

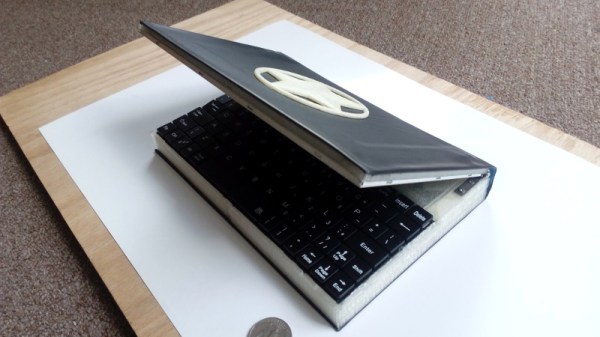
Who says there’s no such thing as magic? Not anyone who knows what a Unix pipe is, that’s for sure. If you do some of your best incantations at a blinking cursor, this scratch-built Raspberry Pi Zero “Spellbook” laptop created by [Calvin] might be just what the apothecary ordered. Lucky for us, he was kind enough to document the design and construction of this penguin-powered tome for anyone else who wishes to dabble in the GNU Dark Arts.

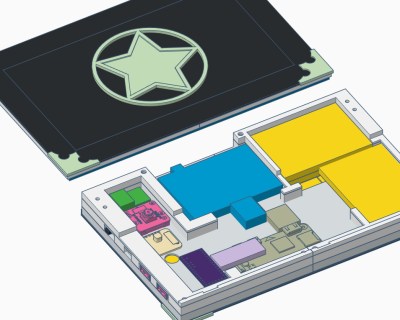
In the series of videos after the break, viewers have the opportunity to watch a project go from idea to final product. The first video was uploaded nearly a month before the project was completed, and goes over some of the design elements of the project as well as different ideas [Calvin] had in terms of things like component placement. Throughout the video, he illustrates his ideas in TinkerCAD, which might not have been our first choice for a project this complex, but it does go to show what’s possible in the free web-based CAD package.

By the second video, [Calvin] has printed some parts and now has the hardware coming together. The general idea is that the outside panels of the “book” are made out of steel cut from the side panel of an old computer, with the 3D printed components taking the form of spacers between the electronic components. These plastic “pages” are not only easier and faster to print than a complete case, but help sell the appearance of the book when viewed from the sides.

[Calvin] has shared his TinkerCAD design so that others can print out the necessary components for the book, though you’ll have to source your own steel plates. He also breaks down all the principle components he used and gives links to where you can buy them, from the display and keyboard down to the screws and standoffs. He went with the Pi Zero and sticks to mainly console work, but if you want something with enough power to throw around a graphical environment, he says there’s room in the case for a Pi 3.

Hackers seem to enjoy hiding hardware inside of books, PLA or otherwise. We’ve recently seen an iPad nestled snugly into a notebook, and of course no house would be complete without a book doubling as a hidden switch.

Continue reading “A Raspberry Pi Grimoire For The Command Line Wizard”

Xbox One X Gets Aluminum Laptop Makeover

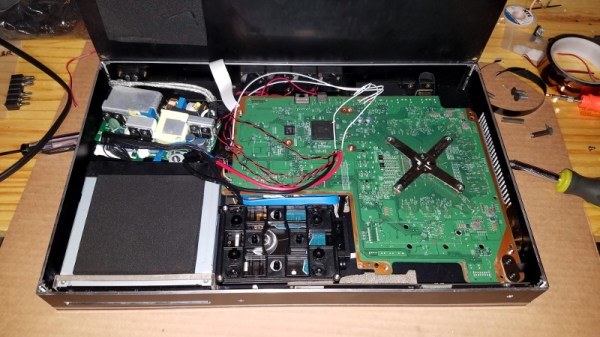
While many a gamer was willing to brave hand-to-hand combat this Black Friday just to get a few bucks off of Microsoft’s premium-tier game console, [jomega] was already cutting his to pieces from the comfort of his own home. Not dissuaded by the system’s fairly high sticker price or relatively limited modding scene, he decided to transplant his Xbox One X into an incredibly slick laptop-style aluminum enclosure.
Turning a game console into a “laptop” is hardly new, Ben Heck has been doing it for over a decade now, but in general they tend to look pretty clunky. With a few exceptions, the builder’s goal is not so much to make the final result look sleek and professional, but simply to take their favorite games on the go. But from the start [jomega] wanted something that would not only allow him to take long walks in the park with Master Chief, but look gorgeous doing it.

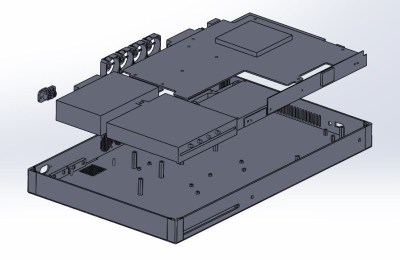
One of his goals was to make the final device thinner than the original system, so the first step was to assemble virtual representations of the Xbox’s principal components in CAD to find the most efficient placement for everything. Long before the first pieces of aluminum were cut, [jomega] already knew where each part and screw was going to end up. The time he invested in planning out the build in CAD more than made up for itself when it came time to assemble the final product, and also means this design is highly reproducible should he decide to build another one on commission.

Even though the final system seems impossibly thin, no hardware or functionality had to be left out. Even the optical drive, which on the stock console is something of an afterthought to begin with in an era of digital downloads (rumor has it the next Xbox will drop optical discs entirely), has been retained. Special consideration did need to be given to cooling the 4K powerhouse though, and [jomega] warns that running the system with the case open or the fans off can have dangerous consequences.

Thanks to the Xbox One’s wireless capabilities (for both Internet connection and controllers), there’s a notable lack of ports on the case. This made the design a bit easier, as [jomega] really only needed to have a connector for the AC power cord in the back and a couple of holes for the system’s power, eject, and controller sync buttons. He did add in a USB port for convenience, but even that could be skipped to make things easier.

In the past we’ve seen some rather husky Xbox 360 laptop builds, and at least one attempt to build a more slimline version, but this latest entry in the long line of portable-ized Xboxen has set the bar very high.

Continue reading “Xbox One X Gets Aluminum Laptop Makeover”

Gorgeous Bartop Arcade Build Is A Cut Above

At this point we’ve seen a good number of desktop-sized arcade cabinets, and while they’ve naturally all been impressive in their own ways, they do tend to follow a pretty familiar formula. Cut the side panels out of MDF (or just buy a frame kit), stick a Raspberry Pi and an old LCD monitor in there, and then figure out how to control the thing. Maybe a couple strategically placed stickers and blinking LEDs to add a few extra horsepower, but nothing too surprising.

[Andy Riley] had seen plenty of builds like that, and he wasn’t having any of it. With the heart of an old laptop and bones made of IKEA cutting boards, his build is proof positive that there’s always more than one way to approach a problem that most would consider “solved” already. From the start, he set out to design and build a miniature arcade cabinet that didn’t look and feel like all the other ones he’d seen floating around online, and we think you’ll agree he delivered in a big way.

Powering the arcade with an old laptop is really a brilliant idea, especially since you can pick up older models for a song now that they’re considered nearly disposable by many users. As long as it doesn’t have a cracked display, you’ll get a nice sized LCD panel and potentially a rather powerful computer to drive it. Certainly the graphical capabilities of even the crustiest of used laptops will run circles around the Raspberry Pi, and of course it opens the possibility of playing contemporary PC games. As [Andy] shows in his detailed write-up, using a laptop does take more custom work than settling for the Pi, but we think the advantages make a compelling case for putting in the effort.

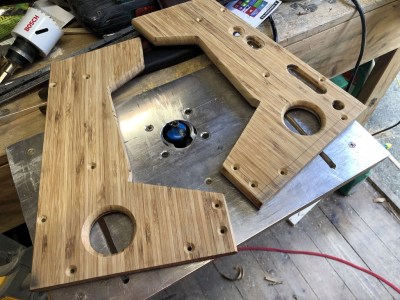
Of course, that’s only half the equation. Arguably the most impressive aspect of this build is the cabinet itself, which is made out of a couple IKEA bamboo cutting boards. [Andy] used his not inconsiderable woodworking skills, in addition to some pretty serious power tools, to turn the affordable kitchen accessories into a furniture-grade piece that really stands out from the norm. Even if you aren’t normally too keen on working with dead trees, his step-by-step explanations and pictures are a fascinating look at true craftsman at work.

If you’re more concerned with playing Galaga than the finer points of varnish application, you can always just turbocharge the old iCade and be done with it. But we think there’s something to be said for an arcade cabinet that could legitimately pass as a family heirloom.

Steady Hand Repurposes Cheap SSD Modules

For hackers, cheap (and arguably disposable) consumer hardware makes for a ready supply of free or low-cost components. When you can walk into a big box store and pick up a new low-end laptop for $150, how many are going to spend the money to repair or upgrade the one they have now? So the old ones go to the bin, or get sold online for parts. From an ecological standpoint our disposable society is terrible, but at least we get some tech bargains out of the deal.

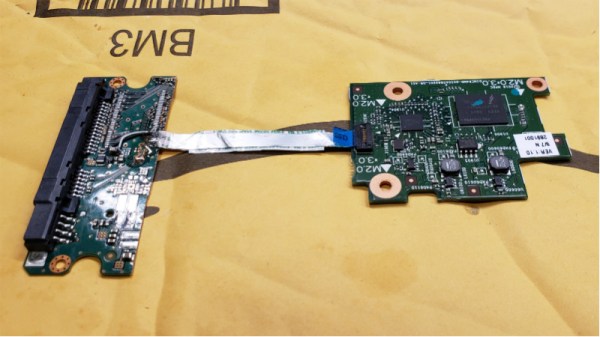
Case in point, the dirt cheap 32 GB eMMC SSDs [Jason Gin] recently scored. Used by Hewlett Packard on their line of budget laptops, he was able to snap up some of these custom drives for only $12 each. Only problem was, since they were designed for a very specific market and use case, they aren’t exactly the kind of thing you can just slap in your computer’s drive bay. He had to do some reverse engineering to figure out how to talk to them, and then some impressive fine-pitch soldering to get them plugged in, but in the end he got some very handy drives for an exceptionally low price.

[Jason] starts by figuring out the drive’s pinout using the cornerstone of the hacker’s electronic toolkit: the multimeter. By putting one lead on an obvious ground point such as the PCB’s screw holes, you can work through the pins on the connector and make some educated guesses as to what’s what. Ground pins will read as a short, but the meter should read power and data pins as a forward-biased diode. With a rough idea of the pin’s identities and some luck, he was able to figure out that it was basically a standard SATA connection in a different form factor.

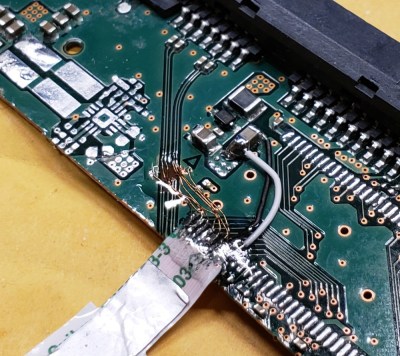
To actually hook it up to his computer, he pulled the PCB off of a dead SATA hard drive, cut it down to size, and was able to use fine magnet wire to attach the conductors in the drive’s ribbon cable to the appropriate pads. He sealed everything up with a healthy dose of hot glue to make sure it didn’t pull loose, and then ran some drive diagnostics on his cobbled together SSD to make sure it was behaving properly. [Jason] reports the drive isn’t exactly a speed demon, but given the low cost and decent performance he still thinks it’s worth the work to use them for testing out different operating systems and the like.

[Jason] seems to have something of an obsession with eMMC hacking. Last time we heard from him, he was bringing a cheap Windows tablet back from the dead by replacing its shot eMMC chip.

You’ll Flip For This 7404 IC Motherboard Fix

We often lament that the days of repairable electronics are long gone. It used to be you’d get schematics for a piece of gear, and you could just as easily crack it open and fix something as the local repairman — assuming you had the knowledge and tools. But today, everything is built to be thrown away when something goes wrong, and you might as well check at the end of a rainbow if you’re searching for a circuit diagram for a new piece of consumer electronics.

But [Robson] writes in with an interesting story that gives us hope that the “old ways” aren’t gone completely, though they’ve certainly changed for the 21st century. After blowing out his laptop’s USB ports when he connected a suspect circuit, he was desperate for a fix that would fit his student budget (in other words, nearly zero). Only problem was that he had no experience fixing computers. Oh, and it takes months for his online purchases to reach him in Brazil. Off to a rocky start.

His first bit of luck came with the discovery he could purchase schematics for his laptop online. Now, we can’t vouch for the site he used (it sure isn’t direct from Dell), but for under $5 USD [Robson] apparently got complete and accurate schematics that let him figure out what part was blown on the board without even having to open up the computer. All he had to do was order a replacement IC (SY6288DAAC), and solder it on. It took two months for the parts to arrive, and had to do it with an iron instead of a hot air station, but in the end, he got the part installed.

Continue reading “You’ll Flip For This 7404 IC Motherboard Fix”

Old Laptop? Mobile X86 Game System!

Between smartphones and tablets, computing is becoming increasingly mobile in nature. It used to be that everyone had a desktop computer, then laptops became the norm, and now many people don’t have anything beyond their mobile device. Unless you’re the kind of person who actually needs the power and versatility offered by a “real” computer, mobile devices are simply a more convenient option to browse the web and consume content.

But what if your needs are somewhere in the middle? You want an x86 computer and full operating system, but you also want something that’s more mobile than a tablet? If you’re like [mnt], you take an old Atom laptop that’s on its last legs and rebuild it as the Hacktop.

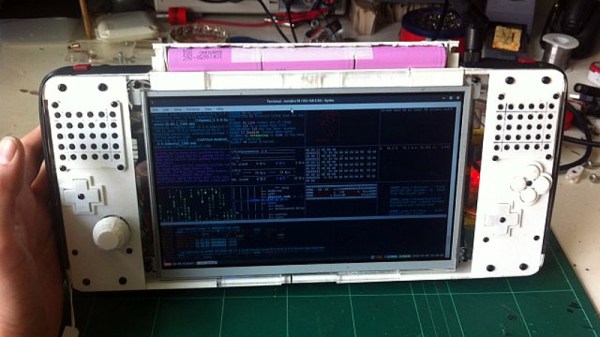
[mnt] describes the Hacktop as an “Emergency Gaming/Hacking Station”, and says he uses it everywhere he goes. Inspired by his Nintendo DSi, gaming controls are front-and-center on the Hacktop and he uses the machine to play everything from Half-Life to classic emulators.

But the Hacktop is capable of more than just playing Amiga games. The hand-soldered QWERTZ keyboard can be used with his thumbs, and the D-Pad doubles as the cursor keys. There’s a laptop touch pad on the back of the case, and the ten-inch LCD display is a touch screen as well. Definitely no shortage of input devices on this thing. It’s also packing some interesting special features, such as integrated RTL-SDR and LIRC hardware for mobile exploration and experimentation. [mnt] says the nine-cell battery should keep it alive and kicking for twelve hours or so, but it of course depends on what kind of stuff he gets into while out and about.

Hackers have been building their own mobile devices for a long time, and we’re always struck by the creative approaches individuals take compared to the rather cookie-cutter world of mobile consumer technology.

Friend In Need Gets Junk Bin PC For Cramped Quarters

If you doubt the power of the Hackaday community, check this one out. Stalwart reader and tipster [starhawk] has pitched in to help a friend in need, someone he met through Hackaday.io. Seems this friend’s current living arrangements are somewhat on the cramped side, and while he’s in need of a PC, even a laptop would claim too much space.

So with a quick trip to the store and a few items from the junk bin, [starhawk] whipped up an all-in-one PC the size of a tablet for his friend. As impressed as we are by the generosity, we’re more impressed by the quality of his junk bin. The heart of the compact machine is a motherboard from a Wintel CX-W8, scarcely larger than a Raspberry Pi model A. After the addition of a larger heatsink and fan, the board was attached via a sheet of plastic to the back of a 7-inch touchscreen, also a junk bin find. A cheap picture frame serves as the back of the all-in-one, complete with Jolly Wrencher, of course. Alas, the DC-DC converter was one of the only purchased items, bringing the cost for the build to all of $22, including the $15 for a wireless keyboard/touchpad on clearance from Walmart. After some initial power troubles, the fixes for which are described in this update, the machine was ready to ship.

Does this one seem familiar? It should — [starhawk] built a similar “laptop” for himself a while back when he was low on funds. Now it seems like he’s paying it forward, which we appreciate. For more details on how he pulled this all of, check out The Anytop, [starhawk’s] portable computer anyone can build. It was his 2017 Hackaday Prize entry!