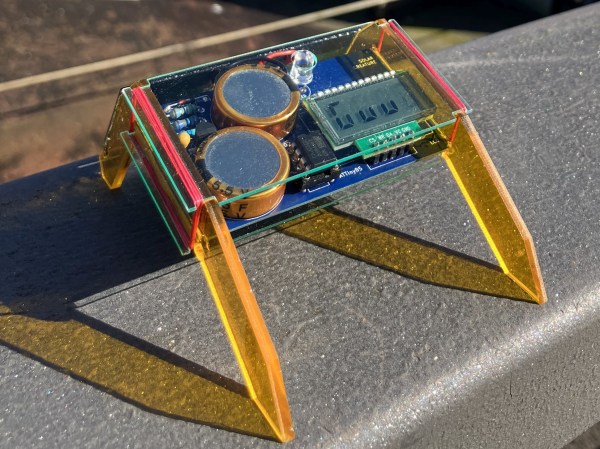
The AUO-manufactured controller board of an LG-branded TV. (Credit: Andrew Menadue)

What To Do With A Broken Television When You Can’t Fix It

Who can say ‘no’ to a free TV, even if it’s broken? This was the situation [Andrew Menadue] ended up in last year when he was offered an LG 39LE4900 LCD TV. As [Andrew] describes in the blog post along with videos (see first part embedded after the break), this particular television had been taken to a television repair shop previously after the HDMI inputs stopped working, but due to a lack of replacement parts the owner had to make due with the analog inputs still working. That is, until those stopped working as well.

The nice thing about these TVs is that they are very modular inside, as [Andrew] also discovered to his delight. In addition to the LG controller board, an inverter board and the power supply board, this TV also contained a TCON PCB. After some initial unsuccessful swapping of the parts with EBay replacements, nothing was (surprisingly) working, but it did turn out that the TCON and inverter boards are made and sold by AUO (major Taiwanese display manufacturer), along with the display itself.

In the end it turned out that the AUO boards and screen were fine, and after sourcing a board to convert VGA input to the LVDS signal accepted by the TCON board, the whole display worked. Naturally using a board with HDMI inputs would be nice, but it does show how a ‘broken’ TV can be turned into a really nice, big monitor without all too much effort if it’s just the controller board that went on the fritz.

Continue reading “What To Do With A Broken Television When You Can’t Fix It”

Reverse Engineering: Trash Printer Gives Up Its Control Panel Secrets

Many of us hardware-oriented types find it hard to walk past a lonely-looking discarded item of consumer electronics without thinking “If only I could lug that back to the car and take it home to play with” and [phooky] from NYC Resistor is no stranger to this sentiment. An old Epson WF-2540 inkjet printer was disassembled for its important ‘nutrients,’ you know, the good stuff like funky motors, encoders and switches. But what do you do with the control panel? After all, they’re usually very specific to the needs of the device they control, and don’t usually offer up much scope for reuse.

The RP2040 PIO is quite capable of pushing out those LCD pixels

[phooky] doesn’t usually bother with them, but this time decided to have a crack at it for fun. Inside, nothing out of the ordinary, with a large single-sided PCB for the key switches and LEDs, and a small PCB hosting the LCD display. The easy part was to figure out how the keyboard scanning was done, which turned out to be pretty simple, it just uses some 74-series shift register devices to scan the columns and clock out the row lines. A Raspberry Pi Pico module was pressed into service to scan the keyboard and enable a keyboard map to be created, by pure brute-force. No need to trace the circuit.

Things got interesting when [phooky] started looking into the LCD interface, based on the Epson E02A46EA chip (good luck finding a datasheet for that one!) and quickly realised that documentation simply wasn’t available, and it would be necessary to do things the hard way. Poking around the lines from the main CPU (an Epson E01A9CA , whatever that is) the display clock was identified, as well as some control signals, and three lines for the RGB channels. By throwing a Saleae data capture into some ROM exploring software, the display configuration was determined to be a standard 320×120 unit.

The PIO unit of the RP2040 was used to generate the video waveforms and push the pixels out to the LCD controller, allowing the RP2040 board to be wired inside the case permanently, converting the control panel into a USB device ready for action!

Want to know a little more about reverse engineering junk (or not) items and repurposing them to your will? Checkout this hacking piece from a couple of weeks back. For something a little more advanced, you could try your hand at a spot of car ECU hacking.

Thanks [Perry] for the tip!

Tiny Switch Ornament Plays GIFs With An ESP32

It constantly amazes us what we hackers can build these days, (electronics shortages aside) we have access to an incredible array of parts, with specifications that only a few years ago would be bank-breaking and longer ago just fantasy. It’s nice to see people building one-offs just for fun, in spite of the current difficulties getting parts to actually be delivered. For example, check out this miniaturized Nintendo Switch created by [scottbez1] that plays animated GIFs from an SD card on tiny 1.14″ LCD display.

Obviously such a diminutive hack requires a custom PCB, which was a job for KiCAD. Armed with a 3D model of the LCD, the casing and PCB outline were drawn using Fusion 360. The PCB hosts a LilyGo ESP32 module for all the heavy lifting, with the WiFi adding some fun future capabilities not yet explored. The design is about as tight as it can get without pushing the limits of the PCB process too far, including a neat trick of sneaking passives inside the body of the SD card! That’s another space-saving idea we’ll be banking.

All-in-all a neat little hack, showing some good modelling and construction techniques and a good looking end result. Code for your reference may be found on the project GitHub, but as of writing the hardware design is not available.

Whilst this project shrinks the Switch, here’s one that goes the other way and super-sizes it, and if you have a switch lite but crave a little modern charging magic, then look no further than this Qi wireless charging hack.

Continue reading “Tiny Switch Ornament Plays GIFs With An ESP32”

Slick Keyboard Built With PCB Magic

Sometimes a chance conversation leads you to discover something cool you’ve not seen before, and before you know it, you’re ordering parts for yet another hardware build. That’s what happened to this scribe the other day when chatting on some random discord, to QMK maintainer [Nick Brassel aka tzarc] about Djinn, a gorgeous 64-key split mechanical keyboard testbed. It’s a testbed because it uses the newest STM32G4x microcontroller family, and QMK currently does not have support for this in the mainline release. For the time being, [Nick] maintains a custom release, until it gets merged.

Hardware-wise, the design is fabulous, with a lot of attention to detail. We have individual per-key RGB LEDs, RGB underglow, a rotary encoder, a five-way tactile thumb switch, and a 240×320 LCD per half. The keyboard is based on a three PCB stack, two of which are there purely for structure. This slick design has enough features to keep a fair few of us happy.

Interestingly, when you look at the design files (KiCAD, naturally) [Nick] has chosen to take a mirrored approach to the PCB. That means the left and right sides are actually the same PCB layout. The components are populated on different sides of the PCB depending on which half you’re looking at! By mirroring footprints on both PCB sides, and hooking everything up in parallel, it’s possible to do it all with a single master layout.

This is a simple but genius idea that this scribe hadn’t come across before (the shame!) Secondarily it keeps costs down, as your typical Chinese prototyping house will not deal in PCB quantities below five, so you can make two complete keyboards on one order, rather than needing two orders to make five. (Yes, there are actually three unique PCBs, but we’re simplifying the situation, ok?)

Now, if only this pesky electronics shortage could abate a bit, and we could get the parts to build this beauty!

Obviously, we’ve covered many, many keyboards over the years. Here’s our own [Kristina’s] column all about the things. If you need a little help with your typing skills, this shocking example may be the one for you. If your taste is proper old-school clackers, there’s something for everyone.

A tiny TV that shows weather, news, and the classic test pattern.

Tiny TV Tells The Temperature Tale

Once upon a time, we would run home from the bus stop to watch Gargoyles and Brady Bunch reruns on the family TV, a late-1970s console Magnavox number that sat on the floor and was about 50% more cabinet than CRT. The old TV, a streamlined white Zenith at least ten years older, had been relegated to the man cave in the basement. It looked so mod compared to the “new” TV, but that’s not the aesthetic my folks were after. They wanted their electronics to double as furniture.

This little TV is a happy medium between the two styles, and for us, it’s all about those feet. But instead of cartoons, it switches between showing the current weather and the top news headlines. Inside that classy oak cabinet is an LCD, an ESP32, and an SD card module. The TV uses OpenWeatherMap and pulls the corresponding weather image from the SD card based on time of day — light images for day, and dark images for night.

We love that it shows the SMPTE color bars, aka the standard American TV test pattern as it switches between weather and news. After showing the top headlines, it automatically switches back to the weather channel. Be sure to check out the short demo video after the break.

Do you like your tiny televisions in strange places? Here’s one you can use to trim your tree this year.

Continue reading “Tiny TV Tells The Temperature Tale”

Banish Early Morning Zombification With The Zom-b-gone!

[Applied Procrastination] aka [Simen E. Sørensen] has a simple project to help those of us that struggle with early-morning zombification. By leveraging the backlight optics from a broken LCD monitor, it is possible to create an excellent diffused light source to simulate daylight, before your chosen waking time. The theory is that it is less shocking to the brain to be woken more gradually than an alarm may do. The increasing light level is to prepare the brain with a slowly increasing light level, reminiscent of daybreak, before being properly awoken by an alarm, regardless of the actual light level outdoors. This particularly useful for those of us in more northern regions, such as [Simen]’s native Norway, where mornings are very dark in the winter months.

Daylight is not purely a diffuse source however, it depends on the degree of atmospheric scattering, local reflections and such, but as far as we’re concerned here, we can just aim for as diffuse a light source a possible.

Source: DOI:10.1117/12.797854

The implementation makes use of the existing LCD metal frame, the light guide panel (usually a big hunk of acrylic covered in etched markings on one side) the diffuser/brightener sheet, and the prism sheet. A white LED strip mounted around the frame edge directs light into the light guide, which with a combination of total internal reflection and scattering on one side only, effectively turns the light through 90 degrees, and spreads it out evenly across that surface. The result of this optical sandwich is flat, even light, exactly what you want for a display, and also for simulating daylight.

Nestled beneath the expected 3D printed frame, is a custom PCB derived by smooshing together the designs from the Adafruit DS3231 RTC module and the Arduino Nano, an additional push button and rotary encoder complete the minimalistic UI, and allow the device to double up as general purpose lamp during the day. Despite a few wobbles with assembling the frame, and some incorrect PCB footprinting, the whole thing came together pretty nicely. This is a perfect thing to do with broken LCD monitors, eeking out a new life and keeping the amount of landfill to a minimum.

For further details of the hardware and codes, see the Zom-b-Gone Github.

Continue reading “Banish Early Morning Zombification With The Zom-b-gone!”

Custom Instrument Cluster For Aging Car

All of the technological improvements to vehicles over the past few decades have led to cars and trucks that would seem borderline magical to anyone driving something like a Ford Pinto in the 1970s. Not only are cars much safer due to things like crumple zones, anti-lock brakes, air bags, and compulsory seat belt use, but there’s a wide array of sensors, user interfaces, and computers that also improve the driving experience. At least, until it starts wearing out. The electronic technology in our modern cars can be tricky to replace, but [Aravind] at least was able to replace part of the instrument cluster on his aging (yet still modern) Skoda and improve upon it in the process.

These cars have a recurring problem with the central part of the cluster that includes an LCD display. If replacement parts can even be found, they tend to cost a significant fraction of the value of the car, making them uneconomical for most. [Aravind] found that a 3.5″ color LCD that was already available fit perfectly in the space once the old screen was removed, so from there the next steps were to interface it to the car. These have a CAN bus separated from the main control CAN bus, and the port was easily accessible, so an Arduino with a RTC was obtained to handle the heavy lifting of interfacing with it.

Now, [Aravind] has a new LCD screen in the console that’s fully programmable and potentially longer-lasting than the factory LCD was. There’s also full documentation of the process on the project page as well, for anyone else with a Volkswagen-adjacent car from this era. Either way, it’s a much more economical approach to replacing the module than shelling out the enormous cost of OEM replacement parts. Of course, CAN bus hacks like these are often gateway projects to doing more involved CAN bus projects like turning an entire vehicle into a video game controller.

Continue reading “Custom Instrument Cluster For Aging Car”