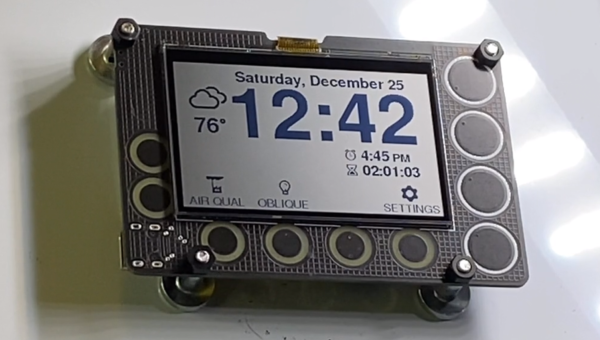
A Mini USB Display For Your PC Desktop

By now it’s likely that most Hackaday readers will be used to USB display adapters, in their most common form channeling DisplayPort over the ubiquitous serial interface. Connecting to projectors and other screens with a laptop becomes a breeze, and gone are the days of “Will my laptop work in the venue” stress for people delivering presentations. [Avra Mitra]’s STM32 tiny monitor may not ascend to these giddy heights, but it does at least live up to the promise of reproducing a desktop onto a small colour LCD hooked up through a USB port.

Not through any DisplayPort wizardry though, instead it relies on a Python script that takes successive screen grabs and streams them through USB to the microcontroller, which in tun puts them on the display. It’s claimed to achieve 6 to 7 frames per second as you can see in the video below, with an admission that there remains a huge scope for improvement.

Notwithstanding its limited utility at the moment, we can see that maybe this idea could have its uses in a very basic display after a few improvements. Meanwhile, more conventional monitors take the established route of pairing a dedicated controller board with an LCD panel.

Continue reading “A Mini USB Display For Your PC Desktop”

Recycling A Laptop Screen Into A Portable Folding Monitor

There’s plenty of times we’ve seen a laptop fail, break, or just become too slow for purpose despite the fact that it’s still packing some useful components. With all the single-board computers and other experiments lurking about the average hacker workshop, it’s often useful to have a spare screen on hand, and an old laptop is a great way to get one. This recycled display build from [Gregory Sanders] is a great example of how to reuse old hardware.

The build doesn’t simply package a laptop monitor in the same way as a regular desktop unit. Instead, [Gregory] designed a custom 3D printed frame with an arch design. The laptop screen is installed onto the frame using its original hinges, and [Gregory] designed in standoffs for an laptop LCD driver board to run the display as well as a generic frame where single-board computers can be installed.

The result is a portable monitor that can be folded up for easy transport, which is also self-supporting with its nice large base. It can also be used with other hardware, as it has a full complement of DVI, HDMI and VGA inputs on board. Of course, while you’re tinkering with laptop displays, you might also consider building yourself a dual-screen laptop as well.

Automated Watering Machine Has What Plants Crave: Fertilizer

We’ve seen countless automated plant care systems over the years, but for some reason they almost never involve the secret sauce of gardening — fertilizer. But [xythobuz] knows what’s up. When they moved into their new flat by themselves, it was time to spread out and start growing some plants on the balcony. Before long, the garden was big enough to warrant an automated system for watering and fertilizing.

This clever DIY system is based around a 5L gravity-fed water tank with solenoid control and three [jugs] of liquid fertilizer that is added to the water via peristaltic pump. Don’t worry, the water tank has float switches, and [xythobuz] is there to switch it off manually every time so it doesn’t flood the flat.

On the UI side, an Arduino Nano clone is running the show, providing the LCD output and handling the keypad input. The machine itself is controlled with an ESP32 and a pair of four-channel relay boards that control the inlet valve, the four outlet valves, and the three peristaltic pumps that squirt out the fertilizer. The ESP also serves up a web interface that mimics the control panel and adds in the debug logs. These two boards communicate using I²C over DB-9, because that’s probably what [xythobuz] had lying around. Check out the demo video after the break, and then go check on your own plants. They miss you!

Don’t want to buy just any old peristaltic pumps? Maybe you could print your own.

Continue reading “Automated Watering Machine Has What Plants Crave: Fertilizer”

MicroLEDs: Lighting The Way To A Solid OLED Competitor

We’re accustomed to seeing giant LED-powered screens in sports venues and outdoor displays. What would it take to bring this same technology into your living room? Very, very tiny LEDs. MicroLEDs.

MicroLED screens have been rumored to be around the corner for almost a decade now, which means that the time is almost right for them to actually become a reality. And certainly display technology has come a long way from the early cathode-ray tube (CRT) technology that powered the television and the home computer revolution. In the late 1990s, liquid-crystal display (LCD) technology became a feasible replacement for CRTs, offering a thin, distortion-free image with pixel-perfect image reproduction. LCDs also allowed for displays to be put in many new places, in addition to finally having that wall-mounted television.

Since that time, LCD’s flaws have become a sticking point compared to CRTs. The nice features of CRTs such as very fast response time, deep blacks and zero color shift, no matter the angle, have led to a wide variety of LCD technologies to recapture some of those features. Plasma displays seemed promising for big screens for a while, but organic light-emitting diodes (OLEDs) have taken over and still-in-development technologies like SED and FED off the table.

While OLED is very good in terms of image quality, its flaws including burn-in and uneven wear of the different organic dyes responsible for the colors. MicroLEDs hope to capitalize on OLED’s weaknesses by bringing brighter screens with no burn-in using inorganic LED technology, just very, very small.

So what does it take to scale a standard semiconductor LED down to the size of a pixel, and when can one expect to buy MicroLED displays? Let’s take a look. Continue reading “MicroLEDs: Lighting The Way To A Solid OLED Competitor”

A Handy Reference For Display Drivers And LCD Controllers

Ever tried to find the data on a mysterious LCD controller that’s kicking around in your parts bin? Well check out this list of various LCD controllers that [Achim] has put together. He summarizes the basic specifications for each controller and includes data sheet links if available (note — the website is in German, although most of the data itself is in English). All in all, he has collected 72 controllers from five different manufacturers, and 46 of them have data sheets. For each controller, he tabulates maximum resolution, color depth, type of interface, and the targeted display technology. For example, here is the entry for the Ilitech ILI9341 TFT controller commonly found in embedded projects:

Furthermore, many of the controllers also have a short video clip showing them in operation posted over on [Achim]’s YouTube channel, where he also has a bunch of quick (less than one minute) videos of all sorts of embedded goodies. We do find this table of controllers to be a little dated — for example, another popular controller used on small color OLED displays, the Solomon Systech SDS1351, is not included. But it is certainly a good resource to bookmark.

We suspect that [Achim] made this table as a result of developing µGUI, a small (only three files) C-language graphics library (see the GitHub repository) he released back in 2015. Do you have any good resources for tracking down unknown LCD controllers? If so, share in the comments below. And thanks to [Dmitry] for sending in this tip.

Continue reading “A Handy Reference For Display Drivers And LCD Controllers”

Augmented Reality On The Cheap With ESP32

Augmented reality (AR) technology hasn’t enjoyed the same amount of attention as VR, and seriously lags in terms of open source development and accessibility.  Frustrated by this, [Arnaud Atchimon] created CheApR, an open source, low cost AR headset that anyone can build at home and use as a platform for further development

[Arnaud] was impressed by the Tilt Five AR goggles, but the price of this cutting edge hardware simply put it out of reach of most people. Instead, he designed and built his own around a 3D printed frame, ESP32, cheap LCDs, and lenses from a pair of sunglasses. The electronics is packed horizontally in the top of the frame, with the displays pointed down into a pair of angled mirrors, which reflect the image onto the sunglasses lenses and into the user’s eyes. [Arnaud] tested a number of different lenses and found that a thin lens with a slight curve worked best. The ESP32 doesn’t actually run the main software, it just handles displaying the images on the LCDs. The images are sent from a computer running software written in Processing. Besides just displaying images, the software can also integrate inputs from a MPU6050 IMU and  ESP32 camera module mounted on the goggles. This allows the images to shift perspective as the goggles move, and recognize faces and AR markers in the environment.

All the design files and software is available on GitHub, and we exited to see where this project goes. We’ve seen another pair of affordable augmented reality glasses that uses a smartphone as a display, but it seems the headset that was used are no longer available.

Taking Over The Amazing Control Panel Of A Vintage Video Switcher

Where does he get such wonderful toys? [Glenn] snagged parts of a Grass Valley Kalypso 4-M/E video mixer switcher control surface from eBay and since been reverse engineering the button and display modules to bend them to his will. The hardware dates back to the turn of the century and the two modules would have been laid out with up to a few dozen others to complete a video mixing switcher console.

[Glenn’s] previous adventures delved into a strip of ten backlit buttons and gives us a close look at each of the keyswitches and the technique he used to pull together his own pinout and schematic of that strip. But things get a lot hairier this time around. The long strip seen above is a “machine control plane” module and includes a dozen addressible character displays, driven by a combination of microcontrollers and FPGAs. The square panel is a “Crosspoint Switch Matrix” module include eight individual 32 x 32 LCDs drive by three dedicated ICs that can display in red, green, or amber.

[Glen] used an STM8 Nucleo 64 to interface with the panels and wrote a bit of code to help map out what each pin on each machine control plane connector might do. He was able to stream out some packets from the plane that changed as he pressed buttons, and ended up feeding back a brute-force of that packet format to figure out the LED display protocols.

But the LCDs on the crosspoint switch were a more difficult nut to crack. He ended up going back to the original source of the equipment (eBay) to get a working control unit that he could sniff. He laid out a man-in-the-middle board that has a connector on either side with a pin header in the middle for his logic analyzer. As with most LCDs, the secret sauce was the initialization sequence — an almost impossible thing to brute force, yet exceedingly simple to sniff when you have a working system. So far he has them running under USB control, and if you are lucky enough to have some of this gear in your parts box, [Glen] has painstakingly recorded all of the details you need to get them up and running.