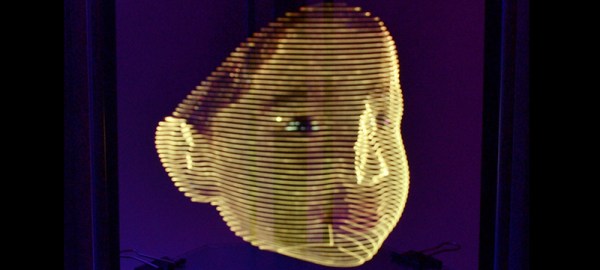
Notification Cube

LED Notification Cube Is A Good First Project

Two years ago, [Matt] made a move away from his software hacks and into the physical world. He was part of a pilot program to provide mentorship to children as part of the Maker Education Initiative. This program gave him access to 3D printers, CNC machines, and laser cutters within the New York Hall of Science makerspace. [Matt] chose to build an illuminated notification cube for his first physical project. The idea being that smart phones have so many alerts, many of which are unimportant. His project would help him to visualize and categorize each alert to better understand its importance.

The brain of the system is a Raspberry Pi. [Matt] found a Python library that allowed him to directly control an RGB LED strip based on the LPD8806 chip. He wired the data pins directly to the Pi and used an old 5V cell phone charger to power the LEDs. The strip was cut into smaller strands. Each face of the cube would end up with three strands of two LEDs each, or six LEDs per side. [Matt] found a mount for the Pi on Thingiverse and used a 3D printer to bring it into existence. The sides were made of frosted laser cut acrylic. The frosted look helps to diffuse the light from the LEDs.

Over time [Matt] found that the cube wasn’t as useful as he originally thought it would be. He just didn’t have enough alerts to justify the need. He ended up reprogramming the Pi to pull weather information instead, making use of the exact same hardware for another, more useful purpose.

Nyan Cat

Embroidered Nyan Cat Brings A Meme To The Real World

Have you ever come across an Internet meme and just thought to yourself, “I have to bring this into the physical world!” Well [0xb3nn] and [Knit Knit] did. They decided to take the classic nyan cat meme and bring it to life.

The frame is 24″ x 36″. Many hours went into the knitting process, but the result obviously turned out very well. The stars include 24 LED sequins to add a sparkling animation effect. These were sewn onto the back of the work using conductive thread. They are bright enough to shine through to the front where needed. These connect back to an Arduino Pro Mini 5V board.

The Arduino is also connected to a capacitive touch sensor. This allows the user to simply place their hand over the nyan cat image to start the animation. No need for physical buttons or switches to take away from the visual design. An Adafruit AudioFX sound board was used to play back a saved nyan cat theme song over a couple of speakers. The source code for this project is available on github. Be sure to watch the demo video below. Continue reading “Embroidered Nyan Cat Brings A Meme To The Real World”

LEDs Strips Tell You The Trains Aren’t Running

[James] is a frequent user of the London Underground, a subway system that is not immune to breakdowns and delays. He wanted a way to easily tell if any of the trains were being disrupted, and thanks to some LEDs, he now has that information available at a glance without having to check a webpage first.

Inspired by the Blinky Tape project at FT Engineering, [James] thought he could use the same strip of addressable LEDs to display information about the tube. A Raspberry Pi B+ gathers data from the London Underground’s TfL API and does a few calculations on the data. If there is a delay, the LEDs in the corresponding section of the strip will pulse, alerting the user to a problem with just a passing glance.

The project is one of many that displays data about the conditions you’ll find when you step outside the house, without having to look at a computer or smartphone. We recently featured an artistic lamp which displays weather forecasts for 12 hours into the future, and there was an umbrella stand which did the same thing. A lot is possible with LEDs and a good API!

Continue reading “LEDs Strips Tell You The Trains Aren’t Running”

Fibonacci Clock Is Hard To Read, Looks Good

Artists have been incorporating the golden ratio in their work for many hundreds of years, and it is thought that when proportions are in line with this ratio, it tends to be more aesthetically pleasing. With that in mind, the clock that [Philippe] created must mathematically be the best looking clock we’ve ever featured, even if it is somewhat difficult to tell time from it.

The clock is made up of squares which represent the first five numbers of the Fibonacci sequence. The squares are backlit with LEDs, which will illuminate red for the hour, green for the minute, and blue representing the overlap of hours and minutes. Simply add up the red and blue squares to get the hour, and add the green and blue squares to get the minutes. The minutes are displayed in 5 minute increments since there aren’t enough blocks though, so you’ll also have to multiply. Confused yet? If not, it turns out that there are several ways to display certain times using this method, any of which can be randomly selected by the clock. [Philippe] reports that there are 16 different ways to represent 6:30, for example.

The clock is driven by an ATmega328P and is housed in a wooden case. There are schematics and code available on [Philippe]’s site if you want to build your own, there are detailed descriptions of how to tell time with this clock. You’ll probably need those. If you like getting confused by clocks, you might also like this one as well.

Continue reading “Fibonacci Clock Is Hard To Read, Looks Good”

Use A Lamp To See Into The Future

We’ve heard of magic lamps before, but this one is actually real. [Alex] has created a wall-mounted lamp that can tell you what the future will be like; at least as far as the weather is concerned. It is appropriately named “Project Aladdin” and allows you to tell a great deal about the weather at a glance as you walk out of the door.

The lamp consists of twelve LED strips arranged vertically. The bottom strip represents the current hour, and each strip above represents another hour in the future. The color of each strip indicates the temperature, and various animations of the LEDs within each strip indicate wind speed and precipitation.

The system uses a weather forecasting backend built-in Java, which is available on the project’s page. The LEDs are controlled by an application that is written in C, and the entire set of LEDs are enclosed in a translucent housing which gives it a very professional appearance. Be sure to check out the demo video after the break. Be sure to check out some other takes on weather lamps which use regular desk lamps instead of intricate scratch-made LED lamps.

Continue reading “Use A Lamp To See Into The Future”

An Introduction To Individually Addressable LED Matrices

The most fascinating project you can build is something with a bunch of blinky hypnotic LEDs, and the easiest way to build this is with a bunch of individually addressable RGB LEDs. [Ole] has a great introduction to driving RGB LED matrices using only five data pins on a microcontroller.

The one thing that is most often forgotten in a project involving gigantic matrices of RGB LEDs is how to mount them. The enclosure for these LEDs should probably be light and non-conductive. If you’re really clever, each individual LED should be in a light-proof box with a translucent cover on it. [Ole] isn’t doing that here; this matrix is just a bit of wood with some WS2812s glued down to it.

To drive the LEDs, [Ole] is using an Arduino. Even though the WS2812s are individually addressable and only one data pin is needed, [Ole] is using five individual data lines for this matrix. It works okay, and the entire setup can be changed at some point in the future. It’s still a great introduction to individually addressable LED matrices.

If you’d like to see what can be done with a whole bunch of individually addressable LEDs, here’s the FLED that will probably be at our LA meetup in two weeks. There are some crazy engineering challenges and several pounds of solder in the FLED. For the writeup on that, here you go.

[Mike] Illuminates Us On LED Filaments

LED filaments started showing up in light bulbs a few months back. [Mike] discovered that the strips are available in bulk from ebay and Alibaba. Always keen to work with new LED technologies, [Mike] ordered a few for experimenting and posted the results on his [mikeselectricstuff] YouTube channel. He also added the information to his website.

The filaments consist of 28 LEDs connected in series. The blue LEDs are covered by the typical yellow phosphors to make them glow white. It’s interesting to note that some of the filaments use a removable silicone sleeve to hold the phosphor coating, while others are coated with a resin material. The LEDs themselves are bare dies mounted to a metal strip and joined by bond wires. The entire strip can be bent, but be careful, or you’ll break the fragile bond wires.

The strips do require a fair bit of voltage to operate. The entire strip runs best at around 75 and 10~15 mA, while putting out about 1 Watt of light. [Mike] tested a strip to destruction by pumping 40 mA through it. Predictably the strip went out when the bond wires melted. The surprising part was that the strip blinked back on as the wires cooled and re-connected. The strip and wires were working as a temperature controlled switch, similar to the bimetalic strip found in old fashioned “twinkling” incandescent Christmas lights.

Not satisfied with simple tests, [Mike] went on to build a clock using the filaments as elements of a seven segment display. Inspired by numitron and minitron displays, [Mike] built a single sided PCB which held the clock circuit on the bottom and the LED filaments on top. The filaments are spaced off the board by tall wire wrap sockets, which proved to be difficult to keep from shorting out. Texas Instruments TPIC6B595 chips were used to control the LED filaments. Logically the chip functions the same as a 75LS595, which means it can be driven with a SPI bus. The open drain outputs can handle 50 volts – which makes them perfect for this application.  The clock is tremendously bright, but there is still a bit of room for improvement. [Mike] notes that the phosphor of un-powered filaments tend to glow a bit due to light absorbed from nearby illuminated filaments. He’s experimenting with color filters to reduce this effect. At full power though, [Mike] says this clock would easily be daylight readable, and we don’t doubt it!

[Mike’s] final test was a bit whimsical – he built a cube entirely from the LED filaments. The cube looks awesome, but we can’t wait to see who will move things into the 4th dimension and build a tesseract!

Continue reading “[Mike] Illuminates Us On LED Filaments”