Casio F-91W, Going Dark

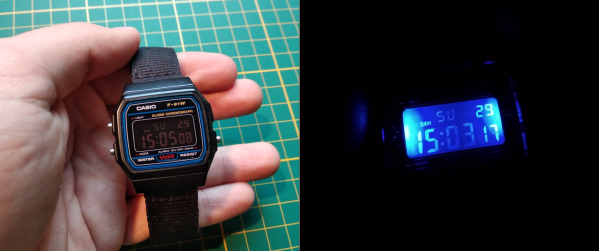
The Casio F-91W is easily one of the most iconic and popular watches worldwide. But what’s cool about having the same exact thing as millions of other people? Not much, unless of course you modify it to make it your own. That’s exactly what [Gautchh] did to their beloved watch. Between permanent dark mode, stereo blue LED backlights, and a new strap, this timepiece really stands out from the crowd.

Once [Gautchh] got the watch open, the first order of business was to re-polarize the LCD with a different film so the digits are light and the background is dark. This watch ships with a single green backlight LED that’s fairly faint, so [Gautchh] upgraded it to bright blue and added a second 1206 LED in parallel on the other side of the readout. Finally, they replaced the rubber strap with something less likely to chafe.

We think dark mode looks great, though [Gautchh] says it requires a little bit of training to hold your wrist just right to make it readable. They make these mods look easy, but they likely aren’t for the faint of heart. If you want to give it a shot, there are good step-by-step instructions and several pictures to help out.

We’ve seen a lot of Casio F-91W projects over the years, including a method for waterproofing the internals. If you have a lot of love for this watch, why not make a giant version?

Remoticon Video: Making Glowy Origami With Charlyn Gonda

Hacking is about pushing the envelope to discover new and clever ways to use things in ways their original designers never envisioned. [Charlyn Gonda]’s Hackaday Remoticon workshop “Making Glowly Origami” was exactly that; a combination of the art of origami with the one of LEDs. Check out the full course embedded below, and read on for a summary of what you’ll find. Continue reading “Remoticon Video: Making Glowy Origami With Charlyn Gonda”

Can You Use An Easy-Bake Oven For Reflow Soldering?

The answer is yes, yes you can. As long as you have one made after about 2011, at least. In the video after the break, [Blitz City DIY] takes us briefly through the history of the venerable Easy-Bake Oven and into the future by reflow soldering a handful of small blinky boards with it.

You’re right, these things once used special light bulbs to cook pint-sized foods, but now they are legit ovens with heating elements that reach 350°F and a little above. The only trouble is that there’s no temperature controller, so you have to use low-temperature solder paste and an oven thermometer to know when to pull the little tray out. Other than that, it looked like smooth sailing.

If you’re only doing a board every once in a while, $40 for a reflow oven isn’t too shabby. And yeah, as with all ovens, once you’ve reflowed a board in it, don’t use it for food.

If you’d rather build an oven, high-powered light bulbs will still do the trick.

Continue reading “Can You Use An Easy-Bake Oven For Reflow Soldering?”

Atreus Gets A TrackPoint And Layer LEDs

Fancy, split keyboards are cool and all, and they can really help with repetitive strain injury issues depending on a lot of different factors. But the big, glaring problem is that they often lack nice features that regular keyboards have — things like a number pad, media buttons, or in [discordia]’s case, a ThinkPad-style pointing stick. Fortunately, there’s a perfect spot for one between the two halves of the Keyboardio Atreus.

[discordia] is happy with the Atreus, but the whole layers thing can take some getting used to. Since Atreus only has 44 keys, it utilizes a layering system to change their function to cover all the keys you’d find on a full keyboard. After getting stuck in one rarely-used layer for a while, they decided to remedy the situation with some RGB LEDs to indicate the active layer. If you’ve got an Atreus that could use a few upgrades, check out [discordia]’s step-by-step instructions for adding a trackpoint and one-wire RGB LEDs.

If you have an old enough ThinkPad on your hands, then you may want to liberate the clicky keyboard, too.

Infinity Mirror Guitar Shreds Forever

Just when we thought there was nothing left to make into an infinity mirror, [Burls Art] goes and builds something that seems obvious now that it exists — an infinity mirror guitar. Check out the build video after the break, where [Burls Art] gets right to it without wasting any time.

He started by making a 3/4″ wood frame for the body and the one-piece neck and headstock. The acrylic on the top has two-way mirror film, and the back piece is painted with mirror paint to get the infinity effect going. [Burls Art] also fashioned acrylic boxes for the pickup and the electronics. Those are both buffed to be frosty, so the lights reflect nicely off of them.

There’s nothing super-fancy going on with the electronics, just some app-controlled RGB LEDs. We would love to see a version where the LEDs respond in real time to the music. The effect is still quite cool, so if you don’t want to watch the whole build, at least check out the demo at the end where [Burls Art] plays a riff. Never has a delay pedal been so appropriate.

If you’re not much of a luthier, don’t fret about not being able to make a cover version. We’ve seen plenty of infinity mirrors, but if you want something useful, whip up some infinity drink coasters.

Continue reading “Infinity Mirror Guitar Shreds Forever”

Circuit Sculpture Breathes Life Into Discrete Components

We’ve probably all given a lot of thought to breathing this year in various contexts. Though breathing is something we all must do, this simple act has become quite the troublemaker in 2020. They say the best art imitates life, and [bornach]’s Astable Exhalation certainly does that, right down to the part about astability. It’s especially interesting that the end result — breathing, visualized — is so calming, it could almost be a meditative device.

There is nary a microcontroller to be found on this circuit sculpture, which uses a pair of astable multivibrator(s) to light two sets of LEDs that represent air being inhaled and exhaled. We like that [bornach] used two sized of exhale LEDs to represent droplets and aerosols in this beautiful circuit sculpture, and we love that most of the components were scavenged from old electronics and older projects.

Our Circuit Sculpture Challenge runs until November 10th, so even if you’re waiting to take the Remoticon workshop before entering, there’s still a little bit of time to whip something up afterward in the post-con adrenaline rush phase. If you need inspiration, check out some of the other contest entries or just surf through all things circuit sculpture.

Continue reading “Circuit Sculpture Breathes Life Into Discrete Components”

POV LED Staff Takes Art For A Spin

The human body does plenty of cool tricks, but one of the easiest to take advantage of is persistence of vision (POV). Our eyes continue to see light for a fraction of a second after the light goes off, and we can leverage this into fun blinkenlight toys like POV staffs. Sure, you can buy POV staffs and other devices, but they’re pretty expensive and you won’t learn anything that way. Building something yourself is often the more expensive route, but that’s not the case with [shurik179]’s excellent open-source POV staff.

There’s a lot to like about this project, starting with the detailed instructions. It’s based on the ItsyBitsyM4 Express and Adafruit’s Dotstar LED strips. You could use the Bluetooth version, but it’s already quite easy to load images to the staff because it shows up as a USB mass storage device. We like that [shurik179] added an IMU and coded the staff so that the images look consistent no matter how fast the staff is spinning. In the future, [shurik179] might make a Bluetooth version that’s collapsible. That sounds like quite the feat, and we can’t wait to see it in action.

As cool as it is to wave a POV staff around, there’s no real practical application. What’s more practical than a clock?