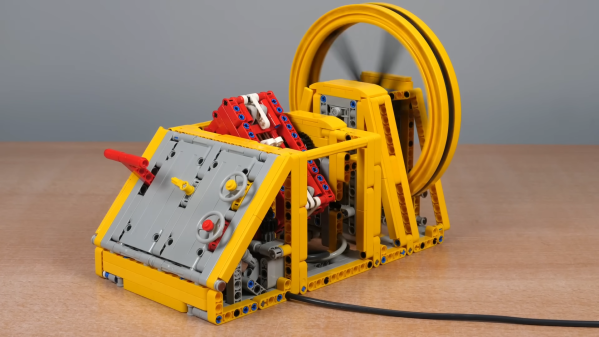
LEGO Rig Makes Pretty Water Vortexes

LEGO and its Technic line is a great way to learn about all kinds of mechanical things, but it’s also just a whole lot of fun to play with. We suspect the latter reason is what got [Brick Technology] to pursue creating a trippy water vortex with the building toy.

The first design uses a transparent plastic sphere as a water vessel. Inside the sphere is placed a small turbine, turned from the outside via a magnetic coupling. This means the sphere can remain intact, with no holes required, nor complicated seals which can leak. It works well, and produces a vortex when the turbine is spun by a regular LEGO motor. A second attempt elects to rotate the entire sphere itself. Small LEGO wheels are then used to hold the sphere in place on the rapidly spinning turntable. The results are impressive, creating a large and relatively well-formed vortex.

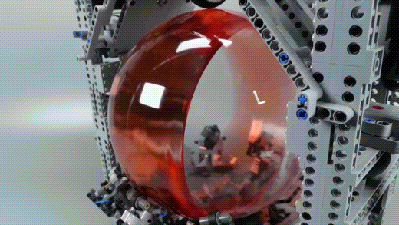
Naturally, though, the video saves the best for last. The big transparent sphere is installed in a rig that surrounds it completely. The sphere itself is spun up thanks to wheels installed on two different axes. This allows the sphere to be spun in various directions under command from a PlayStation controller, creating more complicated vortexes and flow patterns. A set of swiveling casters are provided to hold the sphere in place as it rotates in various directions, and are damped with springs and rubber bands to stop the rig shaking itself apart.

Is there much purpose to this? Well, not on the surface level, no. However, it would certainly make one heck of a rig for shaking up cocktails. Or, if for some reason you need a noisy yet attractive centrifugal separator, maybe this could do the trick. Continue reading “LEGO Rig Makes Pretty Water Vortexes”

Simple Hacks To Make LEGO Train Track Out Of Other Pieces

LEGO trains are fun to play with, but as with any model train, you so seldom have enough track to fulfill your greatest desires. YouTuber [brick_on_the_tracks] has come up with some creative ideas of his own to make track compatible with Lego trains using other techniques.

TRAINED LEGO PROFESSIONALS! DO NOT ATTEMPT IN REAL LIFE!

The most straightforward is to use the LEGO fence piece, first released in 1967. They can be laid in two rows, four studs apart, and they’ll serve as perfectly functional train track. It’s a 100% legal building technique as per the official LEGO rules, too. Official track pieces can be linked up by placing them on a 1-stud-high booster. [brick_on_the_tracks] argues that it’s up to nine times cheaper than using official track, but it depends on how you’re building your layout, and you need to take into account the need for a base plate.

On the sillier side of things, it’s actually possible to use mini-figures as track, too. Again, it’s a 100% legal technique, though the trains don’t run as smoothly compared to the fence track. It’s very amusing, though, and could be a fun addition to a build you’re taking to a local LEGO convention.

If you’re really strapped for cash though, you can go as far as using cardboard. It’s not legal in the LEGO world, and it’s pretty basic, but you could literally make up a layout using nothing but a craft knife and pizza boxes. We’ve actually featured other LEGO train hacks before, like this neat automatic decoupler design.

Continue reading “Simple Hacks To Make LEGO Train Track Out Of Other Pieces”

How To Become A Lego Submariner

A submarine is by necessity a complex and safety-critical machine, but the principle upon which it depends is quite simple. The buoyancy is variable by means of pumping water in and out of tanks, allowing the craft to control the depth at which it sits. The [Brick Experiment Channel] has a series of posts describing in detail the construction of a working submarine, with a hull made from a plastic tube and mechanics made from Lego.

In this submarine the buoyancy tank is a syringe operated by a Lego motor, and the propulsion comes courtesy of a pair of Lego motors driven through ingenious magnetic couplings to avoid a shaft seal. To monitor depth there is both a laser distance sensor and a pressure sensor, and there is a Raspberry Pi Zero to control the whole show.

In the video below the break you can see the craft in action as it zips around a swimming pool at different depths, before setting off on a longer journey with on-board footage along a shady creek. It’s an extremely practical submarine, and one we wish we could try.

This is version 4.0, and it shows.  We had a look at version 3.0 last year, and it’s by no means the first submarine we’ve featured, here’s one made from PVC pipe.

Continue reading “How To Become A Lego Submariner”

There’s A LEGO Suspension Dyno Now

When it comes to the development and testing of performance suspension, it’s helpful to have a test apparatus that lets you recreate certain conditions reliably. This LEGO suspension dyno does just that, and it’s clearly a big help for those doing R&D on minifig motorcycle suspension.

The build relies on four motors to overcome the resistance of turning a chunky conveyor belt, which acts as a rolling road. As the belt is built out of Technic beams, various LEGO blocks can be added to the conveyor to act as bumps or perturbations for testing suspension.

The video demonstrates the use of the dynamometer, showing how a simple LEGO motorbike design deals with bumps of various sizes. It’s easy to swap out forks and springs and change the geometry to tune the suspension, and the changes can be easily seen when running it through the same test conditions.

While we don’t imagine there are too many people working in this particular field, the lessons being taught here are valuable. This setup allows one to quickly visualize how changing vehicle parameters affects handling. It’s hard to imagine a better teaching tool for vehicle dynamics than something like this that lets you see directly what’s really going on!

Continue reading “There’s A LEGO Suspension Dyno Now”

The blue LEGO brick described, with the OLED inside shining through the 3D-printed and subsequently cast brick body. The picture on the small OLED imitates the lines of text shown on the brick that this is an imitation of.

Computer-Shaped LEGO Brick Brought To Life

In childhood, many of us wondered — wouldn’t it be cool if our miniature toys had “real” functions? Say, that our toy cars actually were able to drive, or at least, that the headlights could light up. [James Brown] captures some of this childhood expectation of magic, recreating the 2×2 45°-sloped Lego bricks with computer screens and panels drawn on them by building a LEGO brick (thread, nitter) with an actual display inside of it.

This is possible thanks to an exceptionally small OLED display and a microcontroller board that’s not much larger. It’s designed to plug onto a LEGO platform that has an internal 9V battery, with power exposed on the brick’s studs. [James] has taken care building this — the brick was built with help of a tiny 3D-printed form, and then, further given shape by casting in what appears to be silicone or resin.

We’ve yet to hear more details like the microcontroller used — at least, the displays look similar to the ones used in a different project of [James]’, a keyboard where every keycap has a display in it (thread, nitter). Nevertheless, it is lovely to witness this feat of micro-engineering and fabrication. It reminds us of an another impressive build we covered recently — a 1/87 scale miniature Smart Car that’s as functional as you can get!

Continue reading “Computer-Shaped LEGO Brick Brought To Life”

A system that stores data on LEGO bricks

How To Use LEGO Bricks For Data Storage

Those old enough to have encountered punch cards in their lifetime are probably glad to be rid of their extremely low data density and the propensity of tall stacks to tip over. But obsolete as they may be, they’re a great tool to show the basics of binary data storage: the bits are easily visible and can even be manipulated with simple tools. As an experiment to re-create those features in a more modern system, [Michael Kohn] made a punch card-like system based on LEGO bricks that stores machine code instructions for a 65C816 CPU, the 16-bit successor to the venerable 6502.

Bits are stored on a white 8×20 stud board, onto which small black pieces are placed. A white background stud encodes a logic “zero”, while a black stud encodes a logic “one”. The bits are read out by an array of reflectance sensors, which conveniently has the same 8 mm pitch as standard LEGO studs. A big wheel driven by a stepper motor slides the data card under the readout circuit along a short stretch of LEGO train tracks.

The optical sensors are read out by an MSP430 series microcontroller, which also drives the motor through a stepper motor driver. Once the data is read out, the bytes are transferred into a WDC W65C265SXB board, which executes them as machine code instructions on its 65C816 CPU. In the video below, you can see a program being loaded that blinks an LED.

We’ve featured educational punch-card systems before, like this Raspberry Pi-based model. If you’ve got a bunch of actual punch cards that need reading out, check out this Arduino-powered readout system.

Continue reading “How To Use LEGO Bricks For Data Storage”

Lego Fourteen-Segment Display Needs Plenty Of Motors

Hackers love 7-segment displays, and will gladly wax lyrical about the silly words you can almost spell on them and so on. Less appreciated are their bigger cousins, the fourteen and sixteen segment displays, which get all alphanumeric about things and are thus much easier for humans to read. You can even build the former out of Lego, as [ord] demonstrates.

A look at the mechanism driving the display.

The “segments” are made up of Lego shafts that are pushed up through a yellow matrix of holes when they are switched “on.” A full seven motors are used to make the single-character display work, each one driving two segments. Two Lego Powered Up controller bricks are required to drive everything going on here, making the final design not just mechanically complicated, but electronically complicated as well.

Amusingly, those don’t come cheap, either; the parts total cost of this build is likely somewhere between $50-100 US. You probably don’t want to build an entire scrolling message board using this design, even if it does look resplendent in black and taxi yellow.

We’ve seen [ord]’s work before, too, in the form of these mechanically magnificent 7-segment Lego displays. Video after the break.

Continue reading “Lego Fourteen-Segment Display Needs Plenty Of Motors”