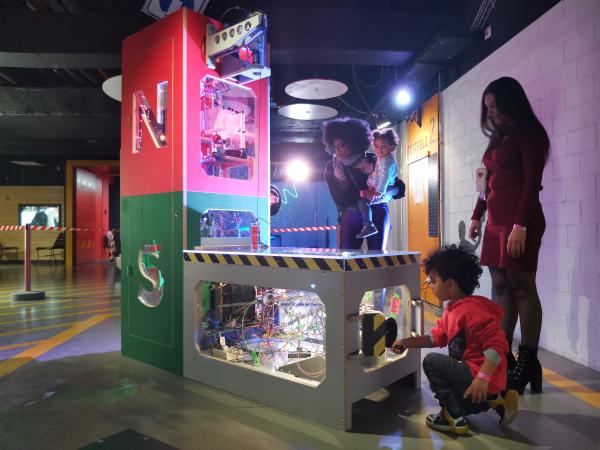
Modular Box Design Eases Silicone Mold-Making

Resin casting is a fantastic way to produce highly detailed parts in a wide variety of colors and properties, and while the process isn’t complicated, it does require a certain amount of care and setup. Most molds are made by putting a part into a custom-made disposable box and pouring silicone over it, but [Foaly] was finding the process of making and re-making those boxes a bit less optimized than it could be. That led to this design for a re-usable, modular, adjustable mold box that makes the workflow for small parts considerably more efficient.

The walls of the adjustable box are four identical 3D-printed parts with captive magnets, and the base of the box is a piece of laser-cut steel sheet upon which the magnetic walls attach. The positioning and polarity of the magnets are such that the box can be assembled in a variety of sizes, and multiple walls can be stacked to make a taller mold. To aid cleanup and help prevent contamination that might interfere with curing, the inner surfaces of each piece are coated in Kapton tape.

The result is a modular box that can be used and re-used, and doesn’t slow down the process of creating and iterating on mold designs. The system as designed is intended for small parts, but [Foaly] feels there is (probably) no reason it can’t be scaled up to some degree. Interested? The design files are available from the project’s GitHub repository, and if you need to brush up a bit on how resin casting works, you can read all about it here.

Guitar With Hot-Swappable Pickups Lights Our Fire

There’s a story that goes something like this: Chet Atkins was playing his guitar when someone remarked, ‘that guitar sounds great!’ Mr. Atkins immediately stopped playing and asked, ‘how does it sound now?’ While it’s true that the sound ultimately comes from you and your attention to expression, we feel that different pickups on the same guitar can sound, well, different from each other.

However, this is merely speculation on our part, because changing pickups is pretty serious surgery, and there’s only one company out there making guitars with hot-swappable pickups. Since their low-end model is out of most people’s price range, [Mike Lyons] took one for the team and decided to build a guitar from scratch to test out various pickups of any size, from lipstick to humbucker. [Mike] can swap them out in under a minute, and doesn’t need any tools to do it.

[Mike] modeled the swapping system on that one company’s way of doing things, because why reinvent the wheel? The pickups are inserted through the back and held in place with magnets and a pair of cleverly-designed printed pieces — one to mount the pickup to, and the other inside the pickup cavity.

As far as actually connecting the things up, [Mike] went with a commercially-available quick-connect pickup solution that uses a mini four-conductor audio plug and jack. The body is based on the Telecaster, while the headstock is more Stratocaster — the perfect visual combination, if you ask us.

We are particularly fond of [Mike]’s list of caveats for this project, especially the requirement that it had to be built using only hand tools and a 3D printer. Although a drill press would have been nice to use, [Mike] did a fantastic job on this guitar. Whether you’re into guitars or not, this is a great story of an awesome build.

What, you don’t even have hand tools? You could just print the whole guitar instead.

Adjustable, Low-Impact Keeb Is About As Comfortable As It Gets

What’s the coolest-looking way to ease the repetitive stress of typing without quitting altogether? Move nothing but your fingers, and move them as little as possible without any stretching or reaching. We’ve been fans of the weirdly wonderful DataHand keyboard since we first laid eyes on one, but [Ben Gruver] has actually been using these out-of-production keyboards for years as a daily driver. And what do we do when we love something scarce? Make our own, improved version like [Ben] has done, with the lalboard.

[Ben] has been using the lalboard for about two years now and has a laundry list of improvements for version two, a project we are proud to host over on IO. Many of the improvements are designed to make this massive undertaking a bit easier to print and put together. Version one uses copper tape traces, but [Ben] is working on a fab-able PCB that will use something other than a pair of Teensy 2.0s, and perhaps QMK firmware.

Something that won’t be changing is the fantastic optical key switch design that uses an IR LED and phototransistor to capture key presses, and tiny square magnets to return the key to the home position and deliver what we’re quite sure is a satisfying clack.

The absolute coolest part of this keyboard is that it’s so adjustable. Every key cluster can be adjusted in 6 directions, which includes the ability to dial in different heights for each finger if that’s what works best. Once that’s all figured out, then it’s time to print some perfect permanent standoffs. Want to make one of these sci-fi clackers for yourself? [Ben] has the BOM, some printing instructions and tips, and a guide to making the copper tape PCBs over on GitHub. Check it out in action after the break as [Ben] rewrites Kafka’s Metamorphosis at 120 WPM.

Interested in learning more about the original DataHand keyboard? Here’s our take.

Continue reading “Adjustable, Low-Impact Keeb Is About As Comfortable As It Gets”

PCB Bath Comes From Russia With Love

[Ruvin Kub] likes magnets, a lot. Most of his projects feature some sort of magnet and his PC board agitation bath is no exception. You can see a video about the device, below. We’ll admit our Russian is pretty rusty, but if you ask YouTube nicely it will translate the Russian subtitles into whatever language you like.

One of the things we liked about the video was that he uses hydrogen peroxide, citric acid, and salt as an etchant. We’ve seen the same mix with vinegar or muriatic acid instead of citric acid. We aren’t sure what the actual  translation is about why he doesn’t like ferric chloride, but YouTube says, “she’s too gloomy for my light souls.”

Continue reading “PCB Bath Comes From Russia With Love”

Wireless Mouse Gets A Charging House

Mouse batteries always seem to die at the worst possible moment, like when you’re in the middle of pwning noobs or giving a presentation at work. [AyhamAS] was tired of having to look around for a replacement battery and decided to build a nice little charging dock for their mouse.

At the heart of this build is a TC4056A charging board inside the dock. Since this board is designed to charge 3.7 V batteries, [AyhamAS] removed the charge current-limiting resistor and replaced it with a pair of through-hole resistors. A switch on the back of the dock lets [AyhamAS] choose between the two values for fast or slow charging.

On the mouse side, [AyhamAS] cleverly used the receiver storage cubbyhole to house the contacts. Magnets in in the mouse and the dock and spring-loaded contacts add even more tactile feedback to the whole experience. The dock itself looks great, too — it’s made from acrylic that’s been sanded down to a matte finish. Check out the build video after the break.

If your mouse has a battery pack, you could always upgrade to a bigger one as long as there’s room.

Continue reading “Wireless Mouse Gets A Charging House”

Wooden Disc Player Translates Binary Back Into Text

[jbumstead] used MATLAB to convert the text messages into binary to be cut out of the disk.
[jbumstead] wanted to demonstrate the idea of information-storing devices such as LPs, CDs, and old hard drives. What he came up with lies directly at the intersection of art and technology: an intricately-built machine that plays beautiful collaged wooden disks. Much like the media that inspired the Wooden Disk Player, it uses a laser to read encoded data, which in this case is short bits of text like “Don’t Panic”.

These snippets are stored in binary and read by a laser and photodiode pair that looks for holes and not-holes in the disk. The message is then sent to an Arduino Nano, which translates it into English and scrolls the text on an LED matrix. For extra fun, the Nano plays a MIDI note every time it reads a 1, and you can see the laser reading the disk through a protective acrylic shield.

Though the end result is fantastic, [jbumstead] had plenty of issues along the way which are explored in the build video after the break. We love it when people show us their mistakes, because it happens to all of us and we shouldn’t ever let it tell us to stop hacking.

If anyone knows their way around lasers, it’s [jbumstead]. We loved playing their laser harp at Supercon!

Continue reading “Wooden Disc Player Translates Binary Back Into Text”

Print Your Way To Keyboard Stability

Keyboard key stabilizers, or stabs as they’re known in enthusiast circles, do exactly what you’d expect — they stabilize longer keys like the Shifts and the space bar so that they don’t have to be struck dead-center to actuate evenly. Stabs work by flanking the key switch with two non-functional switch actuators linked with a thick wire bar. Some people love stabs and insist on stabilizing every key that’s bigger than 1u, while other people think  stabs are more trouble than they’re worth for various reasons, like rattling.

[Riskable 3D Printing] has been working on a parametric, printable stabilizer system for Cherry MX caps that uses small disk magnets to keep the wire in place. As you can see in the video (embedded after the break), the result is a crisp clacker that doesn’t rattle. The magnets stabilize the wire, so it snaps back quite nicely.

Although the print is an easy one, [Riskable] says the design process wasn’t as cut and dried as it seems. The center points of the stabilizer stems aren’t supposed to be in the center of cutouts, even though it looks that way to the naked eye. After that, the pain point has shifted to the wire, and getting it as straight as possible before making the necessary bends. [Riskable] is going to make a straightener to help out, and we suggest something like this one.

Clacker hacking is quite the rabbit hole, especially when combined with 3D printing. We recently saw a completely 3D-printed macro pad, springs and all.

Continue reading “Print Your Way To Keyboard Stability”