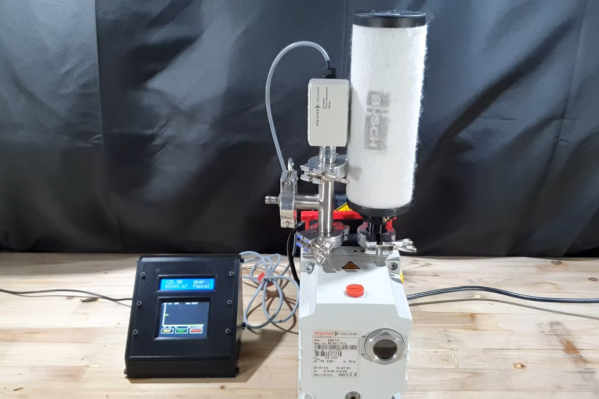
A Low-Cost Current Probe For IoT Applications

When it comes to the Internet of Things, many devices run off batteries, solar power, or other limited sources of electricity. This means that low power consumption is key to success. However, often these circuits draw relatively small currents that are difficult to measure, with plenty of transient current draw from their RF circuits. To effectively measure these low current draws, [Refik Hadzialic] built a cheap but accurate current probe.

The probe consists of a low value resistor of just 0.1 Ω, acting as a current shunt in series with the desired load. By measuring the voltage drop across this known resistor, it’s possible to calculate the current draw of the circuit.

However, the voltage drop is incredibly small for low current draws, so some amplification is needed. [Refik] does a great job of explaining his selection process, going deep into the maths involved to get the gain and part choice just right. The INA128P instrumentation amplifier from Texas Instruments was chosen, thanks to its good Common Mode Rejection Ratio (CMRR) and gain bandwidth.

The final circuit performs well, competing admirably with the popular uCurrent Gold measurement tool. While less feature-packed, [Refik]’s circuit appears to perform better in the noise stakes, likely due to the great CMRR rating of the TI part. It’s a great example of how the DIY approach can net solid results over and above simply buying something off the shelf.

Current sensing is a key skill to have in your toolbox, and can even help solve laundry disputes. Video after the break.

Continue reading “A Low-Cost Current Probe For IoT Applications”

If You Need A Measurement Tool Just Build A Measurement Tool

[Darlan Johnson] was working on a wearable project and needed a way to measure the change in voltage and current over time. 

Most measurement tools are designed to take snapshots of a system’s state in a very small window of time, but there are few common ones designed to observe and log longer periods. It’s an interesting point, for example, many power supply related failures such as resets occur sporadically. Longer timescale measuring devices could pick these up.

[Darlan] had a ton of Feathers and shields lying around, and combined them into the needed instrument. An INA219 current sensor records the measurements. They are then displayed on a TFT and logged to an SD card. Everything is bundled into a neat 3D printed case along with a battery for wireless operation. A set of barrel connectors provide the breakout to split the wires for the current measurement.

It’s a neatly done hack and we can see it as a nice addition to any hacker’s measurement drawer.

2D-Scanner Records Surfboard Profiles For Posterity

[Ryan Schenk] had a problem: he built the perfect surfboard. Normally that wouldn’t present a problem, but in this case, it did because [Ryan] had no idea how he carved the gentle curves on the bottom of the board. So he built this homebrew 2D-scanner to make the job of replicating his hand-carved board a bit easier.

Dubbed the Scanbot 69420 – interpretation of the number is left as an exercise for the reader, my dude – the scanner is pretty simple. It’s just an old mouse carrying a digital dial indicator from Harbor Freight. The mouse was gutted, with even the original ball replaced by an RC plane wheel. The optical encoder and buttons were hooked to an Arduino, as was the serial output of the dial indicator. The Arduino consolidates the data from both sensors and sends a stream of X- and Z-axis coordinates up the USB cable as the rig slides across the board on a straightedge. On the PC side, a Node.js program turns the raw data into a vector drawing that represents the profile of the board at that point. Curves are captured at various points along the length of the board, resulting in a series of curves that can be used to replicate the board.

Yes, this could have been done with a straightedge, a ruler, and a pencil and paper – or perhaps with a hacked set of calipers – but that wouldn’t be nearly as much fun. And we can certainly see applications for this far beyond the surfboard shop.

Frequency Counting A Different Way

Counting frequency is one of those tasks that seems simple on the face of it, but actually has quite a bit of nuance. There are two obvious methods, of which the first is to count zero crossings for some period. If that period is one second you are done, otherwise it’s a simple enough case of doing the math. That is, if you count for half a second, multiply the result by 2, or if you count for 10 seconds, divide by 10. The other obvious method is to measure the period of a single cycle as accurately as you can. Then there’s this third method.from [WilkoL], which simultaneously counts a known reference clock alongside the frequency to be measured.  You can see the result in the video, below.

The first method is easy but the lower the frequency you want to measure, the longer you have to count to get any real resolution. Also, you need the time base to be exact. For the second method, you need to be able to make a highly precise measurement. The reason [WikolL] chose the third method is that it doesn’t require a very precise time base — a moderately accurate reference oscillator will do. The instrument gets good resolution quickly at both high and low frequencies.  Continue reading “Frequency Counting A Different Way”

Low-Level Analog Measurement Hack Chat

Join us on Wednesday 17 July 2019 at noon Pacific for the Low-Level Analog Measurement Hack Chat with Chris Gammell!

A lot of electronics enthusiasts gravitate to the digital side of the hobby, at least at first. It’s understandable – an Arduino, a few jumpers, and a bit of code can accomplish a lot. But in the final analysis, digital circuits are just analog circuits with the mystery abstracted away, and understanding the analog side opens up a fascinating window on the world of electronics.

Chris Gammell is well-known around hacker circles thanks to his Amp Hour Podcast with Dave Jones, his KiCad tutorials, and his general hacker chops. He’s also got a thing for the analog world, and wants to share some of the tips and tricks he’s developed over his two decades as an electrical engineer. In the next Hack Chat, we’ll be joining Chris down in the weeds to learn the ins and outs of low-level analog measurements. Join us with your questions and insights, or just come along to peel back some of the mysteries of the analog world.

join-hack-chatOur Hack Chats are live community events in the Hackaday.io Hack Chat group messaging. This week we’ll be sitting down on Wednesday July 17 at 12:00 PM Pacific time. If time zones have got you down, we have a handy time zone converter.

Click that speech bubble to the right, and you’ll be taken directly to the Hack Chat group on Hackaday.io. You don’t have to wait until Wednesday; join whenever you want and you can see what the community is talking about.

Hacked Calipers Make Automated Measurements A Breeze

Now, digital calipers with wired interfaces to capture the current reading are nothing new. But the good ones are expensive, and really, where’s the fun in plugging a $75 cable into a computer? So when [Max Holliday] was asked to trick out some calipers for automating data capture, he had to get creative.

[Max] found that cheap Harbor Freight digital calipers have the telltale door that covers a serial connector, making them a perfect target for hacking. A little Internet sleuthing revealed the pinout for the connector as well as some details on the serial protocol used by most digital calipers: 24-bit packets is six four-bit words. [Max] used his SAM32, a neat open-source board with both a SAMD51 and an ESP32 that can run CircuitPython. An inverting buffer interfaces the serial lines to the board, which is just the right size to mount on the back of the caliper head. It’s hard to tell how [Max] is triggering readings, but the SAM32 is mounted as a USB device and sends keystrokes directly to a spreadsheet – yes, with the ESP32 it could have been wireless, but his client specifically requested a wired setup. Taking multiple readings is easy now that the user never has to swap calipers for a pen.

Cheap calipers like these are pretty hackable – you can add Bluetooth, turn them into DROs for a milling machine, or even make them talk.

Digital Multimeasure Helps You Get The Job Done

In any mechanical field of work, accurate measurement is key to success. [Patrick Panikulam] knows this well, and decided to build a device that would be useful for some of the more tricky measurement tasks he was encountering.

[Patrick]’s digital multi-functional measurement tool packs a bunch of useful hardware into a pocket-sized form factor. There’s a Sharp IR distance sensor for non-contact measurements, a rotary wheel encoder for measuring distances along curved lines, and an MPU6050 IMU packing accelerometers and gyroscopes for measuring angles and surface levels. Control is via touch buttons, so measurements can be taken without disturbing the position of the device.

The use cases for such a device are many and varied. [Patrick] reports using it to verify that his 3D printer bed is leveled, as well as using it to measure curved surfaces in order to accurately cut stickers to suit. It’s got the hardware to serve as a digital protractor, too.

Combining a variety of useful hardware into a compact form factor, while also taking into account usability, has netted [Patrick] a handy tool. It’s not dissimilar from commercial measurement tools available online, and yet is completely built from off-the-shelf parts. Truly a handy device to have in any hacker’s toolbox!