
MIDI is normally baked into the chipset of a synthesizer, or something you use a microcontroller to handle. But that’s not the only way to speak the language! [Kevin] decided to have some fun doing MIDI with discrete logic instead, with some pretty neat results.
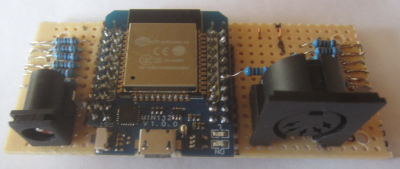
[Kevin] had previously built a control voltage step sequencer called the Baby8, which relied on 4017 counter ICs. He later realized he could repurpose three of his old Baby8 PCBs to create something that could generate MIDI using nothing more than discrete logic. The stack of three boards generate a simple MIDI message—in this case, a two-byte Program Change command. At 8 bits per byte, plus a start and stop bit, that comes out to 20 bits in total. The bits to be sent are configured via the switches on the PCBs, and clocked out through the counter ICs via a clock running at the MIDI baud rate of 31,250 Hz.
Obviously, it’s not very practical to code your MIDI commands manually via DIP switches and then clock them out in this fashion. But—it does work, and you can do it! If you wanted to build an old-school logic circuit that just spits out simple short MIDI commands, this is one way to go about it.
We’ve seen [Kevin]’s work before, too, like this neat musical rotary phone build.
Continue reading “Doing MIDI With Discrete Logic Is Neat, If Not Particularly Useful”


 settled upon a simple linear arrangement of beams held within a laser-cut wooden box frame. Since these laser modules are quite small, some aluminium rod was machined to make some simple housings to push them into, making them easier to mount in the frame and keeping them nicely aligned with their corresponding LDR.


