ESP32 Powers Fresh Take On An IoT Geiger Counter

Over the years we’ve covered many projects aimed at detecting elevated radiation levels, and a fair number of them have been Internet connected in some way. But as they are often built around the Soviet-era SBM-20 Geiger–Müller tube, these devices have generally adhered to a fairly conservative design. With the current situation in Europe heightening concerns over potential radiation exposure, [g3gg0] thought it was a good a time as any to revisit the idea of an Internet-connected Geiger counter using more modern components.

Now to be clear, even this modernized approach still makes use of that same SBM-20 tube. There’s such an incredible wealth of information floating around out there about how to work with them that you’d almost put yourself at a disadvantage to chose something else to base your design on. Put simply, it’s hard to go wrong with a classic.

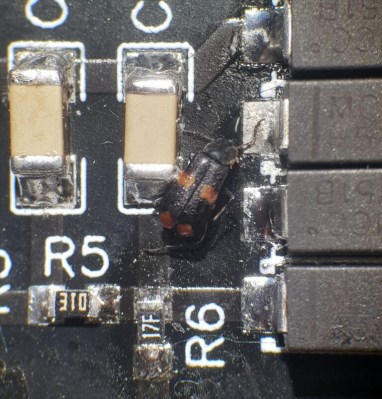
An unfortunate bug was discovered in the HV circuit.

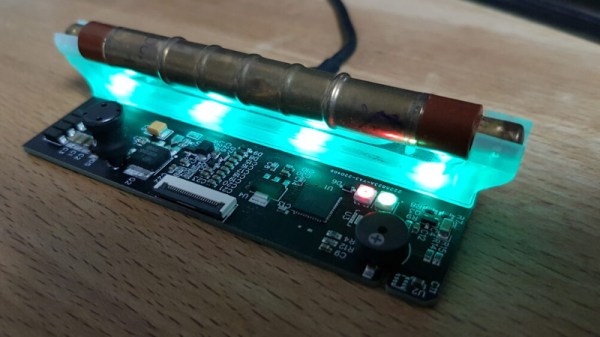
That said, [g3gg0] decided early on that the design would use as many SMD components as possible, a considerable departure from many of the SBM-20 counters we’ve seen. That meant coming up with a new high-voltage power supply capable of providing the tube with the necessary 400 V, which from the sound of things, took a few attempts to complete. The final result is perhaps the smallest and cleanest looking board we’ve ever seen play host to this particular tube.

To run the show, [g3gg0] selected the ESP32-PICO-D4. You certainly don’t need such a powerful microcontroller to read the impulses from the SBM-20 tube and publish them via MQTT, but to be fair, the chip has a number of other duties. It’s handling the WS2812 RGB LEDs that go off in response to detected particles, running the (apparently optional) 2.9 inch WaveShare electronic paper display, and also pulling data from a BME280 environmental sensor as well as a CCS811 VOC sensor — so it’s keeping fairly busy.

As impressive as this build is, we do hate that it had to be built. From certain world leaders dropping casual comments about the strength of their nuclear arsenal to foolhardy attempts to capture the Chernobyl power station, having access to a reliable Geiger counter isn’t an unreasonable precaution right now. For everyone’s sake, let’s hope the fancy RGB LEDs on this particular build remain as dark as possible.

Continue reading “ESP32 Powers Fresh Take On An IoT Geiger Counter”

Farm Data Relay System: Combine LoRa And 2.4 Ghz Networks Without WiFi Routers And Cloud Dependence

Setting up a wireless sensor network over a wide area can quickly become costly, and making everything communicate smoothly can be a massive headache, especially when you’re combining short range Wi-Fi with long range LoRa. To simplify this, [Timm Bogner] created Farm Data Relay System which simplifies the process of combining LoRa, 2.4Ghz modules and serial communications in various topologies over wide areas.

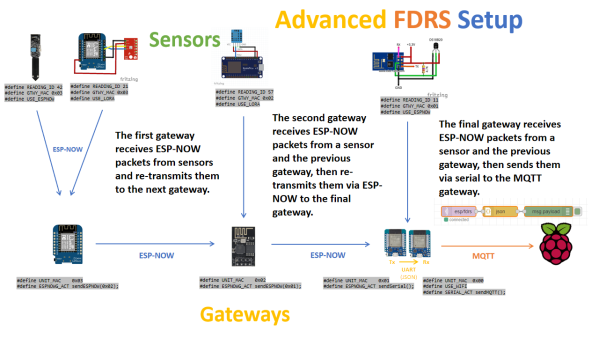
The FDRS uses a combination of ESP32/8266 sensor nodes for short range, and LoRa nodes for long range. The ESP nodes use Espressif’s connectionless ESP-NOW peer-to-peer protocol on which allow multiple ESP boards to communicate directly without the need for a Wi-Fi router. The ESP modules can have one of 3 roles, nodes, repeaters or gateways, and gateways and repeaters share the same code. Nodes take sensor inputs, and are configured to each have a unique READING_ID.

Relays just retransmit ESP-NOW packets to extend the network range, while gateways convert packets between ESP-NOW, MQTT over Wi-Fi, LoRa or serial messages as required. Repeaters and gateways each have a unique UNIT_MAC for addressing. The code that handles communication for the ESP devices is simple and well documented, so you only need to set a few configuration values, and then can focus your efforts on the code required for your specific application.

The hub of the system is a Raspberry Pi running Node-RED which acts as the final MQTT gateway and connects to the ESP MQTT gateways. This means that all the action happens in the local network, without being dependent on an internet connection and cloud service. However, it can still send and receive data over the internet using MQTT or any other protocol as required. Node-RED makes it particularly easy to build custom automations and interfaces.

In the video after the break, Andreas Spiess, the man with the Swiss accent, who also has a hand in the project, goes over all the features, setup and caveats.

Continue reading “Farm Data Relay System: Combine LoRa And 2.4 Ghz Networks Without WiFi Routers And Cloud Dependence”

A brick mailbox with a LIDAR sensor mounted inside

Using A LIDAR Sensor To Monitor Your Mailbox

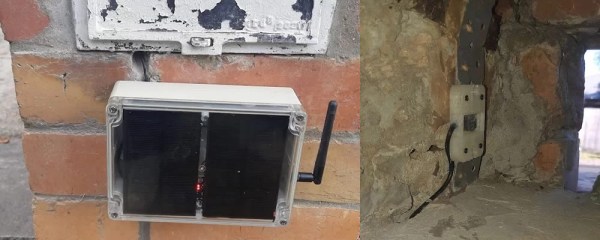
The inconvenience of having to walk to your mailbox to check for mail has inspired many hackers to install automated systems that let them know when the mail has been delivered. Mailbox monitors have been made based on several different mechanisms: some measure the weight of the items inside, some use cameras and machine vision, while others simply trigger whenever the mailbox’s door or flap is moved. When [Gary Watts] wanted to install a notification system for his 1940s brick letterbox, his options were limited: with no flap or door to monitor, and limited space to install mechanical contraptions, he decided to use a LIDAR sensor instead.

Probably best-known for their emerging application in self-driving cars, LIDAR systems send out a laser pulse and measure the time it takes for it to be reflected off a surface. In the case of [Gary]’s mailbox, that surface is either the brick wall or a letter leaning against it. Since letters are inserted through a vertical slot, they will usually be leaning upright against the wall, providing a clear target for the laser.

The LIDAR module, a VL53L0X made by ST, is hooked up to a Wemos D1 Mini Pro. The D1 communicates with [Gary]’s home WiFi through an external antenna, and is powered by an 18650 lithium battery charged through a solar panel. The whole system is housed inside a waterproof plastic case, with the LIDAR sensor attached to the inside of the mailbox through a 3D-printed mounting bracket. On the software side, the mailbox notifier is powered by Home Assistant and MQTT. The D1 spends most of its time in deep-sleep mode, only waking up every 25 seconds to read out the sensor and send a notification if needed.

We’ve seen quite a few fancy mailbox monitors over the years: some are extremely power efficient, some use multiple sensors to allow for different use-cases, and some others are simply beautifully designed.

Remote MQTT Temperature Sensor Shows How It’s Done

First of all, there are definitely simpler ways to monitor remote temperatures, but [Mike]’s remote MQTT temperature sensor and display project is useful in a few ways. Not only does it lay out how to roll such a system from scratch, but it also showcases system features like solar power.

After all, if one simply wants to monitor temperature that’s easily done, but once one wishes to log those temperatures and use them to trigger other things, then rolling one’s own solution starts to get more attractive. That’s where using someone else’s project as a design reference can come in handy.

[Mike’s] solution uses two Wemos D1 boards: one with a DS18B20 temperature sensor for outdoors, and one with a small OLED screen for an interior display. The external sensor relies on a rechargeable 18650 cell and a solar panel for a hassle-free power supply, and the internal sensor (of which there can be many) has a cute enclosure and is powered by USB. On the back end, a Raspberry Pi running an MQTT gateway and Node Red takes care of the operational side of things. The whole system has been happily running for over two years.

What is MQTT? It is essentially a messaging protocol, and takes care of the whole business of reliably communicating data back and forth between IoT devices. It scales very well and doesn’t need to be hard or intimidating; our own [Elliot Williams] can tell you all about implementing it.

NTP server heated with Bitcoin mining dongles

Bitcoin Mining ASICs Repurposed To Keep NTP Server On Track

They say time is money, but if that’s true, money must also be time. It’s all figurative, of course, but in the case of this NTP server heater powered by Bitcoin mining dongles, money actually does become time.

This is an example of the lengths to which Network Time Protocol aficionados will go in search of slightly better performance from their NTP servers. [Folkert van Heusden], having heard that thermal stability keeps NTP servers happy, used a picnic cooler as an environmental chamber for his  Pi- and GPS-based NTP rig. Heat is added to the chamber thanks to seven Block Erupter ASIC miner dongles, which are turned on by a Python script when a microcontroller sends an MQTT message that the temperature has dropped below the setpoint.

Each dongle produces about 2.5 Watts of heat when it’s working, making them pretty effective heaters. Alas, heat is all they produce at the moment — [Folkert] just has them working on the same hash over and over. He does say that he has plans to let the miners do useful work at some point, not so much for profit but to at least help out the network a bit.

This seems like a bit of a long way around to solve this problem, but since the mining dongles are basically obsolete now — we talked about them way back in 2013 — it has a nice hacky feeling to it that we appreciate.

Picture of the automatic blind controller and three servo motors, all in their enclosures, displayed on a table.

Automated Window Blinds Using MQTT And Home Assistant

Finnish software engineer [Toni] is on a quest to modernize his 1991 house, and his latest project was to automate the window blinds and control them using Home Assistant. Unless your blinds have built-in motors, most of the effort of such a project centers around how to integrate and attach the motor — and as [Toni] points out, there are tons of different blinds with all kinds of operating mechanisms. But once you solve that issue, half the battle is over.

These particular blinds require less than one turn of the control rod to go from fully open to fully closed, and [Toni] selects a 270-degree range-of-motion, 20 kg*cm torque servo motor to drive them. He really wanted to install the motor inside the window, but it just wouldn’t fit. Instead, each servo motor is mounted in a custom 3D-printed case installed on the window frame just below the operating rod. An ESP8266-based controller box is installed above the window, hidden behind curtains, and operates all three servos.

On the software side of things, the project is coded in C++ and uploaded using the Ardiono IDE. The blinds communicate to [Toni]’s Home Assistant network using MQTT. All the software is available on the project’s GitHub repository, and the 3D-printed case design is posted on Thingiverse. Even though your blinds may be of a completely different design, we think many parts of [Toni]’s project are still useful — do check out this project if you’re thinking about doing something similar. The notion of motorized window blinds has been around for a some time — we covered one project way back in 2013 and another in 2016. If you have added automation to your window blinds, let us know how it went down in the comments section.

Continue reading “Automated Window Blinds Using MQTT And Home Assistant”

Voice-Controlled Smart Home From The Foundation Up

Smart homes are becoming an increasingly popular way to automate one’s home, whether it’s turning on lights, closing blinds, or even feeding pets. But the commercial offerings often rely on an internet connection to reach servers in order to work, which invites a lot of privacy concerns for a large percentage of us as well as being inconvenient when the internet is down. Essentially the only way to have a privacy-respecting, self-sufficient smart home is to build one on your own from the ground up, which is exactly what [Xasin] has done with this project.

This build is based on ESP32 modules with a Raspberry Pi as a hub, but it’s not as simple as a MQTT implementation. Not only does the self-contained home automation setup not rely on any outside services, but a failure of the central Pi server will not impact the nodes either as they are configured to continue operating independently even without central control. This allows for a robust home automation implementation without a single point of failure, and also includes some other features that are helpful as well including voice control, all while retaining a core design philosophy that makes it relatively easy to build.

Not only is the build technologically impressive for its standalone capabilities and its elimination of privacy concerns, but [Xasin] also did an excellent job with the physical design as well, adding plenty of RGB and a hexagonal enclosure that gives it a unique look wherever its is placed. If you’re renting right now or otherwise unable to interface any automation with your current home, be sure to take a look at some projects that do home automation without making any permanent changes.

Continue reading “Voice-Controlled Smart Home From The Foundation Up”