Handheld MQTT Remote For Home Automation

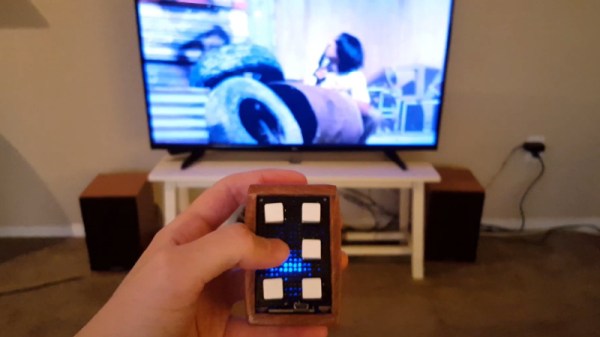
If you’re working on a home automation project, you’re probably knee-deep into MQTT by now. If not, you should be. The lightweight messaging protocol is an ideal choice for getting your “Things” on the Internet, and controlling them all can be done easily through a simple web interface or an application on your mobile device. Or if you’re [serverframework], you make yourself a handsome little all-in-one MQTT remote.

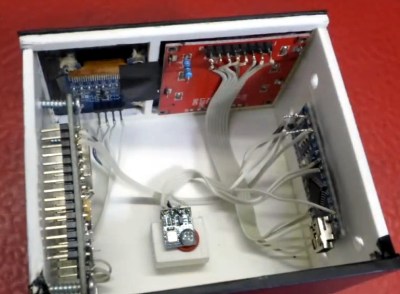
The hardware here is pretty simple; inside there’s just a NodeMCU ESP8266 development board, some buttons, an RGB LED to give feedback, and a 3.7v 1200mAh LiPo battery with associated charging module. Everything is held inside a nice little wooden box that looks like it would fit right in with the living room decor. We’d like to see some kind of a cover over the exposed perfboard the circuit is assembled on, but that’s arguably a personal preference kind of thing.

Most of the magic in this project is actually happening on the software side. Not only does the provided source code handle all the MQTT communications with Home Assistant, but it provides a clever user interface that allows [serverframework] to perform 25 functions with just five buttons. No, you aren’t seeing things. There are actually six buttons on the device, but one of them is a dedicated “power” button that wakes the remote out of deep sleep.

If you’d like to learn more about getting this protocol working for you, our resident MQTT guru [Elliot Williams] has plenty of thoughts on the subject. From his talk at the 2017 Hackaday Supercon to his home automation tutorial series, there’s plenty of information to get you started.

Continue reading “Handheld MQTT Remote For Home Automation”

Fried Desk Lamp Reborn: How To Use ESP8266 To Build Connected Devices

Some hacks are born of genius or necessity, and others from our sheer ham-fisted incompetence. This is not a story about the first kind. But it did give me an excuse to show how easy it is to design WiFi-connected devices that work the way you want them to, rather than the way the manufacturer had in mind.

It started out as a sensible idea – consumer electronics in Vietnam have many different electric plug types for mains AC power: A, C, G, F, and I are fairly present, with A and C being most common. For a quick review of what all those look like, this website sums it up nicely. There are universal power adapters available of course, but they tend to fit my most common type (C) poorly, resulting in intermittent power loss whenever you sneeze. So I figured I should replace all the plugs on my devices to be A-type (common to those of you in North America), as it holds well in all the power bar types I have, mainly leftover server PDUs.

This was very straightforward until I got to my desk lamp. Being a fancy Xiaomi smart lamp, they had opted to hide a transformer in the plug with such small dimensions that I failed to notice it. So instead of receiving a balmy 12 volts DC, it received 220 volts AC. With a bright flash and bang, it illuminated my desk one final time.

Continue reading “Fried Desk Lamp Reborn: How To Use ESP8266 To Build Connected Devices”

DIY Geiger Counter Is Sure To Generate Clicks

On the outside, a Geiger counter seems like a complicated thing. And you might think a device that detects a dangerous, mostly invisible threat like radiation should be complicated. But they’re actually pretty simple. The Geiger-Muller tube does most of the work, which boils down to detecting brief moments of conductivity caused by chain reactions of charged particles in radioactive materials.

[Prabhat_] wanted to build a unique-looking Geiger counter, and we’d say that this slick, Star Trek-esque result succeeds. A well-organized display shows the effective dose rate, counts per minute, and cumulative dose, which can be displayed in either microsieverts or millirems. We dig the 3D printed case design, because we like to see form follow function.

The counter is powered by an 18650 cell that’s DC-to-DC boosted to 400+ volts. A NodeMCU processes the signal coming in from the G-M tube and expresses it in both clicks and LED blinks, both of which can be toggled on or off from the home screen. The alert threshold can be customized in the settings, which means the point at which green changes to red.

Click-click-click past the break for [prabhat_]’s great walk-through video, where he tests it with uranium ore and a thoriated gas lantern mantle.

If you want to take the opposite approach and get to clicking ASAP, well, fire up your hot glue gun and dump out your scrap bin.

Continue reading “DIY Geiger Counter Is Sure To Generate Clicks”

ESP8266 Sound Machine Soothes Baby Remotely

[Zack] had trouble getting his six-month-old to sleep through the night. That was before he found out about ‘shh’ videos on YouTube. These are exactly what they sound like: eight hours of someone whooshing white noise into a microphone. He set a phone up on a charger in the nursery and let one of these play overnight. But the phone was unreliable. It would lock up, or just crash completely, making the baby’s distress worse.

To restore peace in the house, he built a sound machine that both simplifies and fortifies the white noise shh-loution. It uses an ESP8266 and a DFPlayer Mini to loop a lone MP3 file of shh-video audio and play it from a small speaker. By integrating the machine with Home Assistant, he’s able to trigger the sound remotely at baby’s bedtime. ESP Home has no module for the DFPlayer, but [Zack] built one that he’s happy to share.

If you are mired in early parenthood, this is a nice, simple solution. The DFPlayer does all the work of reading from the SD card and converting the signal to analog for speaker output, so there’s no need to get your hands dirty wasting valuable sleeping or kid-playing time.

Once the kid starts toddling out of babyhood, [Zack] could turn to ESP8266-based ambient lighting to help establish the difference between sleep and wake time.

Building A Smarter Smoke Alarm With The ESP8266

The modern hacker wields a number of tools that operate on the principle of heating things up to extremely high temperatures, so a smoke alarm is really a must-have piece of equipment. But in an era where it seems everything is getting smarter, some might wonder if even our safety gear could benefit from joining the Internet of Things. Interested in taking a crack at improving the classic smoke alarm, [Vivek Gupta] grabbed a NodeMCU and started writing some code.

Now before you jump down to the comments and start smashing that keyboard, let’s make our position on this abundantly clear. Do not try to build your own smoke alarm. Seriously. It takes a special kind of fool to trust their home and potentially their life to a $5 development board and some Arduino source code they copied and pasted from the Internet. That said, as a purely academic exercise it’s certainly worth examining how modern Internet-enabled microcontrollers can be used to add useful features to even the most mundane of household devices.

In this case, [Vivek] is experimenting with the idea of a smoke alarm that can be silenced through your home automation system in the event of a false alarm. He’s using Google Assistant and IFTTT, but the code could be adapted to whatever method you’re using internally to get all your gadgets on the same virtual page. On the hardware side of things, the test system is simply a NodeMCU connected to a buzzer and a MQ2 gas sensor.

So how does it work? If the detector goes off while [Vivek] is cooking, he can tell Google Assistant that he’s cooking and it’s a false alarm. That silences the buzzer, but not before the system responds with a message questioning his skills in the kitchen. It’s a simple quality of life improvement and it’s certainly not hard to imagine how the idea could be expanded upon to notify you of a possible situation even when you’re out of the home.

We’ve seen how a series of small problems can cascade into a life-threatening situation. If you’re going to perform similar experiments, make sure you’ve got a “dumb” smoke alarm as a backup.

Continue reading “Building A Smarter Smoke Alarm With The ESP8266”

Desktop Weather Monitor Leaves Nothing To Chance

[Mirko Pavleski] has put together a little weather station for himself that combines Internet-sourced forecasts with physical sensor data to give him a complete view of his local conditions. There’s no shortage of weather applications for our smartphones and computers that will show us the current local conditions and the forecast for the next couple of days. It’s so easy to pull weather data from the various APIs out there that you even see the functionality “baked in” to different gadgets these days. Of course, you can dig through every weather API in the world and not find the temperature and humidity inside your office; for that, you need your own sensors.

[Mirko] took a somewhat unconventional approach by essentially building two totally separate weather devices and packing them into one enclosure, which gives the final device a rather unique look thanks to the contrasting display technologies used.

Local conditions are detected by an Arduino Nano connected to a BMP180 sensor and displayed on a Nokia 5110 LCD. The screen shows not only real-time temperature and barometric pressure, but the change in pressure over the last several hours. The three-day forecast, on the other hand, is provided by a NodeMCU ESP8266 development board connected to the increasingly ubiquitous 0.96 inch OLED.

If you’re not into the whole duality thing and would rather do it all on the same device, you might be interested in one of the ESP8266 weather monitors we’ve seen in the past.

Transcending The Stack With The Right Network Protocol

The increase in network-connected devices the past years has been something of a dual-edged sword. While on one hand it’s really nice to have an easy and straight-forward method to have devices talk with each other, this also comes with a whole host of complications, mostly related to reliability and security.

With WiFi, integrating new devices into the network is much trickier than with Ethernet or CAN, and security (e.g. WPA and TLS) isn’t optional any more, because physical access to the network fabric can no longer be restricted. Add to this reliability issues due to interference from nearby competing WiFi networks and other sources of electromagnetic noise, and things get fairly complicated already before considering which top-layer communication protocol one should use. Continue reading “Transcending The Stack With The Right Network Protocol”