Mind Control Via Serial Port

brain-control-via-serial-port

[Zibri] found a very simple method for using brain waves as a controller via a DB9 serial port. He’s using Uncle Milton’s Force Trainer which we saw yesterday in the brain controlled Arduino. In that project the Arduino tapped into the LEDs and interfaced those signals with a computer via USB. This time the connection was made using an RS-232 transceiver to pass data from the programming header inside of the toy’s base unit to a computer over the serial port. Tapping into the programming header has a lot more potential and should be more reliable than sniffing logic out of LED connections. [Zibri] has written an application to display the received data but it doesn’t look like he’s made the code available for download.

Apparently he tipped us off about a week ago. We recall seeing this submission but as you can tell it’s a little bit light on the detail. So if you want your tips to be at the front of the line, make sure you do what you can to fill us in on all the details of your project. At our request [Zibri] provided a picture of the PCB from the Force Trainer’s base unit. See it after the break. Continue reading “Mind Control Via Serial Port”

How To Populate A Surface Mount PCB

Reflow_08

Let’s face it friends, everything is moving toward surface mount components. We’ve seen quite a few features here that cover using stencils to populate boards and using ovens to reflow. [Oleg] has put together a tutorial on the process he uses to populate and reflow his own boards.

[Oleg] is the creator of the USB Isolator and therefore has a need to frequently populate the same board. He’s using an acrylic frame that fits the PCB perfectly to hold it in place so that paste and be applied right up to the edges of the board. He ordered a laser cut Kapton stencil for applying the solder. The paste is squeegeed into the stencil holes, the stencil is removed, and parts are placed with tweezers and a steady hand. For the final step, the boards go into an old toaster oven for reflow.

[Oleg] uses temperature marker on his boards to monitor the progress of the reflow. This marker is basically a crayon that begins to melt at a specific temperature. When the board has cooled, the melted mark can be scraped away or removed with alcohol.

Of course this is only really useful if you have a bunch of high-quality boards to populate. But with the relatively low cost of getting professionally made boards we think the need for this type of assembly process is on the rise.

Color Changing Paint Display

heat_actuated_display

We’ve seen several creative projects from [Sprite_tm] and this one sets a new bar. He got his hands on some paint that changes color with temperature. By covering a circuit board with the paint then heating the circuits he’s created a heat actuated 7-segment display (his post is in Dutch). Three seconds at about 1 amp is enough to turn the black paint white. When the segment has been disconnected for about one minute the paint fades back to black. Now that we’ve seen his concept, leave a comment and tell us how you’d use it.

SparkFun Kegerator Goes To Eleven

sparkfun-kegerator

It started with a simple need: keep tabs on SparkFun Electronics’ in-house kegerator so the beer won’t run out at inopportune times. But of course SparkFun and “simple need” make strange bedfellows…throw beer in the mix, and you know this can’t end well. The result, as you might imagine, reads like a who’s-who of electronics hackery buzzwords.

Arduino? Check. Custom PCB? Check. Web interface? Check. Twitter feed? Check.

They’ve assembled a nice build tutorial on how this all went together, including code, example circuits, an explanation of some of the sensors used, and links to other tutorials for such things as Twittering and persistent storage in EEPROM using Arduino. Not to mention the eye candy: a custom Arduino shield (solder mask and all), custom acrylic tap handle, custom SparkFun pint glasses. They never do anything halfway, do they?

Direct-to-PCB Inkjet Printing

inkjet-pcb

Full Spectrum Engineering has offered up a tutorial for their inkjet direct PCB kits that repurpose direct-to-CD capable inkjet printers (such as the Epson R280) to print etch-resistant ink straight onto copper clad board. This is easier and less error prone than some iron-on methods, especially for two-sided boards. Just print (no need to reverse the design), dry on a hot plate or in a toaster oven for a couple minutes, and your board’s ready for etching!

Homebrew methods exist for all of this, but for those who would rather move ahead with their design than spend time scrounging for the required bits, the kits offer a pretty good value. They can also meet you halfway…say if you’re only lacking access to a laser cutter and just want the CD stencil…all of the parts are available individually or as a complete set: the resist ink cartridge, the stainless steel board-holding stencil, and a supply of double-sided copper clad boards precisely sized for the stencil (3.5 by 2.5 inches). The small board size is well within the limits of the freeware Eagle Light Edition software.

Concerned about gunking up your nice inkjet with non-OEM ink? You can dedicate hardware to the job without breaking the bank. Many of the compatible printers are of the “free printer after rebate” bundle variety that can now be found inexpensively on Craigslist or eBay.

Fritzing, Go From Prototype To Product

fritzing

Fritzing is an open source project designed to help you move from a prototype to a finished project. Aimed at those basing their projects around Arduino, you start by building your physical prototype, then recreate it with Fritzing software’s graphical editor. From there you can generate a schematic, PCB artwork, and PCB production files.

[thanks CH]

PCB Toner Transfer With Dowel

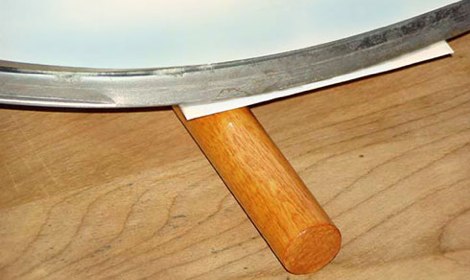
Pulsar Professional FX has a neat tip on their site for getting a really even toner transfer when making your own PCBs. First, the PCB is cut to size, and the paper is tacked to the board. Then, the PCB is placed paper up onto a dowel and rolled back and forth with the iron. Since the board bends slightly over the dowel the toner sticks evenly to the copper. After that, just remove the paper as usual and etch with your preferred method.