Test PCBs On A Bed Of Nails

While it might be tempting to start soldering a circuit together once the design looks good on paper, experience tells us that it’s still good to test it out on a breadboard first to make sure everything works properly. That might be where the process ends for one-off projects, but for large production runs you’re going to need to test all the PCBs after they’re built, too. While you would use a breadboard for prototyping, the platform you’re going to need for quality control is called a “bed of nails“.

This project comes to us by way of [Thom] who has been doing a large production run of circuits meant to drive nixie tubes. After the each board is completed, they are laid on top of a number of pins arranged to mate to various points on the PCB. Without needing to use alligator clamps or anything else labor-intensive to test, this simple jig with all the test points built-in means that each board can be laid on the bed and tested to ensure it works properly. The test bed looks like a bed of nails as well, hence the name.

There are other ways of testing PCBs after production, too, but if your board doesn’t involve any type of processing they might be hard to implement. Nixie tubes are mostly in the “analog” realm so this test setup works well for [Thom]’s needs.

A Close Look At The Prusa I3 MK3

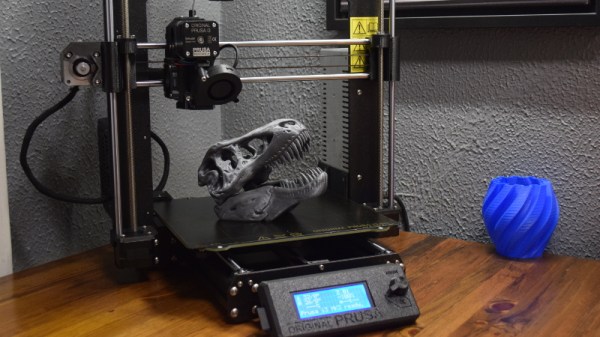
The Prusa i3 MK3 is, for lack of a better word, inescapable. Nearly every hacker or tech event that I’ve attended in 2018 has had dozens of them humming away, and you won’t get long looking up 3D printing on YouTube or discussion forums without somebody singing its praises. Demand for Prusa’s latest i3 printer is so high that there’s a literal waiting list to get one.

At the time of this writing, over a year after the printer was officially put up for sale, there’s still nearly a month lead time on the assembled version. Even longer if you want to wait on the upgraded powder coated bed, which has unfortunately turned out to be a considerable production bottleneck. But the team has finally caught up enough that the kit version of the printer (minus the powder coated bed) is currently in stock and shipping next day.

I thought this was a good a time as any to pull the trigger on the kit and see for myself what all the excitement is about. Now that I’ve had the Prusa i3 MK3 up and running for a couple of weeks, I can say with confidence that it’s not just hype. It isn’t a revolution in desktop 3D printing, but it’s absolutely an evolution, and almost certainly represents the shape of things to come for the next few years.

That said, it isn’t perfect. There’s still a few elements of the design that left me scratching my head a bit, and some parts of the assembly weren’t quite as smooth as the rest. I’ve put together some of those observations below. This isn’t meant to be a review of the Prusa i3 MK3 printer, there’s more than enough of those already, but hopefully these assorted notes may be of use to anyone thinking of jumping on the Prusa bandwagon now that production has started really ramping up.

Continue reading “A Close Look At The Prusa I3 MK3”

Tindie Guides That Hackaday Prize Entry Into Your Hands

The Hackaday Prize invites everyone to focus on specific challenges with encouragement of prize money and motivation of deadlines. But what happens after the award ceremony? While some creators are happy just to share their ideas, many projects need to get into the real world to make their full impact. Several past prize winners have used their award as seed money to start production and go into business. Recognizing this as something worth supporting, a new addition this year is Tindie’s Project to Product program.

Tindie is a marketplace for makers to sell to other makers, hence a natural place for Hackaday.io projects to find an audience. (And many have found success doing so.) For Project to Product, two Hackaday Prize semifinalists will receive support from mentors to transition their hand crafted project into something that can be produced in quantity. In addition to engineering support, there’s also funding (above and beyond their prize winnings) towards their first production run. In exchange, Tindie asks for the first production run to be sold exclusively on Tindie marketplace.

Of course, some entries are ahead of the curve and already available on Tindie, like Reflowduino and Hexabitz. We know there are more creators with ambition to do the same, putting in effort cleaning up their design and sorting out their BOM (Bill of Materials) towards production. They’ve done a lot of work, and we hope Tindie can give them that final push. They see their invention become reality, Tindie gets cool new exclusive products for the marketplace, and the rest of us can buy some to play with. Everyone wins.

If this sounds like something you want to join in as a creator, there’s still time. The final Musical Instrument Challenge is accepting entries for one more week. Better hurry!

(Disclaimeroo: Supplyframe, which owns Hackaday and is a sponsor of the Prize, also owns Tindie.)

When Are Dumb LEDs The Smart Choice?

A couple years ago I got into making electronic conferences badges by building a device for DEFCON 25 shaped like a dragonfly. Like all badges the most important design factor was quite literally how flashy it was, and two years ago I delivered on that with ten RGB LEDs. At the time I planned to hand-assemble each and every of the 105 badges at my kitchen table. Given those constraints, and a desire for electrical and programmatic simplicity, I landed on using APA102s (DotStar’s in Adafruit parlance) in the common 5050 sized package. They were easy to place, easy to design with electrically, simple to control, and friendly to a human pick-n-place machine. Though by the end of the production run I had discovered a few problems, the APA102s were a success.

This year I made a new and improved version of the dragonfly, but applying my lessons learned led me to choose a very different LED architecture than 2017. I swapped out the smart LEDs for dumb ones.

Continue reading “When Are Dumb LEDs The Smart Choice?”

A Resistor Cutting Robot You Can Build

If you’re populating kits, it can get tiring and time consuming. Like all good repetitive processes, it should be automated. As far as cutting resistors goes, this is one way to do it, thanks to [Pablo].

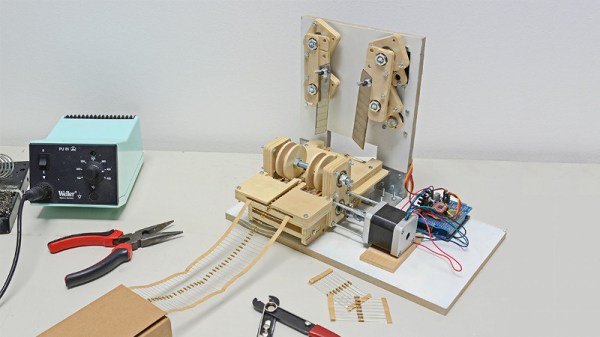
The build is actually cribbed from earlier work by a gang called [oomlout]. Parts for these cutters are made with either lasercut or CNC milled sheet stock. A stepper motor is used to transport the resistor tape, and the cutting blades are moved by standard hobby servos. The use of servos for the blades allows the action to be controlled precisely without having to go to the effort of implementing extra limit switches and circuitry.

Control is by an Arduino Uno, with an A4988 driver controlling the stepper. Servo control is achieved with the Uno’s onboard peripherals. There’s a video below of the machine in operation, which shows it to be a simple and efficient tool for the job.

This build turns an otherwise maddeningly basic chore into a set-and-forget operation. We’ve seen other work in this area before from the [oomlout] team, too. Video after the break.

Continue reading “A Resistor Cutting Robot You Can Build”

A Pin Pusher To Make Life Easier

Picture the scene: you’ve whipped up an amazing new gadget, your crowdfunding campaign has gone well, and you’ve got a couple hundred orders to fill. Having not quite hit the big time, you’re preparing to tackle the production largely yourself. Parts begin to flood in, and you’ve got tube after tube of ICs ready to populate your shiny new PCBs? After the third time, you’re sick and tired of fighting with those irksome little pins. Enter [Stuart] with the answer.

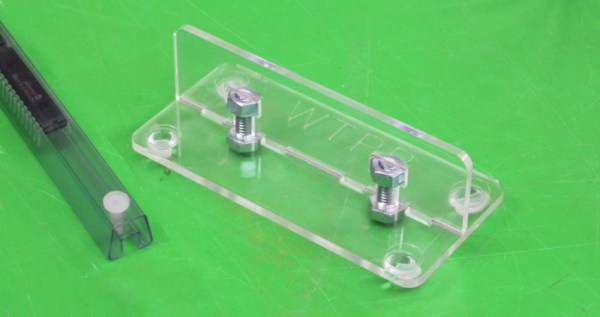
It’s a simple tool, attractively presented. Two pieces of laser cut acrylic are assembled in a perpendicular fashion, creating a vertical surface which can be used to press pins out of IC tubes. [Stuart]’s example has rubber feet, though we could easily see this built into a work surface as well.

The build highlights two universal truths. One, that laser cutters are capable of producing elegant, visually attractive items almost effortlessly, something we can’t say about the garden variety 3D printer. Secondly, all it takes is a few little jigs and tools to make any production process much easier. This is something that’s easy to see in the many factories all over the world – special single-purpose devices that make a weird, tricky task almost effortless.

In DIY production lines, testing is important too – so why not check out this home-spun test jig?

Automated Syrup System Is Sweet Sweet Madness

Here at Hackaday we are big fans of the TV show, “How It’s Made”. It’s not much of a stretch to assume that, as somebody who is currently reading this site, you’ve probably seen it yourself. While it’s always interesting to see the behind the scenes process to create everyday products, one of the most fascinating aspects of the show is seeing how hard it is to make things. Seriously, it’s enough to make you wonder how companies are turning a profit on some of these products when you see just how much technology and manual work is required to produce them.
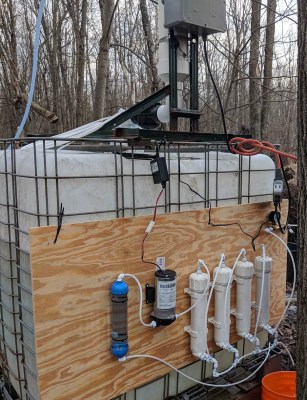
That’s precisely the feeling we got when browsing through this absolutely incredible overview of how [HDC3] makes his maple syrup. If that’s not a sentence you ever thought you’d see on Hackaday, you aren’t alone. But this isn’t a rusty old pail hanging off of a tap, this is a high-tech automated system that’s capable of draining 100’s of gallons of sap from whole groves of trees. We’ll never look at a bottle of syrup in the store the same away again.

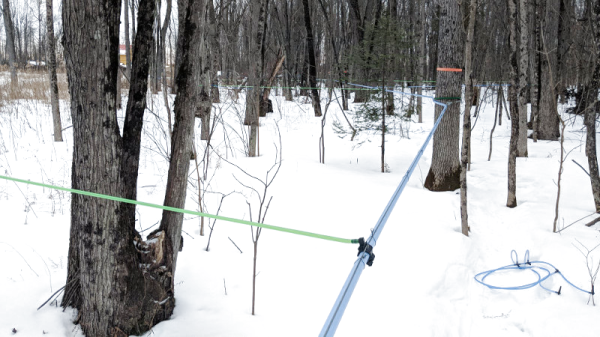
It all starts with hundreds of tiny taps that are drilled into the trees and connected to a network of flexible hoses. The plumbing arrangement is so complex that, in certain, areas high tension support wires are necessary to hold up the weight of the hoses and their sweet contents. The main hose leads to an Arduino-powered collection station which maintains a 100 kPa (29 inHg) vacuum throughout the entire system.

The sap is temporarily held in a 250 gallon container, but at this point it’s still just that: sap. It needs to be refined into something suitable for putting on your pancakes. The first step of that process utilizes a reverse osmosis filtration system to pull the water out of the sap and increase its sugar concentration. [HDC3] says the filtration system is built from eBay scores and parts from the home improvement store, and it certainly looks the part of something that would be under a kitchen sink. This system is able to increase the sugar concentration of the sap from around 2% as it comes out of the trees to 8%. But it’s still a far way off from being ready to use.

Interestingly enough, the last steps of the process are about as old-school as they come. The semi-concentrated sap is placed in a long low metal pan, and heated over a wood fire to drive off more of the water. This process continues until the sap is roughly 60% sugar, at which point it is filtered and moved into the house to finish boiling on the stove.

All told, the syrup is boiled for eight hours to bring its sugar content up to 66%. Even with the improvements [HDC3] has made to the system, he reveals that all this hard work only results in slightly more than a half-gallon of final syrup. Talk about dedication.

It probably comes as no surprise that this is the first time Hackaday has ever run a story about producing maple syrup. However we’ve seen a number of automated beer brewing systems that seem to have been tackled with similar zeal. There’s probably a conclusion to be drawn there about the average hacker’s diet, but that’s a bit outside our wheelhouse.

[via /r/DIY]