How The Flipper Zero Hacker Multitool Gets Made And Tested

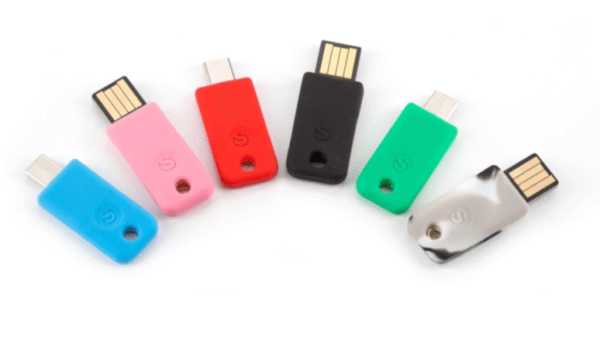
Flipper Zero is an open-source multitool for hackers, and [Pavel] recently shared details on what goes into the production and testing of these devices. Each unit contains four separate PCBs, and in high-volume production it is inevitable that some boards are faulty in some way. Not all faults are identical — some are not even obvious —  but they all must be dealt with before they end up in a finished product.

One of several custom test jigs for Flipper Zero. Faults in high volume production are inevitable, and detecting them early is best.

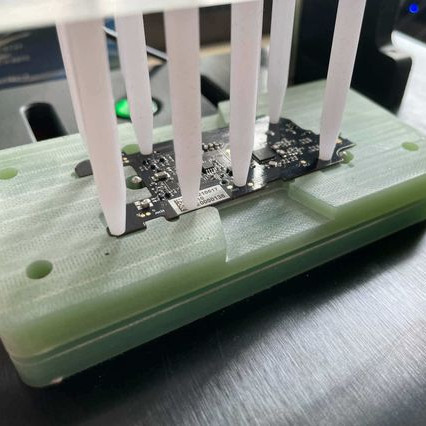
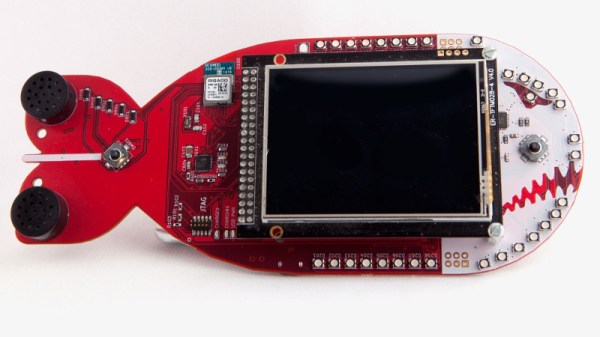
Designing a process to effectively detect and deal with faults is a serious undertaking, one the Flipper Zero team addressed by designing a separate test station for each of the separate PCBs, allowing detection of defects as early as possible. Each board gets fitted into a custom test jig, then is subjected to an automated barrage of tests to ensure everything is as expected before being given the green light. A final test station gives a check to completed assemblies, and every test is logged into a database.

It may seem tempting to skip testing the individual boards and instead just do a single comprehensive test on finished units, but when dealing with production errors, it’s important to detect issues as early in the workflow as possible. The later a problem is detected, the more difficult and expensive it is to address. The worst possible outcome is to put a defective unit into a customer’s hands, where a issue is found only after all of the time and cost of assembly and shipping has already been spent. Another reason to detect issues early is that some faults become more difficult to address the later they are discovered. For example, a dim LED or poor antenna performance is much harder to troubleshoot when detected in a completely assembled unit, because the fault could be anywhere.

[Pavel] provides plenty of pictures and details about the production of Flipper Zero, and it’s nice to see how the project is progressing since its hyper-successful crowdfunding campaign.

Tales (and Advice) From Setting Up A Product Line

Making something that has to get into others’ hands involves solving a lot of different problems, many of which have nothing at all to do with actually building the dang things. [Conor Patrick] encountered them when he ran a successful Kickstarter campaign for an open-source USB security key that was not only shipped to backers, but also made available as an ongoing product for sale. There was a lot of manual and tedious work that could have been avoided, and so [Conor] laid out all the things he wishes he had done when first setting up a product line.

Turning these unprogrammed boards into finished products then shipping them is a big job.

If the whole process is a river, then the more “upstream” an issue is, the bigger its potential impact on everything that comes afterwards. One example is the product itself: the simplest and most easily managed product line is one that has only one product with no variations. That not only minimizes errors but makes supply, production, and shipping more straightforward. Striving for a minimum number of products and variations is also an example of something [Conor] didn’t do. In their crowdfunding campaign they offered the SoloKeys USB device — an implementation of the FIDO2 authentication token — as either USB-A or USB-C. There were also two types of key: NFC-capable (for tapping to a smartphone) and USB only. That is four products so far.

Offering keys in an unlocked state for those who want to tamper makes it eight different products. On top of that, they offered color choices which not only adds complexity to production, but also makes it harder to keep track of what everyone ordered. [Conor] also observed that the Kickstarter platform and back end are really not set up like a store, and it is clunky at best to try to offer (and manage) different products and variations from within it.

Another major point is fulfillment and in [Conor]’s opinion, unless the quantities are small, an order fulfillment company is worth partnering with. He says there are a lot of such companies out there, and it can be very time consuming to find the right one, but it will be nothing compared to the time and effort needed to handle, package, address, and ship several hundreds (or thousands!) of orders personally. His team did their own fulfillment for a total of over 2000 units, and found it a long and tedious process filled with hidden costs and challenges.

There’s good advice and background in [Conor]’s writeup, and this isn’t his first rodeo. He also shared his thoughts on taking electronics from design to production and the more general advice remains the same for it all: be honest and be open. Under-promise and over-deliver, especially when it comes to time estimates.

Silicone Injector Gives Parts Production A Shot In The Arm

Many of us are happy to spend hours cooking up a solution that saves us seconds, if success means never having to do a hated task again. [frankensteinhadason] molds enough silicone parts that he grew tired of all the manual labor involved, so he built a silicone injector to do it for him. Now, all he has to do is push the handle in notch by notch, until silicone starts oozing from the vent holes in the mold.

The mold pictured above is designed to make little shrouds for helicopter communications connections like this one. His friends in the industry like them so much that he decided to sell them, and needed to scale up production as a result. Now he can make six at once.

He designed brackets to hold a pair of syringes side by side against a backplane. There’s a lever that pushes both plungers simultaneously, and adapters that keep the tubing secured to the syringe nozzles. Ejected two-part silicone travels down to a double-barrel mixing nozzle, which extrudes silicone into the top of the mold.

Naturally, we were going to suggest automating the lever operation, but [frankensteinhadason] is already scheming to do that with steppers and an Arduino. Right now he’s working on increasing the hose diameter for faster flow, which will mean changes to the adapter. Once that is sorted, he plans to post the STLs and a video of it pumping silicone.

Ever thought about doing the reverse, and using silicone to mold hot plastic? Yeah, that’s a thing.

Via r/functionalprint

These Tips Make Assembling A Few Hundred PCBs Easier

There are a few common lessons that get repeated by anyone who takes on the task of assembling a few hundred PCBs, but there are also unique insights to be had. [DominoTree] shared his takeaways after making a couple hundred electronic badges for DEFCON 26 (that’s the one before the one that just wrapped up, if anyone’s keeping track.) [DominoTree] assembled over 200 Telephreak badges and by the end of it he had quite a list of improvements he wished he had made during the design phase.

Some tips are clearly sensible, such as adding proper debug and programming interfaces, or baking an efficient test cycle into the firmware. Others are not quite so obvious, for example “add a few holes to your board.” Holes can be useful in unexpected ways and cost essentially zero. Even if the board isn’t going to be mounted to anything, a few holes can provide a way to attach jigs or other hardware like test fixtures.

[DominoTree] ended up having to attach multiple jumper wires to reprogram boards after assembly, and assures us that “doing this a bunch of times really sucked.”
Other advice is more generic but no less important, as with “eliminate as many steps as possible.” Almost anything adds up to a significant chunk of time when repeated hundreds of times. To the basement hacker, something such as pre-cut and pre-tinned wires might seem like a shameful indulgence. But cutting, stripping, tinning, then hand-soldering a wire adds up to significant time and effort by iteration number four hundred (that’s two power wires per badge) even if one isn’t staring down a looming deadline.

[DominoTree] also followed up with additional advice on making assembly easier. Our own [Brian Benchoff] has also shared his observations on the experience of developing and assembling a large number of Hackaday Superconference badges, including what it took to keep things moving along when inevitable problems surfaced.

You don’t need to be making batches of hundreds for these lessons to pay off, so keep them in mind and practice them on your next project.

After The Con: Da Bomb Badge Post Mortem

We’ve reported on the world of electronic badges here at Hackaday since their earliest origins in [Joe Grand]’s work for DEF CON 14 in 2006. In that time we’ve seen an astonishing variety of creations, covering everything from abstract artwork to pure functionality in a wearable device. But it’s not been quite so often that we’ve looked at the other side of the BadgeLife coin, so it’s fascinating to read [John Adams]’ account of the work that went into the production of this year’s 500-piece run of the Da Bomb DEF CON indie badge.

In it, [John] goes over scheduling worries, component sourcing issues, PCB assembly delays, and an in-depth look into the finances of such a project. In case anyone is tempted to look at Badgelife as the route to millions, it rapidly becomes apparent that simply not losing too much money is sometimes the best that can be hoped for. There were a few design problems, one of them being that the SAO I2C bus was shared with the LED controller, resulting in some SAOs compatibility issues. In particular the AND!XOR DOOM SAO had its EEPROM erased, creating something of a headache for the team.

A surprise comes in the distribution: obviously shipping is expensive, so you’d think badge pick-ups at the con would be straightforward alternative. Unfortunately, they became something of a millstone in practice, and organising them was a Herculean task. Astoundingly, some paying customers didn’t bother turn up for their badges. Which was especially infuriating since the team lost valuable conference time waiting for them.

Some of you are BadgeLife creators and will nod sagely at this. Still more of you will wish you were BadgeLife creators and find it a useful primer. For everyone else it’s a fascinating read, and maybe makes us appreciate our badges a bit more.

The images may have departed, but just to return to the origins of BadgeLife, here’s our coverage of that first [Joe Grand] badge.

Marketing And Selling Hardware Hack Chat

Join us Wednesday at noon Pacific time for the Marketing and Selling Hardware Hack Chat with Shawn Hymel!

It may not be every hardware hacker’s dream, but a fair number of us harbor fantasies of thinking up the Next Big Thing and kissing the day job goodbye forever. It’s an understandable dream and a laudable goal, but as they say, a goal is a dream with a plan and a deadline. What’s your plan for turning your project into a marketable product? Chances are good you don’t have one, and if you ever expect to get to your goal you’re going to need one.

Shawn Hymel is an engineer who led several marketing campaigns for Spark Fun and recently shared his thoughts on marketing with attendees of the first-ever KiCon conference in Chicago. He’ll be dropping by the Hack Chat to talk about everything you ever wanted to know about marketing your hardware projects but were afraid to ask.

join-hack-chat

Our Hack Chats are live community events in the Hackaday.io Hack Chat group messaging. This week we’ll be sitting down on Wednesday, May 8 at noon Pacific time. If time zones have got you down, we have a handy time zone converter.

Click that speech bubble to the right, and you’ll be taken directly to the Hack Chat group on Hackaday.io. You don’t have to wait until Wednesday; join whenever you want and you can see what the community is talking about.

WOPR: Building Hardware Worth Sharing

It wouldn’t be much of a stretch to assume that anyone reading Hackaday regularly has at least progressed to the point where they can connect an LED to a microcontroller and get it to blink without setting anything on fire. We won’t even chastise you for not doing it with a 555 timer. It’s also not a stretch to say if you can successfully put together the “Hello World” of modern electronics on a breadboard, you’re well on the way to adding a few more LEDs, some sensors, and a couple buttons to that microcontroller and producing something that might come dangerously close to a useful gadget. Hardware hacking sneaks up on you like that.

Here’s where it gets tricky: how many of us are still stuck at that point? Don’t be shy, there’s no shame in it. A large chunk of the “completed” projects that grace these pages are still on breadboards, and if we had to pass on every project that still had a full-on development board like the Arduino or Wemos D1 at its heart…well, let’s just say it wouldn’t be pretty.

Of course, if you’re just building something as a personal project, there’s often little advantage to having a PCB spun up or building a custom enclosure. But what happens when you want to build more than one? If you’ve got an idea worth putting into production, you’ve got to approach the problem with a bit more finesse. Especially if you’re looking to turn a profit on the venture.

At the recent WOPR Summit in Atlantic City, there were a pair of presentations which dealt specifically with taking your hardware designs to the next level. Russell Handorf and Mike Kershaw hosted an epic four hour workshop called Strategies for your Projects: Concept to Prototype and El Kentaro gave a fascinating talk about his design process called Being Q: Designing Hacking Gadgets which together tackled both the practical and somewhat more philosophical aspects of building hardware for an audience larger than just yourself.

Continue reading “WOPR: Building Hardware Worth Sharing”