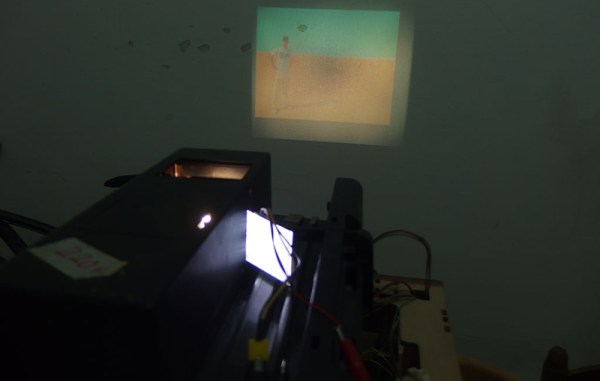
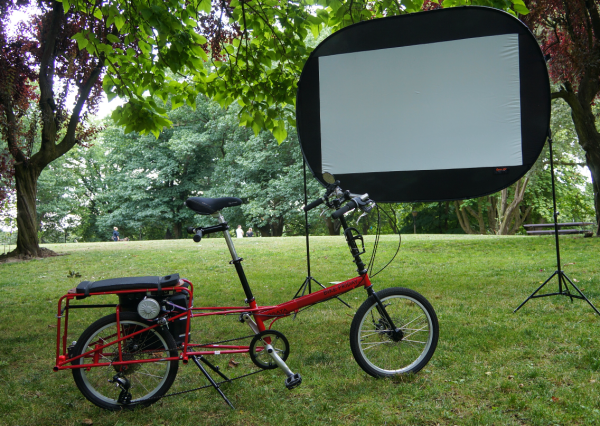
Digital Light Processing, So Many Tiny Mirrors

Did you know there are a million little mirrors flickering back and forth, reflecting light within some modern projectors; like a flip-dot display but at the micro level? In his video, [Ben Krasnow] explains the tiny magic at work in DLP, or digital light processing technology with a scaled up model he constructed of the moving parts.

LCD projectors work much like old slide projectors. Light is shined through a transparent screen containing the image, which is then focused and enlarged through a lens. DLP projectors however achieve the moving image in a slightly different way. A beam of focused light is shined onto a chip equipped with an array of astonishingly small mirrors. When the mirror is flipped in one direction, it reflects the light out through the lens and creates a visible pixel. When the mirror is tilted the opposite direction, no light is reflected and the pixel is dark. All of these tiny moving parts are actuated by means of static electricity, and since a pixel can effectively only either be in an on or off state without any range of value in-between, the pixel must flutter at a rate fast enough to achieve the illusion of intensity, much like pulsing an LED to create a dimming effect.

In addition to slicing open the protective casing of one of these tiny micro-mirrored chips to give us a look at their physical surface under a microscope, [Ben] also built his own functioning matrix from tiles of mirrors and metal washers sandwiched around pieces of string. A wound electromagnet positioned behind each tile tilts the pixel into position when a current is run through the wire — although he didn’t sink the time needed to build out the full array in this manner (and we don’t blame him). If you do have the time and add in a high powered flash-light, this makes for an awesome way to shine messages on your roommate’s wall.

Continue reading “Digital Light Processing, So Many Tiny Mirrors”

Augmented Reality Pinball

Pinball machines are fascinating pieces of mechanical and electrical engineering, and now [Yair Moshe] and his students at the Israel Institute of Technology has taken the classic game one step further.  Using computer vision and a projector, this group of engineers has created an augmented reality pinball game that takes pinball to a whole new level.

Once the laptop, webcam, and projector are set up, a course is drawn on a whiteboard which the computer “sees” to determine the rules of the game. Any course you can imagine can be drawn on the whiteboard too, with an interesting set of rules that no regular pinball game could take advantage of. Most notably, the ball can change size when it hits certain types of objects, which makes for a very interesting and unconventional style of play.

The player uses their hands to control the flippers as well, but not with buttons. The computer watches the position of the player’s hands and flips the flippers when it sees a hand in the right position. [Yair] and his students recently showed this project off at DLD Tel Aviv and even got [Shimon Perez], former President of Israel, to play some pinball at the conference!

Cairo Hackerspace Gets A $14 Projector

The Cairo hackerspace needed a projector for a few presentations during their Internet of Things build night, and of course Friday movie night. They couldn’t afford a real projector, but these are hackers. Of course they’ll be able to come up with something. They did. They found an old slide projector made in West Germany and turned it into something capable of displaying video.

The projector in question was a DIA projector that was at least forty years old. They found it during a trip to the Egyptian second-hand market. Other than the projector, the only other required parts were a 2.5″ TFT display from Adafruit and a Nokia smartphone.

All LCDs are actually transparent, and if you’ve ever had to deal with a display with a broken backlight, you’ll quickly realize that any backlight will work, like the one found in a slide projector. By carefully removing the back cover of the display, the folks at the Cairo hackerspace were able to get a small NTSC display that would easily fit inside their projector.

After that, it was simply a matter of putting the LCD inside the display, getting the focus right, and mounting everything securely. The presentations and movie night were saved, all from a scrap heap challenge.

The R2D2-‘O-Lantern Reddit Doesn’t Want You To See

The people here at Hackaday aren’t dedicating their entire lives to moderating comments and sending press releases to the circular file; some of us actually have jobs and hobbies. [James Hobson] works at a projector company that was having a pumpkin carving contest today. He came up with the best possible use of a pumpkin projector – a R2D2-‘o-lantern that plays the message from [Leia] to [Obi-Wan Kenobi]. [James] submitted this to reddit, but one of the mods deleted it. We’re much cooler than a few mods and their little empire, so we’re putting it up here.

Instead of a knife, [James] used a rather interesting method for carving a pumpkin – a laser cutter. By maxing out the Z height of his laser cutter, he was able to cut a perfect R2D2 graphic on the surface of a pumpkin. No, [James] isn’t removing any of the pumpkin’s skin after the lasering is done, but the result still looks great when backlit.

Inside the pumpkin is a projector playing the famous distress message made from the captured Tantive IV. It’s not entirely accurate – [James] put the projector behind R2’s radar eye and not the holographic projectors, and to project [Leia] in mid-air he would need something like this, Still, it’s a great project we expect to see cloned a year or so from now.

Vector Laser Projector Is A Lesson In Design Processes

After two years of EE coursework, [Joshua Bateman] and [Adam Catley] were looking for a fun summer project. Instead of limping along with the resources they could put together themselves, they managed to get their school — Bristol University — to foot the bill!

Now Uni’s aren’t in the habit of just forking over funding for no reason, and we thing that’s why the two did such a great job of documenting their work. We’re used to seeing blogs devoted to one project, but this one has a vast portfolio of every piece of work that went into the build. Before any assembly started they drew out design diagrams to form the specification, laid out the circuit and the board artwork, and even worked out how the software would function in order to make sure the hardware met all their needs.

When the parts arrived the work of hand-populating the surface mount boards began. This is reflected in the fast-motion video they recorded including this clip which features a 176 pin LQFP. The driver board is a shield for a Raspberry Pi which drives the Galvanometers responsible for the X and Y movements of the mirror.

The video below shows off their success and the blog makes a great resource to point to when applying for work once a freshly minted diploma is in hand.

What do you think the next step should be? We’d advocate for a trip to crazy-town like this RGB laser projector we saw several years ago. Of course the same classic vector games we saw on Thursday would be equally awesome without alerting this hardware at all.

Continue reading “Vector Laser Projector Is A Lesson In Design Processes”

Home Theater, Tribute To A Friend

The Greg Williams Theater

Ever since purchasing this house, [Ed] Always wanted a to turn his living room into a home theater, but not just any old projector and a white wall would do. He wanted the whole experience. [Ed] Started with a slightly damaged 12′ wide 4:3 roll up projector screen, he removed the damaged bottom portion and built a static frame to support the now 16:9 screen. Before he could mount the screen, he needed to drywall over a window that was inconveniently located. With the screen now in place, [Ed] framed out the elevated seating platform and steps with some 2×12 topped off with plywood. Next, the carpet that was sitting directly below the platform and steps was removed and then secured on top. Down firing LED fixtures were installed in the steps, to give them that movie theater look and feel. To provide the image, a refurbished HD projector acquired from the Bay of Electronics, was installed in the loft above the living room.

With the theater functional, [Ed] turned his attention to theater decorations. Dimmable ambiance lighting fixtures, using laser cut acrylic and CNC routed starboard (a marine-grade polymer), were made to resemble a film strip. Next a coffee table was crafted out of an equipment road case filled with movie props. Studio logos were painted on the sides with the use of laser cut stencils, and with a glass top, gives the illusion it came off the set of a hollywood movie. The addition of a rebuilt movie poster marquee, movie posters, candy stand, pop corn machine, and with the existing soda fountain and the arcade in the loft, the home theater was almost complete.

In a fitting tribute, [Ed] designed and built a marquee sign to dedicate and name the theater after his cousin Greg, one of his closest friends and avid movie watcher, who had sadly passed away. Video overview of all the hard work after the break.

Continue reading “Home Theater, Tribute To A Friend”

Fail Of The Week: Projector LED Retrofit

fotw-projector-repair

That’s a deal for a project, how hard could it be to fix it up?

If you’re a real hacker we’d wager you’ve fallen for this type of thought process before. [Luft] bought this used Sharp XR-10X-L projector about a year back and planned to retrofit it with an LED bulb. He gathered all the parts and got to work, successfully testing and installing the modifications. But as luck would have it, the project is stuck in some type of boot loop.

This fail is certainly not for lack of preparation. The first post documenting his adventure shows that the hack has been done before, he acquired the service manual for this particular hardware, and he did his homework when ordering the parts. Success requires circumventing some sensors which ensure the case and internals are in place, and making sure the electronic status of the ballast is reported correctly event though it’s not needed for the LED source. Power-on gets as far as illuminating all the indicator lights in green as it should, but is then followed closely by a reboot sequence.

He tried watching the serial port to see if he can get any status info there but no dice. In keeping with the nature of this column, let’s see if we can provide any constructive troubleshooting advice in the comments.


2013-09-05-Hackaday-Fail-tips-tileFail of the Week is a Hackaday column which runs every Wednesday. Help keep the fun rolling by writing about your past failures and sending us a link to the story — or sending in links to fail write ups you find in your Internet travels.