Flexible Build Platforms Work For FDM, How About SLA?

Flexible steel sheets as the foundation for build platforms are used to great advantage in FDM 3D printers. These coated sheets are held flat by magnets during printing, and after printing is done the sheet (with print attached) can be removed and flexed to pop the prints free. This got [Jan Mrázek] thinking. He was pretty sure the concept could extend to the build platform on his Elegoo Mars resin printer. With a flexible build platform, troublesome prints could be more easily removed, so he non-destructively modified his printer to have a similar system. [Jan] is clear that this is only a proof of concept, but the test results were good! He printed several jobs that were known to be trouble, and they were all a piece of cake to remove.

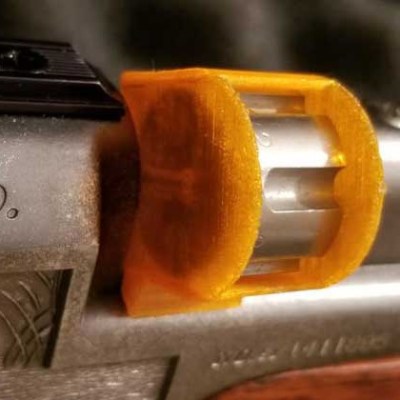
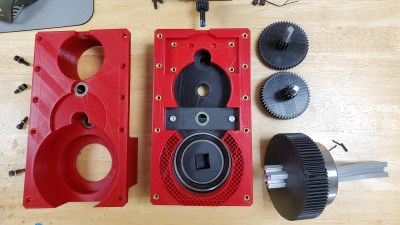
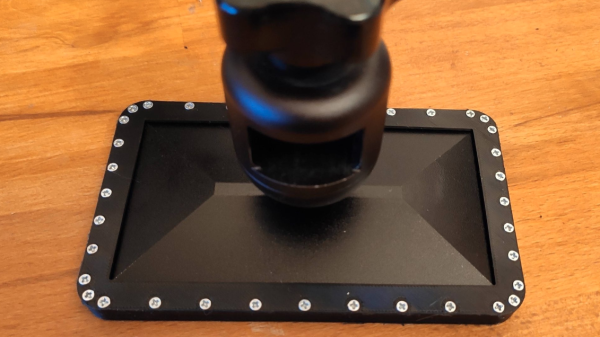
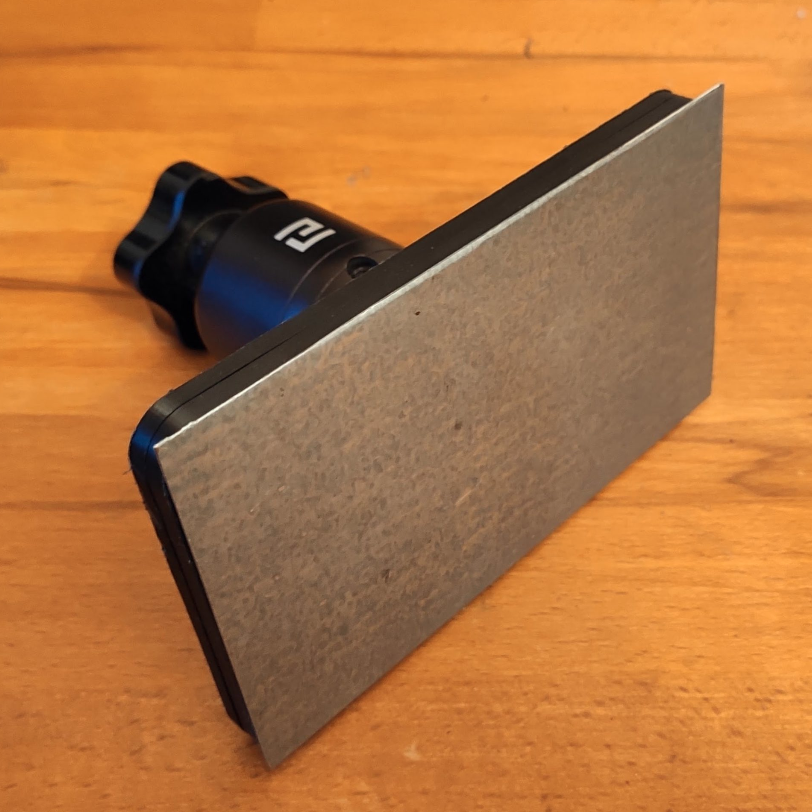
[Jan]’s mod consists of a 3D printed, two-piece unit that encapsulates the normal build platform and contains a few strong magnets. A thin sheet of steel sticks flat to this new piece, held in place by the magnets within, and becomes the new build platform. After a print is done, the sheet is removed and [Jan] reports that its flexibility is a big help in removing otherwise troublesome prints, such as the 3D printed solder stencil we covered recently.

[Jan] provides his CAD model but doesn’t really recommend using it for anything other than development work. Results were promising, but there are a number of drawbacks to the prototype. For one thing, it makes the build platform thicker and the Z-axis limit switch needs to be physically lowered in order to zero the unit. Also, the thicker build platform means the volume of resin the build tank can hold is reduced. Still, the idea clearly has merit and shows there absolutely is value in hardware having a hackable design.

Download A Bit Of Sinclair History

If you are a devotee of the Sinclair series of 8-bit home computers then a piece of news from the Centre For Computing History in Cambridge may be of interest to you, they’ve released a copy of the ROM from their ZX Spectrum prototype. This machine surfaced last year as part of a donation form the company originally contracted to write the Spectrum ROM and has been given pride of place int heir exhibition ever since. They’ve been doing some very careful work on it, and while The Register reports they can’t yet make the board boot, they have extracted the code for study. In the video below the break, we see it running on the Speccy emulator on an older Windows PC.

The ROM comes with an invitation to the ZX Spectrum community to analyze it against the stock version, in the hope of revealing ossified fragments of code such as that for the Microdrive storage peripheral which never made it into the stock Spectrum. But should you simply want to try your favorite games with the earliest possible version of the ROM, you can do that too.

We covered the machine’s emergence last year, meanwhile, if you haven’t been to the Centre for Computing History yet, we suggest you take a look at our review from a few years ago.

Continue reading “Download A Bit Of Sinclair History”

A Drone Sprouts Wings

While there are some fixed-wing drones in the hobby world, most of us around here think of the quadcopter when this word is mentioned. There have been some fixed-wings around, and lots of multi-rotors, but not much of a mix of the two. [Paweł] wanted to see what would happen if he mixed these two together, and created a quadcopter drone with retractable wings, essentially just to see what would happen.

This isn’t something that can convert from fixed-wing flight to helicopter-style hovering like a V22 Osprey or Harrier, either. The lift and thrust is entirely generated by the rotors, and the “wings” are essentially deployable air brakes that allow the drone to slow down quickly without consuming as much energy under propeller power alone. The air brake wings are designed to automatically deploy as a function of throttle position, too, so there’s a lot that could be built on this idea in the future, in theory.

[Paweł] notes that this design is somewhat controversial, and although few of us are in the drone racing community we can imagine how a functional change like this might impact in an arena such as that. He also only saw marginal performance increases and isn’t planning on perusing this idea much further. If you’re interested in a drone with “true” wings, though, check out this one which gets fired out of a grenade launcher.

Continue reading “A Drone Sprouts Wings”

3D Printing Is Transformative Experience For Airgun Shooter

It’s interesting to peek into other scenes and niches and see how they intersect with things that one may find commonplace, like 3D printing. In this case, [NewToOldGuns] wrote a guest blog post for PyramydAir (a retailer, so be prepared for a lot of product links) about how 3D printing has completely transformed the experience of how he uses one of his favorite airguns, and allowed him to make changes and improvements that would not otherwise have been practical.

Not only are the 3D printed improvements thoughtful and useful, but it’s interesting to see familiar insights into the whole design process. After explaining some 3D printing basics, he points out that rapid iteration is key to effective prototyping, and a 3D printer can allow that to happen in a way not previously possible.

The pellets held inside the silver cylinder can no longer fall out, and the orange holder allows it to be simply pushed straight through into the gun’s receiver.

It all started with the small magazine which holds the rifle’s projectiles. It would be really handy to pre-load these for easier reloading, but there were practical problems preventing this. For one thing, there’s nothing to really hold the pellets in place and keep them from just falling out when it’s not loaded into the gun. Also, loading them into the gun without letting anything fall out was awkward at best. The solution was to design a simple holder that would cradle the magazine and cover the front and back to keep everything in place. [NewToOldGuns] also designed it so that it could mate directly to the gun, so the magazine could simply be pushed straight into the receiver while the action was held open.

Once this simple part was working, the floodgates of creativity were opened. Next was a belt attachment to hold multiple reloads, followed by a decision to mount the reloads directly onto the gun instead. An improved lever and sights quickly followed.

I also demonstrated the iterative approach to prototyping when I designed a simple alarm to detect when my 3D printer’s filament had run out. [NewToOldGuns] observes that the real power of 3D printing isn’t being able to make bottle openers or coat hooks on demand. It’s the ability to imagine a solution, then have that solution in hand in record time.

Behold The Crimson Axlef*cker (Do Not Insert Finger)

Are your aluminum extrusions too straight? The Crimson Axlef*cker can help you out. It’s a remarkable 3D printed, 4-stage, 125:1 reduction gearbox driven by a brushless motor. Designer [jlittle988] decided to test an early prototype to destruction and while he was expecting something to break, he didn’t expect it to twist the 2020 aluminum extrusion shaft before it did. We suppose the name kind of stuck after that.

Internals of the first prototype, shaft of BLDC motor just visible at top. Twisted 2020 extrusion output shaft at bottom right.

[jlittle988] has been documenting the build progress on reddit, and recently posted a fascinating video (embedded below) of the revised gearbox twisting the output shaft even further. He’s a bit coy about the big picture, saying only that the unit is part of a larger project. In fact, despite the showy tests, his goal is not to simply obtain maximum torque. We can only speculate on what his bigger project is, but in the meantime, seeing the gearbox results is some good clean fun. He first announced the gearbox test results here, and swiftly followed it up with some revisions, then the aforementioned video. There’s also an image gallery of the internals, so check that out.

The Crimson Axlef*cker is driven by an ODrive brushless dual-shaft motor and an ODrive controller as well; that’s the same ODrive whose open source motor controller design impressed us so much in the past.

Between projects like this one and other gearboxes like this cycloidal drive, it’s clear that custom gearbox design is yet another door that 3D printing has thrown wide open, allowing hobbyists to push developments that wouldn’t have been feasible even just a few years earlier.

Continue reading “Behold The Crimson Axlef*cker (Do Not Insert Finger)”

2019 Hackaday Prize Hack Chat

Join us Wednesday, April 17 at noon Pacific time for the 2019 Hackaday Prize Hack Chat!

The 2019 Hackaday Prize was just announced, and this year the theme is designing for manufacturing. The hacker community has come a long, long way in the last few years in terms of the quality of projects we turn out. Things that were unthinkable just a few short years ago are now reduced to practice, and our benches and breadboards are always stuffed with the latest and greatest components and modules, all teaming up to do wondrous things. But what about the next step? Do you have what it takes to turn that mess o’ wires into a product? What skills do you need to add to your repertoire to make sure you can actually capitalize on your prototype — or more importantly, to get your ideas into someone else’s hands where they can actually do some good? That’s what the Hackaday Prize is all about this year, and we want you taking your projects to the next level!

Majenta Strongheart will be hosting the Hack Chat as we discuss:

  • The importance of designing for manufacturing;
  • What tools we have available to turn prototypes into projects;
  • How the Hackaday Prize is set up this year, and why the theme was selected; and
  • Why you should participate in the 2019 Hackaday Prize

You are, of course, encouraged to add your own questions to the discussion. You can do that by leaving a comment on the 2019 Hackaday Prize Hack Chat and we’ll put that in the queue for the Hack Chat discussion.

join-hack-chatOur Hack Chats are live community events on the Hackaday.io Hack Chat group messaging. This week we’ll be sitting down on Wednesday, April 17, at noon, Pacific time. If time zones have got you down, we have a handy time zone converter.

Click that speech bubble to the right, and you’ll be taken directly to the Hack Chat group on Hackaday.io. You don’t have to wait until Wednesday; join whenever you want and you can see what the community is talking about.

Nixie Power Supply Shows Ins And Out Of Offshore Manufacturing

[Tony] built a high-efficiency power supply for Nixie tube projects. But that’s not what this post is about, really.

As you read through [Tony]’s extremely detailed post on Hackaday.io, you’ll be reading through an object lesson in electronic design that covers the entire process, from the initial concept – a really nice, reliable 170 V power supply for Nixie tubes – right through to getting the board manufactured and setting up a Tindie store to sell them.

[Tony] saw the need for a solid, well-made high-voltage supply, so it delved into data sheets and found a design that would work – as he points out, no need to reinvent the wheel. He built and tested a prototype, made a few tweaks, then took PCBWay up on their offer to stuff 10 boards for a mere $88. There were some gotchas to work around, but he got enough units to test before deciding to ramp up to production.

Things got interesting there; ordering full reels of parts like flyback transformers turned out to be really important and not that easy, and the ongoing trade war between China and the US resulted in unexpected cost increases. But FedEx snafus notwithstanding, the process of getting a 200-unit production run built and shipped seemed remarkably easy. [Tony] even details his pricing and marketing strategy for the boards, which are available on Tindie and eBay.

We learned a ton from this project, not least being how hard it is for the little guy to make a buck in this space. And still, [Tony]’s excellent documentation makes the process seem approachable enough to be attractive, if only we had a decent idea for a widget.