MeatBagPnP Makes You The Automatic Pick And Place

It’s amazing how hackers are nowadays building increasingly complex hardware with SMD parts as small as grains of sand. Getting multilayer PCB’s and soldering stencils in small quantities for prototyping is easier than ever before. But Pick-and-Place — the process of taking parts and stuffing them on the PCB in preparation for soldering — is elusive, for several reasons. For one, it makes sense only if you plan to do volume production as the cost and time for just setting up the PnP machine for a small run is prohibitive. And a desktop PnP machine isn’t yet as ubiquitous as a 3D printer. Placing parts on the board is one process that still needs to be done manually. Just make sure you don’t sneeze when you’re doing it.

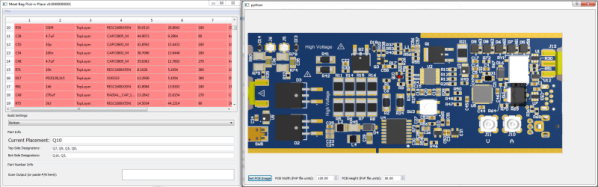
Of course the human is the slow part of this process. [Colin O’Flynn] wrote a python script that he calls MeatBagPnP to ease this bottleneck. It’s designed to look at a row in a parts position file generated from your EDA program and highlight on a render of the board where that part needs to be placed. The human then does what a robotic PnP would have done.

A bar code scanner is not necessary, but using one does make the process a bit quicker. When you scan a code on the part bag, the script highlights the row on the spreadsheet and puts a marker on the first instance of it on the board. After you’ve placed the part, pressing the space bar puts a marker on the next instance of the same value. The script shows it’s done after all parts of the same value are populated and you can then move on to the next part. If you don’t have a bar code scanner handy, you can highlight a row manually and it’ll tell you where to put that part. Check it out in the video below.

Of course, before you use this tool you need some prior preparation. You need a good PNG image of the board (both sides if it is double-sided) scaled so that it is the same dimensions as the target board. The parts position file generated from your EDA tool must use the lower left corner of the board as the origin. You then tell the tool the board dimensions and it scales up everything so that it can put the red markers at the designated XY positions. The script works for single and double-sided boards. For a board with just a few parts, it may not be worth the trouble of doing this, but if you are trying to manually populate a complex board with a lot of parts, using a script like this could make the process a lot less painful.

The project is still fresh and rough around the edges, so if you have comments or feedback to offer, [Colin] is listening.

[Colin]’s name ought to ring a bell — he’s the hacker who built ChipWhisperer which took 2nd Prize at The Hackaday Prize in 2014. The MeatBagPnP project is a result of having worked at building increasingly complex boards manually and trying to make the process easier. In addition to the walk-through of how the script works after the break we’ve embedded his other video from three years back when he was stuffing parts — including BGA’s — the hard way and then reflowing them in a Chinese oven with hacked firmware.

Continue reading “MeatBagPnP Makes You The Automatic Pick And Place”

Tensorflow Tutorial Uses Python

Around the Hackaday secret bunker, we’ve been talking quite a bit about machine learning and neural networks. There’s been a lot of renewed interest in the topic recently because of the success of TensorFlow. If you are adept at Python and remember your high school algebra, you might enjoy [Oliver Holloway’s] tutorial on getting started with Tensorflow in Python.

[Oliver] gives links on how to do the setup with notes on Python versions. Then he shows some basic setup operations. From there, he has the software “learn” how to classify random points that either fall into a circle or don’t. Granted, this is easy enough to do with traditional programming, so it isn’t a great practical example, but it is illustrative for learning purposes.

Given that it is easy to algorithmically decide which points are in the circle and which are not, it is simple to develop training data. It is also easy to look at the result and see how close it is to the actual circle. You’ll see that it takes a lot of slow learning before the result space looks like a circle and not a triangle or some other odd shape.

Continue reading “Tensorflow Tutorial Uses Python”

Learn About Blockchains By Building One

What do we curious Hackaday scribes do when we want to learn about something? First port of call: search the web.

When that something is blockchain technology and we’re looking for an explanation that expands our cursory overview into a more fundamental understanding of the basic principles, there is a problem. It seems that to most people blockchains equate to one thing: cryptocurrencies, and since cryptocurrencies mean MONEY, they then descend into a cultish frenzy surrounded by a little cloud of flying dollar signs. Finding [Daniel van Flymen]’s explanation of the fundamentals of a blockchain in terms of the creation of a simple example chain using Python was thus a breath of fresh air, and provided the required education. Even if he does start the piece by assuming that the reader is yet another cryptocurrency wonk.

We start by creating a simple class to hold all the Python functions, then we are shown a single block. In his example it’s a JSON object, and it contains the payload in the form of a transaction record along with the required proof-of-work and hash. We’re then taken through a very simple proof-of-work algorithm, before being shown how the whole can be implemented as very simple endpoints.

You are not going to launch a cryptocurrency using this code, and indeed that wasn’t our purpose in seeking it out. But if you are curious about the mechanics of a blockchain and are equally tired of evangelists of The Blockchain who claim it will cure all ills but can’t explain it in layman’s terms, then this relatively simple example is for you.

The wrong way to build a blockchain image: Jenny List. #FarmLife.

Trinket Chills Your Drinks

Who wants warm drinks? Well, coffee drinkers, we guess. Other than them, who wants warm drinks? Tea drinkers, sure. How about room temperature drinks? No one, that’s who. It’s silly to buy a refrigerator to cool down a single drink, so what option are you left with? Ice cubes? They’ll dilute your drink. Ice packs and a cooler? Sure, they’ll keep your drinks cold, but they’re hardly cool are they? No, if you want a cold drink the cool way, you build a thermoelectric cooler. And if you want to build one, you’re in luck, because [John Park] has a tutorial to do just that up on AdaFruit.

The parts list includes an AdaFruit Trinket M0, a more powerful version of AdaFruit’s Trinket line. The Trinket is used to control the main part in this build, a Peltier thermoelectric cooler, as well as the temperature display and switches. The other part controlled by the microcontroller is a peristaltic pump, which is used to do the dispensing of the liquid. The code to control everything is written in Python as the Trinket M0 comes with AdaFruit’s CircuitPython by default. Also included in the tutorial are the files for the stand, should you want to 3D print it or cut it with a CNC or laser cutter.

After the break, you can watch as [John] goes over the project and builds it, or go to the AdaFruit website and follow the instructions to build your own. As [John] says, there might be better ways to chill your drinks, but this is “definitely one of the more science-y and interesting ones.” For more projects using the Peltier Effect, try this one that uses the effect in sous-vide cooking, or this one, a Peltier cooled micro-fridge!

Continue reading “Trinket Chills Your Drinks”

Python Keeps A Gecko Happy: Terrarium Automation With Raspberry Pi

For better or worse, pets often serve as inspiration and test subjects for hardware hacks: smarten up that hamster wheel, tweet the squirrel hunting adventures from a dog’s point of view, or automate and remote control a reptile enclosure. [TheYOSH], a gecko breeder from the Netherlands, chose the latter and wrote TerrariumPi for the Raspberry Pi to control and monitor his exotic companion’s home through a convenient web interface.

The right ecosystem is crucial to the health and happiness of any animal that isn’t native to its involuntarily chosen surroundings. Simulating temperature, humidity and lighting of its natural habitat should therefore be the number one priority for any pet owner. The more that simulation process is reliably automated, the less anyone needs to worry.

TerrariumPi supports all the common temperature/humidity sensors and relay boards you will find for the Raspberry Pi out of the box, and can utilize heating and cooling, watering and spraying, as well as lighting based on fixed time intervals or sensor feedback. It even supports location based sunrise and sunset simulation — your critter might just think it never left Madagascar, New Caledonia or Brazil. All the configuration and monitoring happens in the browser, as demonstrated in [TheYOSH]’s live system with public read access (in Dutch).

It only seems natural that Python was the language of choice for a reptile-related system. On the other hand, it doesn’t have to be strictly used for reptiles or even terrariums; TerrariumPi will take care of aquariums and any other type of vivarium equally well. After all, we have seen the Raspberry Pi handling greenhouses and automating mushroom cultivation before.

Home Brew Augmented Reality

In July of 2016 a game was released that quickly spread to every corner of the planet. Pokemon Go was an Augmented Reality game that used a smart phone’s GPS location and camera to place virtual creatures into the person’s real location. The game was praised for its creativity and was one of the most popular and profitable apps in 2016. It’s been download over 500 million times since.

Most of its users were probably unaware that they were flirting with a new and upcoming technology called Augmented Reality. A few day ago, [floz] submitted to us a blog from a student who is clearly very aware of what this technology is and what it can do. So aware in fact that they made their own Augmented Reality system with Python and OpenCV.

In the first part of a multi-part series – the student (we don’t know their name) walks you through the basic structure of making a virtual object appear on a real world object through a camera. He 0r she gets into some fairly dense math, so you might want to wait until you have a spare hour or two before digging into this one.

Thanks to [floz] for the tip!

Cat Feeder Has Steampunk Flair And A GMail Account

While it is often said that “necessity is the mother of invention”, we can’t say that’s always been our experience here at Hackaday. You won’t need to search too long before you find a project or hack on this site that definitely falls out of the realm of strict necessity. But that’s part of the fun, there’s a reason this site isn’t called AppropriateUseOfTime.com

But when [Sam Storino] couldn’t seem to stop his cats from howling for their supper at 3:00 AM, he had the perfect opportunity to fulfill that age-old wisdom. Not only did he manage to turn a trip to the plumbing isle of his local home improvement store into a very Steampunk-looking automatic cat feeder, but he also found the time to write up an exceptionally detailed series of blog posts on what he learned during the process.

The heart of the machine is everyone’s favorite Linux board, the Raspberry Pi. You might be thinking the Pi is overkill for a simple timer, and you’d be right. Rather than just dump the food out on a set schedule, [Sam] decided to get a little fancy and come up with some Python scripts that will monitor a GMail inbox and activate the feeder hardware when it receives an email with the title “feed cats”. He then uses IFTTT to send the appropriately named email to the GMail account of his cat feeder on a specific schedule. Hey, nobody said necessity was the mother of straightforward invention.

In the final post of the series, [Sam] goes over the hardware side of the device. Copper pipe makes up the frame, which holds a commercial off-the-shelf dry food dispenser. The feeder was designed for manual operation, but by attaching a continuous rotation servo [Sam] can spin it up and dump a pre-measured amount of food via the Pi’s GPIO pins. The addition of some PVC pipe and fittings takes the food and (at least in theory) divides it equally between the two cat bowls below.

If you think [Sam] may have put a bit more thought than was necessary into something as simple as feeding his pets, keep in mind that he’s in exceptionally good company. Paging through the archives, it seems the intersection of felines and hackers is littered with gloriously complex contraptions.