Hackaday Prize Entry: Nuclear Powered Random Number Generator

Random number generators come in all shapes and sizes. Some are software based while others, known as true random number generators, are hardware based. These can be created from thermal noise, the photoelectric effect and other methods. But none of these were good enough for [M.daSilva]. He would base his off of the radioactive decay of Uranium 238, and construct a working nuclear powered random number generator.

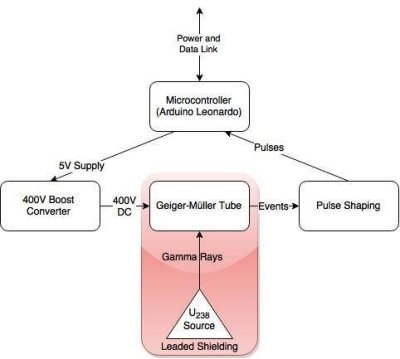
diagram

Because radioactive decay is unpredictable by nature, it makes for an excellent source for truly random data. The process is fairly simple. A piece of old fiestaware plate is used for the radioactive source. Put it in a lead enclosure along with a Geiger tube. Then wire in some pulse shaping circuitry and a microcontroller to count the alpha particles. And that’s about it. [M.daSilva] still has to do some statistical analysis to ensure the numbers are truly random, along with making a nice case for his project. But all in all, it seems to be working quite well.

Be sure to check out the video for quick rundown of [M.daSilva’s] project. If randomness is your thing, make sure you check out entropy harvested from uninitialized RAM, and the story behind the NIST randomness beacon.

Continue reading “Hackaday Prize Entry: Nuclear Powered Random Number Generator”

Retrotechtacular: Gone Fission

This week’s film begins as abruptly as the Atomic Age itself, though it wasn’t produced by General Electric until 1952. No time is wasted in getting to the point of the thing, which is to explain the frightening force of nuclear physics clearly and simply through friendly animations.

[Dr. Atom] from the Bohr Modeling Agency describes what’s going on in his head—the elementary physics of protons, neutrons, and electrons. He explains that atoms can be categorized into families, with uranium weighing in as the heaviest element at the time. While most atoms are stable, some, like radium, are radioactive. This evidently means it stays up all night doing the Charleston and throwing off neutrons and protons in the process of jumping between atomic families. [Dr. Atom] calls this behavior natural transmutation.

Artificial transmutation became a thing in the 1930s after scientists converted nitrogen into oxygen. After a couple of celebratory beers, they decided to fire a neutron at a uranium nucleus just to see what happened. The result is known as nuclear fission. This experiment revealed more about the binding force present in nuclei and the chain reaction of atomic explosions that takes place. It seemed only natural to weaponize this technology. But under the right conditions, a reactor pile made from graphite blocks interspersed with U-235 and -238 rods is a powerful and effective source of energy. Furthermore, radioactive isotopes have advanced the fields of agriculture, industry, medicine, and biochemistry.

Continue reading “Retrotechtacular: Gone Fission”

An Experiment To Test Radioactive Decay Varying Over Time

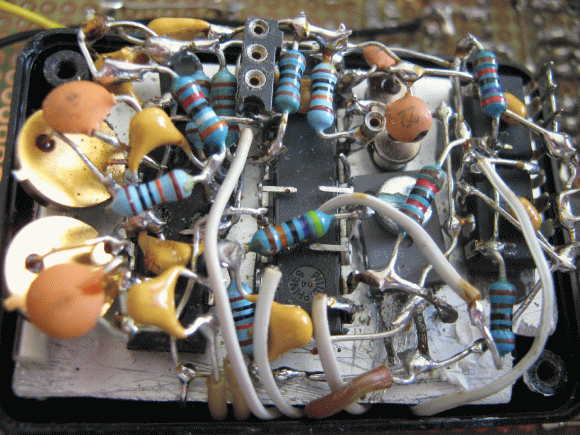
tritium_decay_experiment_black_box_electronics_top_view_IMG_3873

Here’s a hypothesis for you: radioactive decay varies over time, possibly with a yearly cycle. [Panteltje] decided to test this hypothesis, and so far has two year’s worth of data to comb over.

Radioactive decay can be easily detected with a photomultiplier tube, but these tubes are sensitive to magnetic fields and cosmic rays that would easily fly through just about any shielding [Pantelje] could come up with. Instead, the radiation in this setup is detected with simple photo detectors, pressed right up against a tritium-filled glass ampoule, a somewhat common lighting solution for fishing lures, watch faces, and compasses.

The experimental setup records the photo detectors, a temperature sensor, and a voltage reference, recording all the data to an EEPROM once an hour. All the important electronics are stuffed into a heatsinked, insulated, light-proof box, while the control electronics reside on a larger board with battery backup, alarm, indicator LEDs, and an RS232 connection.

After one year, [Pantelje] recorded the data and reset the experiment for another year. There are now two years worth of data available, ready for anyone to analyze. Of course, evidence that radioactive decay changes over the course of a few years would turn just about every scientific discipline on its head, so at the very least [Panteltje] has a great record of the output of tritium lights against the expected half-life.

Improving A Homebrew CT Scanner With Barium

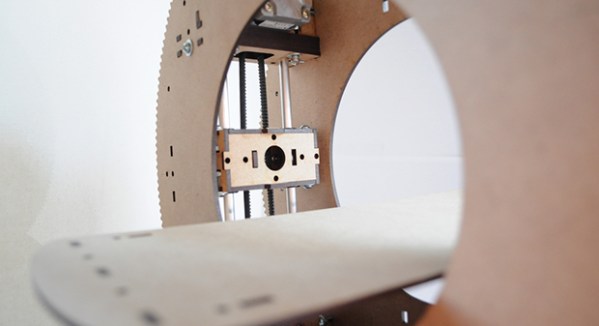
CTscanner

[Peter] has been working on his homebrew CT scanner for a while, and it’s finally become something more than a spinning torus of plywood. He’s managed to image the inside of a few pieces of produce using an off-the-shelf radiation detector and a radioactive barium source

When we last saw [Peter]’s CT scanner, he had finished the mechanical and electronic part of the Stargate-like device, but the radioactive source was still out of reach. He had initially planned on using either cadmium 109 or barium 133. Both of these presented a few problems for the CT scanner.

The sensor [Peter] is a silicon photodiode high energy particle detector from Radiation Watch this detector was calibrated for cesium with a detection threshold of around 80keV. This just wasn’t sensitive enough to detect 22keV emissions from Cd109, but a small add-on board to the sensor can recalibrate the threshold of the sensor down to the noise floor.

Still, cadmium 109 just wasn’t giving [Peter] the results he wanted, resulting in a switch to barium 133. This was a much hotter source (but still negligible in the grand scheme of radioactivity) that allowed for a much better signal to noise ratio and shorter scans.

With a good source, [Peter] started to acquire some data on the internals of some fruit around his house. It’s still a slow process with very low resolution – the avocado in the pic above has 5mm resolution with an acquisition time of over an hour – but the whole thing works, imaging the internal structure of a bell pepper surprisingly well.

Towards A Low Cost, Desktop CT Scanner

For [Peter Jansen], the most interesting course in grad school was Advanced Brain Imaging; each class was a lecture followed by a trip to the imaging lab where grad students would take turns being holed up in a MRI machine. A few years into his doctorate, [Peter] found himself in a very opportune situation – his local hackerspace just acquired a shiny new laser cutter, he had some free time on his hands, and the dream of creating a medical imaging device was still in the back of his mind. A few weeks later, the beginnings of an open source CT scanner began to take shape.

This isn’t an MRI machine that [Peter] so fondly remembered from grad school. A good thing, that, as superconducting magnets chilled with liquid helium is a little excessive for a desktop unit. Instead, [Peter] is building a CT scanner, a device that takes multiple x-ray ‘slices’ around an axis of rotation. These slices can then be recompiled into a 3D visualization of the inside of any object.

The mechanics of the build are a Stargate-like torus with stepper motor moving back and forth inside the disk. This, combined with the rotation of the disk and moving the bed back and forth allow the imager to position itself anywhere along an object.

For the radioactive detector, [Peter] is using a CCD marketed as a high-energy particle detector by Radiation Watch. Not only does this allow for an easy interface with a microcontroller, it’s also much smaller than big, heavy photomultiplier tubes found in old CT scanners. As for the source, [Peter] is going for very low intensity sources, most likely Barium or Cadmium that will take many minutes to capture a single slice.

The machine operates just above normal background radiation, so while being extremely safe for a desktop CT scanner, it is, however, very slow. This doesn’t bother [Peter], as ‘free’ time on a CT scanner allows for some very interesting, not seen before visualizations, such as a plant growing from a seed, spreading its roots, and breaking the surface as a seedling.

[Peter] still has some work to do on his desktop CT scanner, but once the stepper motor and sensor board are complete, he should be well on his way towards scanning carrots, apples, and just about everything else around his house.

A Think-tank Solution For Monitoring Radioactive Water Storge Tanks

SONY DSC

When we hear reports of radioactive water leaking into the ocean from the [Fukushima Dai-Ichi] plant in Japan we literally have to keep ourselves from grinding our teeth. Surly the world contains enough brain power to overcome these hazards. Instead of letting it gnaw at him, [Akiba] is directing his skills at one solution that could help with the issue. There are a number of storage tanks on site which hold radioactive water and are prone to leaking. After hearing that they are checked manually each day, with no automated level monitoring, he got to work. Above is the wireless non-contact tank level sensor rig he built to test out his idea.

A couple of things made this a quick project for him. First off, he just happened to have a MaxSonar MB7389 waterproof sonar sensor on hand. Think of this as a really fancy PING sensor that is water tight and can measure distance up to five meters. [Akiba’s] assumption is that the tanks have a hatch at the top into which this sensor would be positioned. The box next to it contains a Freakduino of his own design which includes hardware for wireless communications at 900 MHz. This is the same hardware he used for that wireless toilet monitor.

We really like seeing hacker solutions to environmental problems. A prime example is some of the cleanup hacks we saw around the time of the BP Gulf of Mexico oil spill.


Geiger Counter Tells You If Your Dishes Are Radioactive

geiger-counter-build

[Henrik] really turned out a nice little Geiger counter board based on a cold war era Geiger tube.

It works in much the same way as other projects along the same lines. It does run on batteries if needed, which is no small feat since the tube wants high voltage to operate correctly. And the video after the break shows it spitting out readings to a terminal window when connected to a computer via USB.

But what really caught our eye is the radioactive source material he used for testing. Since he didn’t have anything on hand he had to order something, and ended up going with a couple shards from a dinner plate. A radioactive dinner plate to exact and it’s a brand name you’ve probably heard of before. Red Fiesta Ware apparently used to be radioactive. It’s even mentioned in the intro to the Wikipedia article. Go figure!

One other thing we noticed was [Henrik’s] method of interfacing his multimeter with a breadboard. One of the project photos shows the probe with thin wire wrapped around the tip. We assume this is to make it easy to plug into the breadboard.

Despite this little digression away from the main project we did really enjoy learning about his build. And you can see him showing it off in the clip after the break.

Continue reading “Geiger Counter Tells You If Your Dishes Are Radioactive”