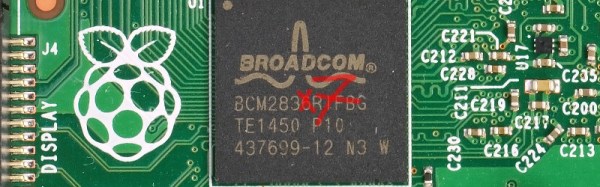
45-Year Old Nixie Calculator Turned UDP Server

In this beautiful and well-documented reverse engineering feat of strength, [Eric Cohen] reverse-engineered a 1971 Singer calculator to gain control of the fabulous Nixie tubes inside. Where a lesser hacker would have simply pulled the tubes out and put them in a more modern housing, [Eric] kept it all intact.

Not even content to gut the box and toss some modern brains inside, he snooped out the calculator’s internal wiring, interfaced a Raspberry Pi to it, and overrode the calculator’s (860 Hz) bus system. With the Pi on the inside, controlling the Nixie tubes, he did what any of us would do: set up a UDP server and write an Android app for his phone to push ASCII data over to the former calculator. When it’s not running in its default clock mode, naturally.

nixie-internals

All of this is extraordinarily well documented both on his website, in a slide presentation (PDF), and in video (embedded below). Our hats are tipped to the amazing attention to detail and fantastic documentation.

Now where is that Singer EC1117 calculator from 1971 that we’ve been saving for just such an occasion?

Continue reading “45-Year Old Nixie Calculator Turned UDP Server”

Hacker-Friendly SBCs: Which Ones?

We have run out of fruits to name all the single-board computers on the market, but that doesn’t mean you can’t buy a rotten one. Bad documentation, incomplete specifications and deprecated firmwares are just some of the caveats of buying only by price and hardware features. To help you out in case you just need to find a great and open-enough SBC with community support, [Eric] has put together a decent list with 81 individually reviewed boards over at hackerboards.com.

Continue reading “Hacker-Friendly SBCs: Which Ones?”

Kansas City Maker Faire: Pi-Plates

As soon as he spied the Jolly Wrencher on my shirt, [Jerry Wasinger] beckoned me toward his booth at Kansas City Maker Faire. Honestly, though, I was already drawn in. [Jerry] had set up some interactive displays that demonstrate the virtues of his Pi-Plates—Raspberry Pi expansion boards that follow the HAT spec and are compatible with all flavors of Pi without following the HAT spec. Why not? Because it doesn’t allow for stacking the boards.

[Jerry] has developed three types of Pi-Plates to date. There’s a relay controller with seven slots, a data acquisition and controller combo board, and a motor controller that can handle two steppers or up to four DC motors. The main image shows the data acquisition board controlling a fan and some lights while it gathers distance sensor data and takes the temperature of the Faire.

The best part about these boards is that you can stack them and use up to eight of any one type. For the motor controller, that’s 16 steppers or 32 DC motors. But wait, there’s more: you can still stack up to eight each of the other two kinds of boards and put them in any order you want. That means you could run all those motors and simultaneously control several voltages or gather a lot of data points with a single Pi.

The Pi-Plates are available from [Jerry]’s site, both singly and in kits that include an acrylic base plate, a proto plate, and all the hardware and standoffs needed to stack everything together.

Digital Opponent In An Analog Package

Unsatisfied with the present options for chess computers and preferring the feel of a real board and pieces, [Max Dobres] decided that his best option would be to build his own.

Light and dark wood veneer on 8mm MDF board created a board that was thin enough for adding LEDs to display moves and for the 10mm x 1mm neodymium magnets in the pieces to trip the reed switches under each space. The LEDs were wired in a matrix and connected to an Arduino Uno by a MAX7219 LED driver, while the reed switches were connected via a Centipede card. [Dobres] notes that you’ll want to test that the reed switches are positioned correctly — otherwise they might not detect the pieces!

Continue reading “Digital Opponent In An Analog Package”

Join The GUI Generation: QTCreator

More and more projects require a software component these days. With everything being networked, it is getting harder to avoid having to provide software for a desktop or phone environment as well as the code in your embedded device.

If you’ve done a lot of embedded systems work, you probably already know C and C++. If so, it is pretty easy to grab up a C compiler and write a command-line application that does what you want. The problem is that today’s users have varying degrees of fear about the command line ranging from discomfort to sheer terror. On a mobile device, they probably don’t even know how to get to a command line. I’ve been waiting for years for the WIMP (Windows/Icon/Mouse/Pointer) fad to fade away, but even I have to admit that it is probably here for the foreseeable future.

qtrigolSo what’s the alternative? There are actually quite a few. However, I wanted to talk about one that is free, has a wide range of deployment options, uses C++, and is easy to pick up: Qt. Specifically, creating programs with QtCreator (see right). Yes, there are other options, and you can develop Qt programs in a number of ways.

You might think Qt isn’t free. There was a time that it was free for open source projects, but not for commercial projects. However, recent licensing changes (as of version 4.5) have made it more like using gcc. You can elect to use the LGPL which means it is easy to use the Qt shared libraries with closed software. You might also think that a lot of strange constructs that “extend” C++ in unusual ways. The truth is, it does, but with QtCreator, you probably won’t need to know anything about that since the tool will set up most, if not all, of that for you.

Background

If you ever used Visual Basic or something similar, you will feel right at home with QtCreator. You can place buttons and text edit boxes and other widgets on a form and then back them up with code. Buttons create signals when you push them. There are lots of signals like text changed or widgets (controls) being created or destroyed.

To handle a signal, an object provides a slot. There is a meta-compiler that preprocesses your C++ code to get all the signal and slot stuff converted into regular C++. Here’s the good news: you don’t really care. In QtCreator you can write code to handle a button push and exactly how that happens isn’t really much of a worry.

QtCreator has kits that can target different platforms and — in general — the code is reasonably portable between platforms. If you do want to do mobile development for Android or iOS, be sure that you understand the limitations before you start so you can avoid future pitfalls.

You Need Class

Like many similar frameworks, Qt uses an application class (QtApplication) that represents a do-nothing application. Your job is to customize a subclass and have it do what you want. You add widgets and you can even add more screens, if you like. You can connect signals to existing slots or new slots.

There are many classes available, and the online documentation is quite good. Depending on which version of Qt you are using, you’ll need to find the right page (or ask QtCreator to find it for you). However, just to whet your appetite, here’s the Qt5 reference page. From there you can find classes for GUI widgets, strings, network sockets, database queries, and even serial ports.

I could do an entire tutorial on using QtCreator, but it would be a duplication of effort. There’s already a great getting started one provided. You’ll find there is plenty of documentation.

Portability

How do you enumerate serial ports? It depends on the platform, right? In Qt, the platform-specific part is hidden from you. For example, here’s a bit of code that fills in a combo box with the available serial port:

MainWindow::MainWindow(QWidget *parent) :
 QMainWindow(parent),
 ui(new Ui::MainWindow)
{
 ui->setupUi(this);
// initialize list of serial ports
 ports = QSerialPortInfo::availablePorts();
// fill in combo box
 for (int i=0; i<ports.length(); i++) 
 {
   ui->comport->addItem(ports[i].portName(), QVariant(i));
 }
}

The QSerialPortInfo object provides an array of serial port objects. The ui->comport is a combo box and the addItem method lets me put a display string and a data item in for each selection. In this case, the display is the portName of the port and the extra data is just the index in the array (as a variant, which could be different types of data, not just a number). When you select a port, the index lets the program look up the port to, for example, open it.

When the combo box changes, a currentIndexChanged signal will occur. Here’s the slot handler for that:

void MainWindow::on_comport_currentIndexChanged(int index)
{
 QString out;
 // get selected index
 int sel=ui->comport->currentData().toInt();
// build up HTML info string in out
 out="<h1>Serial Port Info</h1>";
 ui->output->clear();
 out += ports[sel].portName() + " " + ports[sel].description() + "
";
 out += ports[sel].systemLocation() + "
";
 if (ports[sel].hasVendorIdentifier() && ports[sel].hasProductIdentifier())
 out += ports[sel].manufacturer() + " ("+ QString::number(ports[sel].vendorIdentifier(),16) + ":" + QString::number(ports[sel].productIdentifier(),16) + ")";
 // and put it on the screen
 ui->output->setText(out);
}

In this case, the result is information about the serial port. You can see the resulting output, below. The QString is Qt’s string class and, obviously, the text display widget understands some HTML.

qtserial

Not Just for GUIs

You can develop console applications using Qt, but then many of the provided classes don’t make sense. There’s even a Qt for Embedded (essentially Linux with no GUI). You can find guides for Raspberry Pi and BeagleBoard.

On the mobile side, you can target Android, iOS, and even Blackberry, along with others. Like anything, it probably won’t just be “push a button” and a ported application will fall out. But it still should cut down on development time and cost compared to rewriting a mobile app from scratch.

And the Winner Is…

I’m sure if you want some alternatives, our comment section is about to fill up with recommendations. Some of them are probably good. But it strikes me that not everyone has the same needs and background. The best tool for you might not work as well for me. I find Qt useful and productive.

Even if Qt isn’t your tool of choice, it still can be handy to have in your tool bag. You never know when you will need a quick and dirty cross-platform application.

Beautiful Raspberry Pi Laptop Inspired By Psion

In the four years since the first Raspberry Pi appeared, there have been many takes on a portable computer based on it. The choice of components is fairly straightforward, there is now a wide selection of suitable keyboards, displays, and battery packs to choose from. You might therefore think that there could be nothing new in the world of the portable Pi, indeed another one might be as mundane as just another PC build.

News reaches us from Japan this morning of [nokton35mm]’s “RasPSION” Pi laptop build (machine translation) inspired by the Psion portable computers of the late 1990s.

That hinge, in close-up

The RasPSION features the Raspberry Pi 7″ display as well as a Bluetooth keyboard, 5V battery pack and the Pi camera. What makes it special is its laser cut case, and in particular its pivoting hinge mechanism. This is the part that takes its inspiration from the Psion machines, and its operation can be seen in the video below the break.

He claims the finished laptop gives him about two hours of battery life, which is no mean feat given that it lacks the sophisticated power management you’ll find in a commercial laptop. We hope that in time we’ll see him posting the details of the build somewhere other than Twitter, as this is a laptop we’d love to know more about.

Continue reading “Beautiful Raspberry Pi Laptop Inspired By Psion”

A Pi Robot Without A Hat

Daughter boards for microcontroller systems, whether they are shields, hats, feathers, capes, or whatever, are a convenient way to add sensors and controllers. Well, most of the time they are until challenges arise trying to stack multiple boards. Then you find the board you want to be mid-stack doesn’t have stackable headers, the top LCD board blocks the RF from a lower board, and extra headers are needed to provide clearance for the cabling to the servos, motors, and inputs. Then you find some boards try to use the pins for different purposes. Software gets into the act when support libraries want to use the same timer or other resources for different purposes. It can become a mess.

The alternative is to unstack the stack and use external boards. I took this approach in 2013 for a robotics competition. The computer on the robots was an ITX system which precluded using daughter boards, and USB ports were my interface of choice. I used a servo controller and two motor controllers from Pololu. They are still available and I’m using them on a rebuild, this time using the Raspberry Pi as the brain. USB isn’t the only option, though. A quick search found boards at Adafruit, Robotshop, and Sparkfun that use I2C.

Continue reading “A Pi Robot Without A Hat”