RGB LED Disco Ball Reacts To Sound And Color

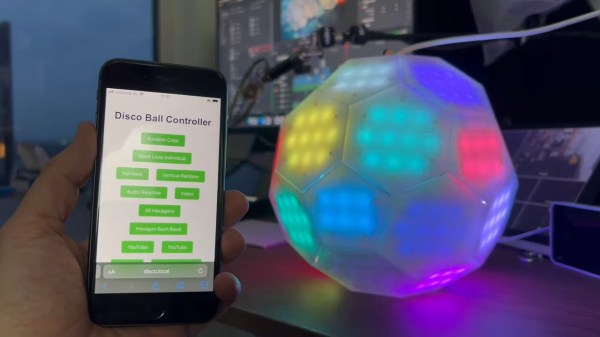
Although disco music and dancing may be long dead, the disco ball lives on as a staple of dance parties everywhere. [Tim van de Vathorst] spent a considerable amount of time reinventing the disco ball into something covered with RGB LEDs that reacts to sound and uses a color sensor to change hue based on whatever it’s presented with.

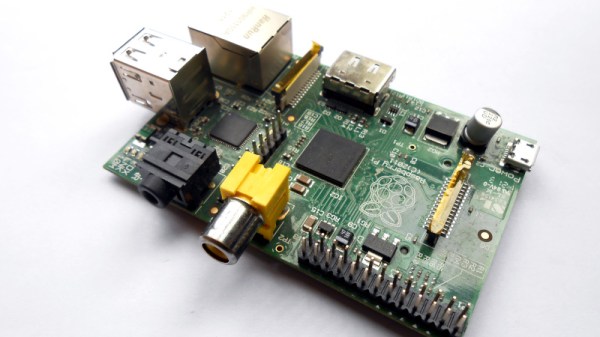
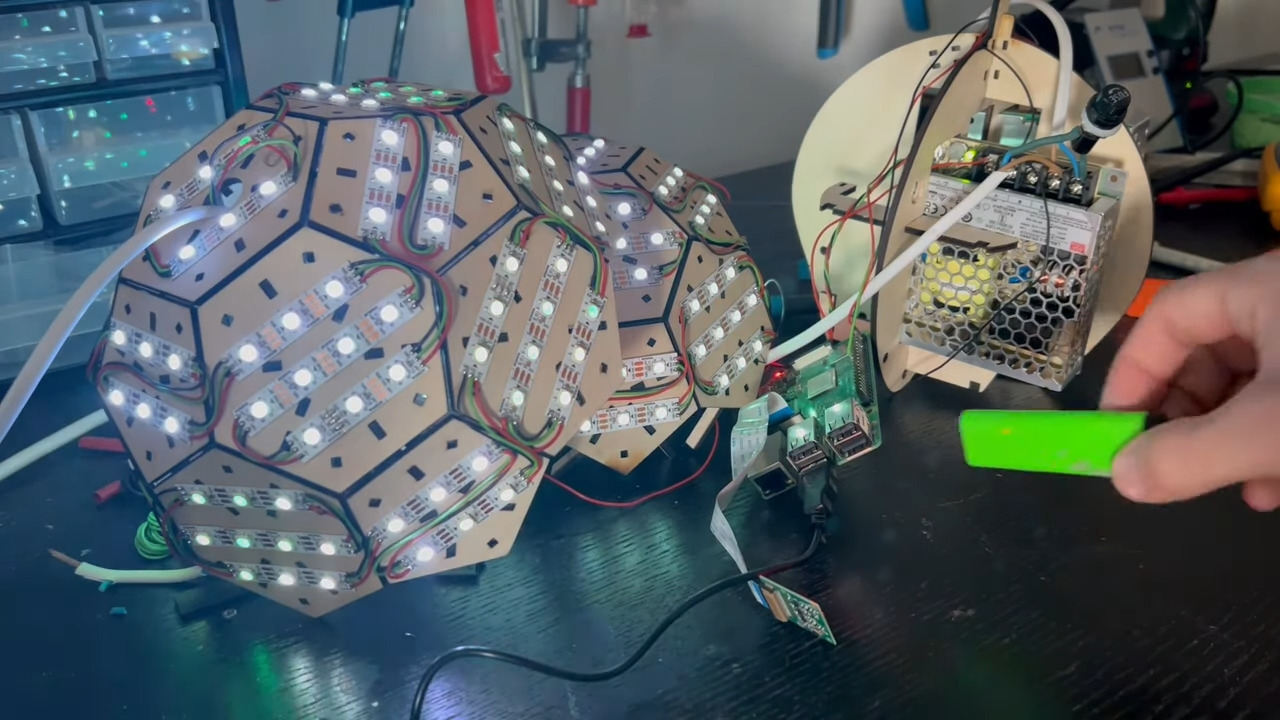
[Tim] started by modeling the disco ball after a soccer ball with a mixture of pentagons and hexagons. Then it was off to the laser cutter to cut it out of 3mm plywood sheets. Once assembled, [Tim] added LED strips across all the faces and wired them up. Then it was time to figure out how to hold the guts together inside of the ball. Back to the drawing board and laser cutter [Tim] went to design a simple two-piece skeleton to hold the Raspberry Pi and the power supply.

In order to do some of the really interesting effects, [Tim] had to make sure that the faces were divvied up correctly in code. That was difficult and involved a really big array, but the result looks worth the trouble. Finally, [Tim] covered the ball in white acrylic to diffuse the LEDs. As you will see in the build/demo video after the break, the ball turned out really well. The only real problem is that the camera doesn’t work very well without light, which is something good parties are usually short on. [Tim] might add a spotlight or something in the future.

Do you prefer the mirrored look of the standard disco ball? Peep the tiny one in this Disco Containment Unit.

Continue reading “RGB LED Disco Ball Reacts To Sound And Color”

render of the Amiga juggler demo

The Juggler: In Rust

Back on the theme of learning to program by taking on a meaningful project — we have another raytracing demo — this time using Rust on the Raspberry Pi. [Unfastener] saw our previous article about writing a simple raytracer in spectrum BASIC and got inspired to try something similar. The plan was to recreate the famous juggler 3D demo, from the early days of 3D rendering on the Amiga.

The juggler story starts with an Amiga programmer called [Eric Graham] who created ssg, the first ray tracer application on a personal computer. A demo was shown to Commodore, who didn’t believe it was done on their platform, but a quick follow-up with the actual software used soon quelled their doubts. Once convinced, they purchased the rights to the demo for a couple of thousand dollars (in 1986 money, mind you) to use in promotional materials. [Eric] developed ssg into the popular Sculpt 3D, which became available also on Mac and Windows platforms, and kick-started a whole industry of personal 3D modelling and ray tracing.

Anyway, back to the point. [Unfastener] needed to get up the considerable Rust learning curve, and the best way to do that is to let someone else take care of some of the awkward details of dealing with GUI, and just concentrate on the application. To that end, they use the softbuffer and winit Rust crates that deal with the (important, yet frankly uninteresting) details of building frame buffers and pushing the pixels out to the window manager in a cross-platform way. Vecmath takes care of — you guessed it — the vector math. There’s no point reinventing that wheel either. Whilst [Unfastener] mentions the original Amiga demo took about an hour per frame to render, this implementation runs in real-time. To that end, the code performs a timed pre-render to determine the most acceptable resolution to get an acceptable frame rate, achieving a respectable 30 or so frames per second on a Pi 5, with the older Pis needing to drop the resolution a little. This goes to show how efficient Rust code can be and, how capable the new Pi is. How far we have come.

We saw another interesting rust-based raytracer a while back, which is kinda fun. We’ve also covered rust in other applications a few times, like inside the Linux kernel. Finally here’s our guide to getting started with rust, in case you need any more motivation to have a crack at this upcoming language.

Cheap Microscope Can Take Amazing Images With Some Simple Upgrades

[Birdbrain] is trying to make their own microfluidic devices. To aid in this quest, they need a quality microscope to see what they’re doing. Instead of buying one outright, they purchased a cheap microscope and upgraded it to do the job instead.

Usability and performance is greatly improved over the stock unit, which was really only fit for learning purposes.

The cheap education-grade microscope cost around $50 USD, had few features, and wasn’t much chop out of the box. The worst part was the sample stage — which was poorly adjustable in the up-and-down axis and could only track about two centimeters up and down. There was no X or Y axis panning either, and it lacked a proper condensor iris, too. Oh, and the included camera module had a resolution of just 240p.

To fix these problems, the microscope was first outfitted with a fully redesigned X-Y-Z stage built out of old components from a salvaged DVD drive and an additional NEMA stepper motor. Camera-wise, it was hooked up with a 2K Raspberry Pi Camera Module 3 running at 10 to 15 frames per second, which broadcasts video over a local network for easy viewing on an external monitor. It also gained an epi-illumination setup for doing reflected light microscopy.

If you’re eager to build a quality microscope with all the controls you personally dream of, this could be a relevant project for you to study. We’ve featured some other builds along these lines before, too. Video after the break.

Continue reading “Cheap Microscope Can Take Amazing Images With Some Simple Upgrades”

For Today Only, Pi=3

In 1897 the state assembly of the American state of Indiana famously tried and failed to pass a bill which would have had the effect of denying the value of the mathematical constant Pi. It was an attempt to define a method to “square the circle”, or draw a square of the same area as a given circle through a series of compass and straight edge steps. It’s become something of a running joke and internet meme, and of course defining Pi exactly remains as elusive as ever.

Today and today alone though, you can in one sense claim that Pi is 3, because it’s twelve years since the launch of the original Raspberry Pi. The 29th of February 2012 was a leap day, and today being the third leap day since, could be claimed by a date pedant to be the third birthday of the little board from Cambridge. It’s all a bit of fun, but the Pi folks have marked the occasion by featuring an LED birthday cake.

Three leap days ago, your scribe was up at the crack of dawn to be one of the first to snag a board, only to witness the websites of the two distributors at the time, RS and Farnell, immediately go down under the denial of service formed by many thousands of other would-be Pi owners with the same idea. It would be lunchtime before the sites recovered enough to slowly buy a Pi, and it would be May before the computer arrived.

The Pi definitely arrived with a bang, but at tweleve years old is it still smoking? We think so, while it’s normalized the idea of an affordable little board to run Linux to the extent that it’s one of a crowd, the Pi folks have managed to stay relevant and remain the trend setter for their sector rather than Arduino-style becoming an unwilling collective term.

We’ve said this before here at Hackaday, that while the Pi boards are good, it’s not them alone which sets them apart from the clones but their support and software. Perhaps their greatest achievement is that a version of the latest Raspberry Pi OS can still run on that board ordered in February 2012, something unheard of elsewhere in single board computers. If you still have an original Pi don’t forget this, while it’s not the quickest any more there are still plenty of tasks at which they can excel. Meanwhile with their move into branded silicon and their PCIe architecture move we think things are looking exciting, and we look forward to another 12 years and three birthdays for them. Happy 3rd birthday, Raspberry Pi!

Reggaeton-Be-Gone Disconnects Obnoxious Bluetooth Speakers

If you’re currently living outside of a Spanish-speaking country, it’s possible you’ve only heard of the music genre Reggaeton in passing, if at all. In places with large Spanish populations, though, it would be more surprising if you hadn’t heard it. It’s so popular especially in the Carribean and Latin America that it’s gotten on the nerves of some, most notably [Roni] whose neighbor might not do anything else but listen to this style of music, which can be heard through the walls. To solve the problem [Roni] is now introducing the Reggaeton-Be-Gone. (Google Translate from Spanish)

Inspired by the TV-B-Gone devices which purported to be able to turn off annoying TVs in bars, restaurants, and other places, this device can listen to music being played in the surrounding area and identify whether or not it is hearing Reggaeton. It does this using machine learning, taking samples of the audio it hears and making decisions based on a trained model. When the software, running on a Raspberry Pi, makes a positive identification of one of these songs, it looks for Bluetooth devices in the area and attempts to communicate with them in a number of ways, hopefully rapidly enough to disrupt their intended connections.

In testing with [Roni]’s neighbor, the device seems to show promise although it doesn’t completely disconnect the speaker from its host, instead only interfering with it enough for the neighbor to change locations. Clearly it merits further testing, and possibly other models trained for people who use Bluetooth speakers when skiing, hiking, or working out. Eventually the code will be posted to this GitHub page, but until then it’s not the only way to interfere with your neighbor’s annoying stereo.

Thanks to [BaldPower] and [Alfredo] for the tips!

Pi Pico Enhances RadioShack Computer Kit

While most of us now remember Radio Shack as a store that tried to force us to buy batteries and cell phones whenever we went to buy a few transistors and other circuit components, for a time it was an innovative and valuable store for electronics enthusiasts before it began its long demise. Among other electronics and radio parts and kits there were even a few DIY microcomputers, and even though it’s a bit of an antique now a Raspberry Pi Pico is just the thing to modernize this Radio Shack vintage microcomputer kit from the mid 80s.

The microcomputer kit itself is built around the 4-bit Texas Instruments TMS1100, one of the first mass-produced microcontrollers. The kit makes the processor’s functionality more readily available to the user, with a keypad and various switches for programming and a number of status LEDs to monitor its state. The Pi Pico comes into the equation programmed to act as a digital clock with an LED display to drive the antique computer. The Pi then sends a switching pulse through a relay to the microcomputer, which is programmed as a binary counter.

While the microcomputer isn’t going to win any speed or processing power anytime soon, especially with its clock signal coming from a slow relay module, the computer itself is still fulfilling its purpose as an educational tool despite being nearly four decades old. With the slow clock speeds it’s much more intuitive how the computer is stepping through its tasks, and the modern Pi Pico helps it with its tasks quite well. Relays on their own can be a substitute for the entire microcontroller as well, like this computer which has a satisfying mechanical noise when it’s running a program.

Continue reading “Pi Pico Enhances RadioShack Computer Kit”

A Straightforward AI Voice Assistant, On A Pi

With AI being all the rage at the moment it’s been somewhat annoying that using a large language model (LLM) without significant amounts of computing power meant surrendering to an online service run by a large company. But as happens with every technological innovation the state of the art has moved on, now to such an extent that a computer as small as a Raspberry Pi can join the fun. [Nick Bild] has one running on a Pi 4, and he’s gone further than just a chatbot by making into a voice assistant.

The brains of the operation is a Tinyllama LLM, packaged as a llamafile, which is to say an executable that provides about as easy a one-step access to a local LLM as it’s currently possible to get. The whisper voice recognition sytem provides a text transcript of the input prompt, while the eSpeak speech synthesizer creates a voice output for the result. There’s a brief demo video we’ve placed below the break, which shows it working, albeit slowly.

Perhaps the most important part of this project is that it’s easy to install and he’s provided full instructions in a GitHub repository. We know that the quality and speed of these models on commodity single board computers will only increase with time, so we’d rate this as an important step towards really good and cheap local LLMs. It may however be a while before it can help you make breakfast.

Continue reading “A Straightforward AI Voice Assistant, On A Pi”