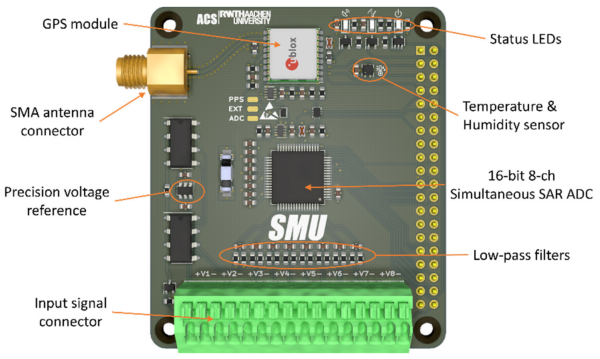
A pinout diagram of the new Pi 4, showing all the alternate interfaces available.

Did You Know That The Raspberry Pi 4 Has More SPI, I2C, UART Ports?

We’ve gotten used to the GPIO-available functions of Raspberry Pi computers remaining largely the same over the years, which is why it might have flown a little bit under the radar: the Raspberry Pi 4 has six SPI controllers, six I2C controllers, and six UARTs – all on its 40-pin header. You can’t make use of all of these at once, but with up to four different connections wired to a single pin you can carve out a pretty powerful combination of peripherals for your next robotics, automation or cat herding project.

The datasheet for these peripherals is pleasant to go through, with all the register maps nicely laid out – even if you don’t plan to work with the register mappings yourself, the maintainers of your preferred hardware enablement libraries will have an easier time! And, of course, these peripherals are present on the Compute Module 4, too. It might feel like such a deluge of interfaces is excessive, however, it lets you achieve some pretty cool stuff that wouldn’t be possible otherwise.

Having multiple I2C interfaces helps deal with various I2C-specific problems, such as address conflicts, throughput issues, and mixing devices that support different maximum speeds, which means you no longer need fancy mux chips to run five low-resolution Melexis thermal camera sensors at once. (Oh, and the I2C clock stretching bug has been fixed!) SPI interfaces are used for devices with high bandwidth, and with a few separate SPI ports, you could run multiple relatively high-resolution displays at once, No-Nixie Nixie clock style.

As for UARTs, the Raspberry Pi’s one-and-a-half UART interface has long been an issue in robotics and home automation applications. With a slew of devices like radio receivers/transmitters, LIDARs and resilient RS485 multi-drop interfaces available in UART form, it’s nice that you no longer have to sacrifice Bluetooth or a debug console to get some fancy sensors wired up to your robot’s brain. You can enable up to six UARTs. Continue reading “Did You Know That The Raspberry Pi 4 Has More SPI, I2C, UART Ports?”

Sending Pics To Grandma, No Smartphone Needed

When it comes to keeping in touch with the grandparents, a lack of familiarity with modern technology can get in the way. [palmerabollo] wanted to share photos with his grandmother, but found that it was difficult as she didn’t have a smartphone or an Internet connection to receive photos. Thus, a custom build for grandma was in order! (translated)

To minimise maintenance requirements, the build relies on a thermal receipt printer. Each roll of thermal paper is good for printing off about 150 images before needing a change, so it’s a low-cost, fuss-free solution with no need for ink changeovers.

A Raspberry Pi Zero 2W runs the show, paired with a HAT that provides cellular internet connectivity. Photos are sent over Telegram with some custom Python code that [palmerabollo] put together. The system uses the Python “thermalprinter” library, with the Floyd-Steinberg dithering algorithm baked in allowing nice quality even on the simple thermal printer.

It’s a fun build, and lets [palmerabollo] send his grandmother fun photos and messages without requiring any effort on her part. It’s super cute to see the photos stuck up on the refrigerator, too.

There’s plenty of fun to be had with thermal printers, so don’t be afraid to get stuck in yourself! Video after the break. Continue reading “Sending Pics To Grandma, No Smartphone Needed”

NTP Server Gets Time From Space

Cheap GPS units are readily available nowadays, which is great if you have something that needs to be very precisely located. Finding the position of things is one of many uses for GPS, though. There are plenty of ways to take advantage of some of the ancillary tools that the GPS uses to determine location. In this case it’s using the precise timekeeping abilities of the satellites to build a microsecond-accurate network time protocol (NTP) server.

GPS works by triangulating position between a receiver and a number of satellites, but since the satellites are constantly moving an incredibly precise timing signal is needed in order to accurately determine location from all of these variables. This build simply teases out that time information from the satellite network and ignores the location data. There are only two parts to this build, a cheap GPS receiver and a Raspberry Pi, but [Austin] goes into great detail about how to set up the software side as well including installing PPS, GPSd, and then setting up the actual NTP server on the Pi.

While this is an excellent way to self-host your own NTP server if you don’t have Internet access (or just want to do it yourself), [Austin] does note that this is probably overkill on timekeeping as far as accuracy goes. On the other hand, the Raspberry Pi has no built-in real time clock of its own, so this might actually be a cost-competitive way of timekeeping even when compared to something more traditional like a DS3231 RTC module.

Continue reading “NTP Server Gets Time From Space”

New Part News: Raspberry Pi Cuts Out The Middleman

Raspberry Pi has just announced that they’ll be selling their RP2040 microcontroller chips by the reel, directly to you, at a decent discount.

About a year ago, Raspberry Pi released its first piece of custom silicon, the RP2040 microcontroller. They’ve have been selling these chips in bulk to selected customers directly, but have decided to open up the same deals to the general public. If you’re looking for 500 chips or more, you can cut out the middleman and save some serious dough.

Because the RP2040 was a clean-slate design, it uses a relatively modern production process that yields many more processors per silicon wafer, and it has been essentially spared from the chip crisis of 2020-2021. According to CEO Eben Upton, they’ve sold 1.5 million in a year, and have wafers in stock for 20 million more. You do the math, but unless you’re predicting the chip shortage to last in excess of 12 years, they’re looking good.

Game Boy Becomes Super Game Boy With A Pair Of Pis

For the Nintendo aficionados of the 90s, the Super Game Boy was a must-have cartridge for the Super Nintendo which allowed gamers to play Game Boy games on your TV. Not only did it allow four-color dot-matrix gaming on the big screen, but it let you play those favorite Game Boy titles without spending a fortune on AA batteries. While later handhelds like the PSP or even Nintendo Switch are able to output video directly to TVs without issue, the original Game Boy needed processing help from an SNES or, as [Andy West] shows us, it can also get that help from a modern microcontroller.

Testing the design before installing it in the NES case.

The extra processing power in this case comes from a Raspberry Pi Pico which is small enough to easily fit inside of a donor NES case and also powerful enough to handle the VGA directly. For video data input, the Pico is connected to the video pins on the Game Boy’s main board through a level shifter. The main board is also connected to a second Pico which handles the controller input from an NES controller. Some fancy conversion needed to be done at this point because although the controller layouts are very similar, they are handles by the respective consoles completely differently.

With all of the technical work largely out of the way, [Andy] was able to put the finishing touches on the build. These included making sure the power buttons, status LEDs, and reset button all functioned, and restoring the NES case complete with some custom “Game Guy” graphics to match the original design of the Game Boy. We commend the use of original Game Boy hardware in this build as well, which even made it possible for [Andy] and his wife to play a head-to-head game of Dr. Mario through a link cable with another Game Boy. If you’re looking for a simpler way of playing on original hardware without burning a hole in your wallet buying AA batteries, take a look at this Game Boy restoration which uses a Lithium battery instead.

Continue reading “Game Boy Becomes Super Game Boy With A Pair Of Pis”

Portable PI Powered Music Player

There was a brief time in the early 2000s when we carried cellphones, wallets, keys, and a bespoke digital media player loaded with a small selection of our music libraries. Devices like iPods, Zunes, Sandisk Sansa, and iRiver. Then as cell phones gained more storage and processing power, the two devices became one, and audio players slipped to obscurity as sports accessories. Perhaps in that vein, [BalderDragonSlayer] made his own Raspberry Pi-powered media player.

The device was cobbled together using a Raspberry Pi Zero, an Adafruit OLED bonnet, a LiPo charger, and a cheap USB DAC. The interface software is written in python, which has all your usual player controls, using the directional joystick and two pushbuttons on the bonnet. DietPi is a slimmed-down Linux that offers an impressively fast boot time, which is why it was picked for this project. The case was a simple project case with some holes dremeled into the face for the screen and buttons.

It is a wonderful little project that seems wonderful for walks in the park. This isn’t the first Pi-powered media player we’ve seen before. But we’re hoping we see more in the future.

Automated Mushroom Cultivation Yields Delicious Fried Goodies

[Kyle Gabriel] knows mushrooms, and his years of experience really shine through in his thorough documentation of an automated mushroom cultivation environment, created with off-the-shelf sensors and hardware as much as possible. The results speak for themselves, with some delicious fried oyster mushrooms to show for it!

Fried oyster mushrooms, grown from scratch.

The most influential conditions for mushroom cultivation are temperature, humidity, and CO2 concentration, and to automate handling the environmental conditions [Kyle] created Mycodo, an open-source system that leverages inexpensive hardware and parts while also having the ability to take regular photos to keep an eye on things.

Calling [Kyle]’s documentation “comprehensive” doesn’t do it justice, and he addresses everything from setting up a positive pressure air filtration system for a work area, to how to get usable cultures from foraged mushrooms, all the way through growth and harvesting. He even includes a delicious-looking recipe for fried mushrooms. It just doesn’t get more comprehensive than that.

We’ve seen [Kyle]’s earlier work before, and it’s fantastic to see the continued refinement. Check out a tour of the whole thing in the video embedded below (or skip to 16:11 if you want to make yourself hungry.)

Continue reading “Automated Mushroom Cultivation Yields Delicious Fried Goodies”