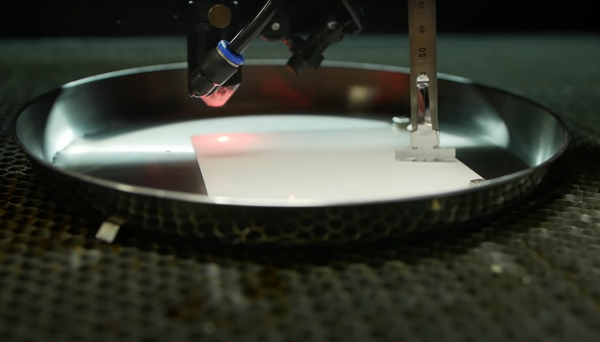
Repairing 200+ Raspberry Pis For A Good Cause

If somebody told you they recently purchased over 200 Raspberry Pis, you might think they were working on some kind of large-scale clustering project. But in this case, [James Dawson] purchased the collection of broken single-board computers with the intention of repairing them so they could be sent to developing countries for use in schools. It sounds like the logistics of that are proving to be a bit tricky, but we’re happy to report he’s at least made good progress on getting the Pis back up and running.

He secured this trove of what he believes to be customer returned Raspberries or the princely sum of £61 ($83 USD). At that price, even if only a fraction ended up being repairable, you’d still come out ahead. Granted all of these appear to be the original Model B, but that’s still a phenomenal deal in our book. Assuming of course you can find some reasonable way to triage them to sort out what’s worth keeping.

To that end, [James] came up with a Bash script that allowed him to check several hardware components including the USB, Ethernet, I2C, and GPIO. With the script on an SD card and a 3.5″ TFT plugged into the Pi’s header for output, he was able to quickly go through the box to get an idea of what sort of trouble he’d gotten himself into. He was only about half way through the process when he wrote this particular blog post, but by that point, he’d found just 40 Pis which wouldn’t start at all. He suspects these might be victims of some common issue in the power circuitry that he’ll investigate at a later date.

The majority of Pis he checked were suffering from nothing worse than some bent GPIO pins or broken SD card slots. Some of the more abused examples had their USB ports ripped off entirely, but were otherwise fine. Another 10 had dead Ethernet, and 4 appear to have damaged traces leading to their HDMI ports. While we’re interested in hearing if [James] can get those 40 dark Pis to fire back up, so far the results are quite promising.

Donating hardware is always a tricky thing, so for now [James] says he’ll be selling the repaired Pis on eBay and donating the proceeds to the Raspberry Pi Foundation so they can continue to develop hardware that will (potentially) accomplish their goal of giving students all over the world a functional computer.

New Parts, New Hacks

The biggest news this week is that Raspberry Pi is no longer synonymous with single-board Linux computers: they’re dipping their toes into the microcontroller business with their first chip: the RP2040, and the supporting breakout board, the Pico. It’s an affordable, capable microcontroller being made by a firm that’s never made microcontrollers before, so that’s newsy.

The Hackaday comments lit on fire about this chip, with some fraction of the commenters lamenting the lack of wireless radios onboard. It’s a glass-half-full thing, I guess, but the RP2040 isn’t an ESP32, folks. It’s something else. And it’s got a hardware trick up its sleeve that really tickles my fancy — the programmable input/output (PIO) units.

The other half of the commenters were, like me, salivating about getting to try out some of the new features. The PIO, of course, was high on that list, but this chip also caters to folks who are doing high-speed DSP, with fast multiplication routines burnt into ROM and a nice accumulator. (You know you’re a microcontroller nerd when you’re reading through a 663-page datasheet and thinking about all the funny ways you can use and/or abuse the hardware peripherals.)

All chip designs are compromises. Nothing can do everything. The new peripherals, novel combinations of old elements, and just pleasant design decisions, open up new opportunities if you’re willing to seek them out. When the ESP32 was new, I was looking at their oddball parallel-I2S hardware and thinking what kind of crazy hacks that would enable, and clever hackers have proven me right. I’d put my money on the PIO being similar.

New chips open up new possibilities for hacks. What are you going to do with them?

Raspberry Pi Enters Microcontroller Game With $4 Pico

Raspberry Pi was synonymous with single-board Linux computers. No longer. The $4 Raspberry Pi Pico board is their attempt to break into the crowded microcontroller module market.

The microcontroller in question, the RP2040, is also Raspberry Pi’s first foray into custom silicon, and it’s got a dual-core Cortex M0+ with luxurious amounts of SRAM and some very interesting custom I/O peripheral hardware that will likely mean that you never have to bit-bang again. But a bare microcontroller is no fun without a dev board, and the Raspberry Pi Pico adds 2 MB of flash, USB connectivity, and nice power management.

As with the Raspberry Pi Linux machines, the emphasis is on getting you up and running quickly, and there is copious documentation: from “Getting Started” type guides for both the C/C++ and MicroPython SDKs with code examples, to serious datasheets for the Pico and the RP2040 itself, to hardware design notes and KiCAD breakout boards, and even the contents of the on-board Boot ROM. The Pico seems designed to make a friendly introduction to microcontrollers using MicroPython, but there’s enough guidance available for you to go as deep down the rabbit hole as you’d like.

Our quick take: the RP2040 is a very well thought-out microcontroller, with myriad nice design touches throughout, enough power to get most jobs done, and an innovative and very hacker-friendly software-defined hardware I/O peripheral. It’s backed by good documentation and many working examples, and at the end of the day it runs a pair of familiar ARM MO+ CPU cores. If this hits the shelves at the proposed $4 price, we can see it becoming the go-to board for many projects that don’t require wireless connectivity.

But you want more detail, right? Read on.

Continue reading “Raspberry Pi Enters Microcontroller Game With $4 Pico”

Solid Oak Arcade Cabinet: When Particle Board Won’t Do

Having an arcade cabinet of one’s own is a common dream among those who grew up during the video game arcade heyday of the 80s and early 90s. It’s a fairly common build that doesn’t take too much specialized knowledge to build. This cabinet, on the other hand, pulled out all of the stops for the cabinet itself, demonstrating an impressive level of woodworking expertise.

The cabinet enclosure is made with red oak boards, which the creator [Obstreperuss] sawed and planed and then glued together to create the various panels (more details are available on his Imgur album). The Mario artwork on the sides and front aren’t just vinyl stickers, either. He used various hardwoods cut into small squares to create pixel art inlays in the oak faces. After the fancy woodwork was completed, the build was finished out with some USB arcade controllers, a flat-panel screen, and a Raspberry Pi to run the games.

While the internals are pretty standard, we have to commend the incredible quality of the woodworking. It’s an impressive homage to classic arcade machines and we wouldn’t mind a similar one in our own homes. If you’re lacking the woodworking equipment, though, it’s possible to get a refined (yet smaller) arcade cabinet for yourself with a 3D printer instead.

Continue reading “Solid Oak Arcade Cabinet: When Particle Board Won’t Do”

A Tubular Fairy Tale You Control With Your Phone

At first glance, this might appear to be a Rube Goldberg machine made of toys. The truth isn’t far off — it’s a remote-control animatronic story machine driven by its spectators and their phones. [Niklas Roy] and a team of volunteers built it in just two weeks for Phaenomenale, a festival centered around art and digital culture that takes place every other year.

A view of the tubes without the toys.

A red ball travels through a network of clear acrylic tubes using 3D printed Venturi air movers, gravity, and toys to help it travel. Spectators can change the ball’s path with their phones via a local website with a big picture of the installation. The ball triggers animations along its path using break beam detection and weaves a different story each time depending on the toys it interacts with.

Here’s how it works: a Raspberry Pi 4 is responsible for releasing the ball at the beginning of the track and for controlling the track switches. The Pi also hosts a server for smartphones and the 25 Arduino Nanos that control the LEDs and servos of the animatronics. As a bonus animatronic, there’s a giant whiteboard that rotates and switches between displaying the kids’ drawings and the team’s plans and schematics. Take a brief but up-close tour after the break.

This awesome art project was a huge collaborative effort that involved the people of Wolfsburg, Germany — families in the community donated their used and abandoned toys, groups of elementary school kids were brought in to create stories for the toys, and several high school kids and other collaborators realized these drawings with animatronics.

Toys can teach valuable lessons, too. Take this body-positive sushi-snarfing Barbie for example, or this dollhouse of horrors designed to burn fire safety into children’s brains.

Continue reading “A Tubular Fairy Tale You Control With Your Phone”

The Last Component Storage System You’d Ever Need

Think you’ve seen the best component storage system? This system could only be better if you could walk up and talk to it. [APTechnologies] was tired of using a hodgepodge of drawers and boxen for storing their components. What they needed was an all-purpose solution for storing all kinds of small-to-medium-sized goodies, be they through hole or SMT.

This one happens to have a software interface as well that is searchable with short, crisp expressions that find parts by ID or with parameters. It’s a Python 3 script running on a Raspberry Pi 4B that’s hiding behind the HDMI display. [APTechnologies] printed a special arm for that, and you can find all the files on GitHub. Not only does the LED above the corresponding drawer light up, it lights up in a color that represents the inventory levels. We assume green/yellow/red, but [APTechnologies] doesn’t specify.

Don’t know what to do with some of your components? If they’re really old, they may be no good anymore. It just depends.

New Micro YARH.IO Designed For Skilled Operators

A few months back we brought you word of the YARH.IO, an extremely impressive Raspberry Pi portable that featured rugged good looks and a unique convertible design made possible by a removable keyboard. One of the most appealing aspects of the design was that everything was built from off-the-shelf modules; it only took a couple jumper wires and some scrap perfboard to get everything wired up inside the 3D printed enclosure.

The downside of this construction style was that the finished product was a bit chunkier than was strictly necessary. But that’s not the case with the new YARH.IO Micro. The palm-sized portable looks almost exactly like the original, though it had to ditch the removable keyboard in the shrinking process. Gone as well is the touch pad, though with the touch screen capabilities of the Pimoroni Hyper Pixel four inch IPS display, that’s not much of a problem.

What’s the catch? Well, at a glance we can tell you this one is considerably harder to build. For one thing, you’ll need to remove the Ethernet and USB connectors from the Pi 3B+. The USB ports get relocated, but Ethernet understandably has to be left on the cutting room floor. Nothing to worry about with the GPIO pins, the display takes up all of those, but you’ll probably want to wire the I2C lines to the female header on the side of the case so you can add external hardware and sensors.

You also need to nestle an Arduino Pro Micro in there to communicate status information about the battery to the operating system over I2C. If you wanted to save a little wiring you could probably leave off the DS3231 RTC module, but it depends on how often you’ll be able to sync up with NTP.

While it may be more difficult to assemble than its predecessor, it’s certainly not unapproachable. Once again, no custom PCBs or exotic components are required. You might be doing a lot more soldering (and desoldering) than you would have before, but it’s nothing that the average Hackaday reader isn’t capable of. For your troubles, you’ll get a exceptionally portable Linux machine that’s ripe for hacking and modification.

If the time and effort it will take to put together a YARH.IO is a bit more than you’re willing to invest right now, there’s always commercial alternatives like the DevTerm. But whether you go with the original or this new Micro edition, we think the satisfaction of having built the whole thing yourself will be more than worth it.