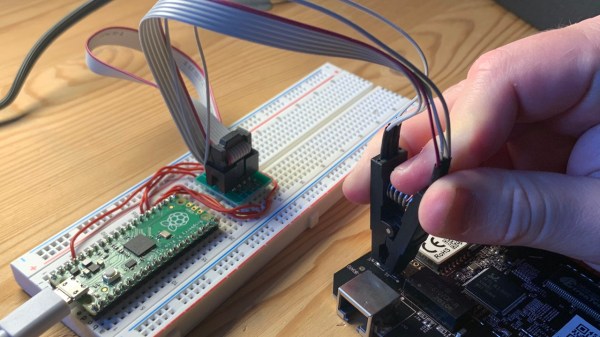
Showing a board with a Pi Pico plugged into it, a USB-A socket marked "USB host", and a character display that says "PASSED" referring to the board being the brains of a testing jig.

USB Host On RP2040 – With PIO

Folks from [Adafruit] are showing off a neat hack – USB host on RP2040, using the now-famous PIO peripheral. [Adafruit] builds a lot of RP2040 boards, and naturally, you gotta test them before you ship them to customers. They’ve been using very specific Teensies for that, and at some point, those became unobtainium. Based on the work of [sekigon-gonnoc] and with help of [Thach], they’ve made their TinyUSB library support bitbanging of USB over PIO, and successfully ported their test jig firmware to it!

The base Pico-PIO-USB repo by [sekigon-gonnoc] shows a pretty impressive state of affairs – with low-speed and full-speed USB host and full-speed USB device modes supported, and quite a few examples to get you started. [Adafruit]’s work integrates this code into their TinyUSB stack, specifically focusing on MST (mass storage) features – as this is what you need to program a RP2040. Of course, they also provide a mass storage example to boot!

Test jigs are pretty important to have when making multiple pieces of a board, and with RP2040 supporting more and more interfaces thanks to PIO, it sounds like the perfect chip for your next production testing-intended PCB. With the jig brains taken care of, you’ll want to look into building no less important mechanical part, and we’ve covered quite a few ways to sort that out – here’s an OpenSCAD script that generates lasercutting files out of KiCad boards, or a jig built out of scrap copperclad FR4, and a pretty extensive tutorial on making your own lasercuttable jigs, to boot.

Continue reading “USB Host On RP2040 – With PIO”

Alpakka: A Creative Commons Game Controller

Input Labs’ mission is to produce open-source Creative Commons hardware and software for creating gaming controllers that can be adapted to anyone. Alpakka is their current take on a generic controller, looking similar to a modern Xbox or PlayStation controller but with quite a few differences. The 3D printed casing has a low-poly count, angular feel to it, but if you don’t like that you can tweak that in blender to just how you want it. Alpakka emulates a standard USB-attached keyboard, mouse, and Xinput gamepad in parallel so should just work out of the box for both Linux and Windows PC platforms. The firmware includes some built-in game profiles, which can be selected on the controller.

No special parts here, just 3D prints, a PCB and some nuts and bolts

The dual D-pads, augmented with an analog stick, is not an unusual arrangement, but what is a bit special is the inventive dual-gyro sensor arrangement –which when used in conjunction with a touch-sensitive pad — emulates a mouse input. Rest your thumb on the right-hand directional pad and the mouse moves, or else it stays fixed, kind of like lifting a mouse off the pad to re-center it.

The wired-only controller is based around a Raspberry Pi Pico, which has plenty of resources for this type of application giving a fast 250 Hz update rate. But to handle no fewer than nineteen button inputs, as well as a scroll wheel, directional switch, and that analog stick, the Pico doesn’t have enough I/O, needing a pair of NXP PCAL6416A I2C IO expanders to deal with it.

The PCB design is done with KiCAD, using a simple 3D printed stand to hold the PCB flat and the through-hole components in place while soldering. Other than a few QFN packages which might be a problem for some people, there is nothing tricky about hand-soldering this design.

We’ve been seeing custom game controllers as long as we’ve been hacking, here’s an interesting take on the mouse-integration theme. If you’re comfortable rolling the hardware side of things, but the firmware is a sticking point, then perhaps look no further than this neat RP2040 firmware project.

Continue reading “Alpakka: A Creative Commons Game Controller”

Open World 3D Game Runs On The RP2040 Microcontroller

The Raspberry Pi RP2040 is versatile and cheap, but it’s by no means known as the most powerful microcontroller on the world. Regardless, it is capable of great things, as demonstrated by [Bernhard Strobl], who built a 3D open world game engine that runs on that very platform.

The graphics are simple, but with a compelling low-poly style.

The game engine itself is built to run on the Pimoroni PicoSystem, which is essentially a handheld gaming platform built around the RP2040 chip. The engine takes advantage of the multi-core nature of the RP2040, using the second core as a dedicated rasterizer to keep frames pumping out.

The basic game [Bernhard] built in the engine features 50 NPC characters and 50 further zombies, all running at the same time. Specs are impressive, with the engine’s included game simulating a “world” of 120 x 120 meters in size. As a maximum limit, the engine can handle a 2.56 x 2.56 km world, thanks to the use of 8-bit integers for directional data. However, limited storage space would make it difficult to achieve such a large world in practice.

We don’t get to see much of the gameplay in the YouTube video, but the quality of the graphics is impressive for such a cheap microcontroller. It seems within the bounds of possibility that an actual open-world game could be practical on the PicoSystem if only enough storage were available. Video after the break.

Continue reading “Open World 3D Game Runs On The RP2040 Microcontroller”

side by side, showing hardware experiments with capacitor gating through FETs, an initial revision of the modchip board with some fixes, and a newer, final, clean revision.

A Modchip To Root Starlink User Terminals Through Voltage Glitching

A modchip is a small PCB that mounts directly on a larger board, tapping into points on that board to make it do something it wasn’t meant to do. We’ve typically seen modchips used with gaming consoles of yore, bypassing DRM protections in a way that a software hacks couldn’t quite do. As software complexity and therefore attack surface increased on newer consoles, software hacks have taken the stage. However, on more integrated pieces of hardware, we’ll still want to return to the old methods – and that’s what this modchip-based hack of a Starlink terminal brings us.

[Lennert Wouters]’ team has been poking and prodding at the Starlink User Terminal, trying to get root access, and needed to bypass the ARM Trusted Firmware boot-time integrity checks. The terminal’s PCB is satellite-dish-sized, so things like laser fault injection are hard to set up – hence, they went the voltage injection route. Much poking and prodding later, they developed a way to reliably glitch the CPU into verifying a faulty firmware, and got to a root shell – the journey described in a BlackHat talk embedded below. Continue reading “A Modchip To Root Starlink User Terminals Through Voltage Glitching”

A Game Boy Advance – Downgraded!

We feature a large number of game console mods here, because enhancing the experience of using a classic machine often involves some really clever work. But here’s one that’s a bit different, instead of upgrading his Game Boy Advance, [Wenting Zhang] has downgraded it from a colour screen to a monochrome LCD. Take a look at the video below the break.

One might ask why this would be necessary, given that there are plenty of backlit colour LCD upgrades already for the GBA, but perhaps people who played the original might understand that it’s about improving the viewability over the rather poor-quality colour LCD original.

Interesting too is the choice of display controller. Where it might be expected to find an FPGA, instead there’s an PR2040. He goes into detail about its programming, and we hope it might inspire any others looking at screen transplants. Meanwhile if the name [Wenting Zhang] means anything to you, it should be for his other work with mono LCDs.

Continue reading “A Game Boy Advance – Downgraded!”

Is This The Smallest CP/M Machine Ever?

If you had an office word processor in the late 1970s, the chances are it ran Digital Research’s CP/M operating system. IBM went for Microsoft in the 1980s and the once-dominant player fell on hard times, but it survives today as a popular choice on retrocomputer platforms. Even the more compact Z80 systems are a little large for 2022, so when [Kian Ryan] needed the ultimate in CP/M portability it fell on a more modern piece of silicon. Hence he’s put it on a tiny RP2040-based board from Pimoroni alongside an Adafruit micro SD card breakout.

The tiny hardware is neat of course, but the real star of the show is the software. Non-CP/M aficionados will be interested to learn about RunCPM, and for this project, RunCPM 2040. This provides an emulated environment on a host microcontroller to run CP/M, allowing the operating system to be hosted on easier hardware than some of the original machines.

All this makes for a tiny development machine, but perhaps of more interest would be a machine that’s all-in-one with a display and perhaps a keyboard. The RP2040 is interesting in this case because of those programmable state machines. Could it be made to run a video display alongside RunCPM? We hope someone has a go at writing it.

An RP2040 Powered Pick And Place

Pick and place machines are a wonder to behold, as they delicately and accurately place part after part. Unfortunately, they have to have a similarly wondrous price tag. Luckily, they aren’t too difficult to make yourself as they share many properties of a 3D printer with some extra constraints. [Stargirl Flowers] released Starfish, an open-source pick-and-place control board based around an RP2040 to help people make their own.

She purchased a LumenPnP, and the itch to tinker became too much to ignore. The STM32 on the stock controller also happened to get fried, leaving an obvious opening to create a custom board. [Stargirl] chose Trinamic TMC2209 motor controllers to drive the three stepper motors. The power circuit is impressively overbuilt with a 3A fuse, a TVS diode for shunting voltage spikes, a P-channel MOSFET for reverse polarity protection, a low-pass filter for AC ripple, and a large 100μF capacitor.

The RP2040 is a good choice since it’s easy to get and has plenty of digital I/O. USB connects the board to the outside work and includes ESD TVS diodes to protect the board when connecting and disconnecting the USB port. Motors for vacuums are controlled by a 74HC2G34 buffer that drives enable lines to two MOSFETs. Solenoids are similar but with a high current peak and a much smaller current to keep them open. The DRV120 fits the bill as it is a single-channel relay with current regulation. I2C vacuum sensors are the same ones on the Lumen motherboard; they just required an I2C multiplexer.

It’s an extremely well-documented project explaining why each part was chosen and why. If you want to create an RP2040 project that needs to last, we consider this a guiding star. It’s all up on GitHub for you to take a look at.

This isn’t the first time we’ve seen RP2040 as part of a motor controller, and we suspect we’ll see more.