Follow The Bouncing Needles Of This Analog Meter Clock

Our community never seems to tire of clock builds. There are seemingly infinite ways to mark the passage of time, and finding unique ways to display it is endlessly fascinating.

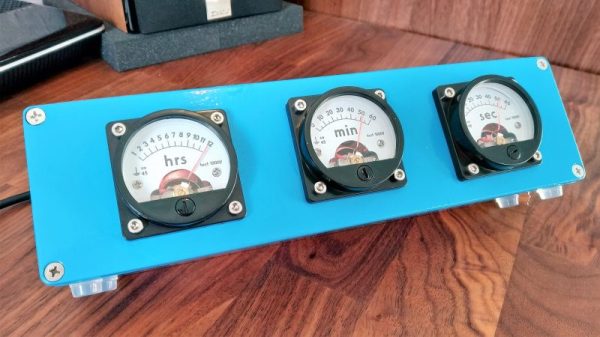
There’s something about this analog voltmeter clock that really seems to have caught on with the Redditors who commented on the r/DIY thread where we first spotted this. [ElegantAlchemist]’s design is very simple – just a trio of moving coil meters with nice industrial-looking bezels. The meters were wired for 300 volts AC, so the rectifier and smoothing cap were removed and the series resistance was substituted for one more appropriate for the 0-5VDC range needed for the project. New dial faces showing hours, minutes and seconds were whipped up in Corel Draw, and everything was put into a sturdy and colorful aluminum “stomp box” normally used for effects pedals. An Arduino Nano and an RTC drive the meters with a nice, bouncy action. Simple, cheap to build, and a real crowd pleaser.

The observant reader will note a similarity to a clock we covered a while back. That one chose 3D-printed cases for an airplane instrument cluster look. We like the spare case design in [ElegantAlchemist]’s build, but wonder how this clock would look in a fine wood case.

Arduino Tachometer Clock Fires On All Cylinders

We’re certainly no strangers to unique timepieces around these parts. For whatever reason, hackers are obsessed with finding new and interesting ways of displaying the time. Not that we’re complaining, of course. We’re just as excited to see the things as they are to build them. With the assumption that you’re just as enamored with these oddball chronometers as we are, we present to you this fantastic digital tachometer clock created by [mrbigbusiness].

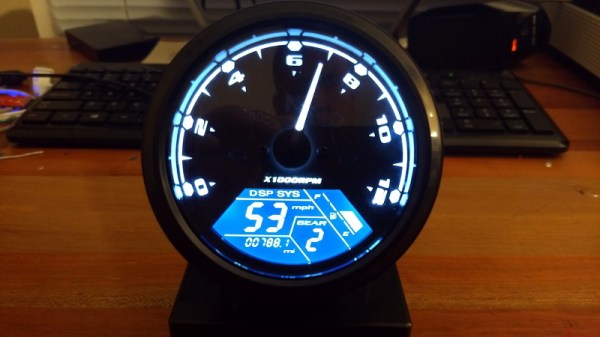
The multi-function digital gauge itself is an aftermarket unit which [mrbigbusiness] says you can get online for as little as $20 from some sites. All he needed to do was figure out how to get his Arduino to talk to it, and come up with some interesting way to hold it at an appropriate viewing angle. The mass of wires coming out of the back of the gauge might look intimidating, but thanks to his well documented code it shouldn’t be too hard to follow in his footsteps if you were so inclined.

Hours are represented by the analog portion of the gauge, and the minutes shown digitally were the speed would normally be displayed. This allows for a very cool blending of the classic look of an analog clock with the accuracy of digital. He’s even got it set up so the fuel indicator will fill up as the current minute progresses. The code also explains how to use things like the gear and high beam indicators, so there’s a lot of room for customization and interesting data visualizations. For instance, it would be easy to scrap the whole clock idea and use this gauge as a system monitor with some modifications to the code [mrbigbusiness] has provided.

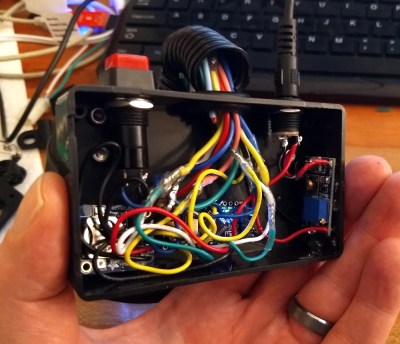
The gauge is mounted to a small project box with some 3D printed brackets and bits of metal rod, complete with a small section of flexible loom to cover up all the wires. Overall it looks very slick and futuristic without abandoning its obvious automotive roots. Inside the base [mrbigbusiness] has an Arduino Nano, a DS1307 RTC connected via I2C, a voltage regulator, and a push button to set the time. It’s a perfectly reasonable layout, though we wonder if it couldn’t be simplified by using an ESP8266 and pulling the time down with NTP.

We’ve seen gauges turned into a timepiece before, but we have to admit that this is probably the most practical realization we’ve seen of the idea yet. Of course if you want to outfit the garage with something a bit more authentic, you can always repurpose a Porsche brake rotor.

A Perfectly Orderly Way To Manage Your Time

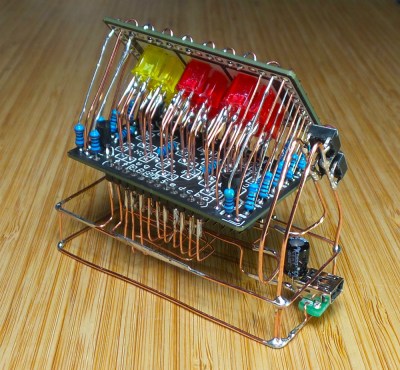
[Paul Gallagher] has spent years separating his tasks into carefully measured out blocks, a method of time management known as the Pomodoro Technique. If that’s not enough proof that he’s considerably more organized and structured than the average hacker, you only need to take a look at this gorgeous Pomodoro Timer he’s entered into the Circuit Sculpture Contest. Just don’t be surprised if you suddenly feel like your own time management skills aren’t cutting it.

While [Paul] has traditionally just kept mental note of the hour-long blocks of time he breaks his work into, he thought it was about time he put together a dedicated timer to make sure he’s running on schedule. Of course he could have used a commercially available timer or an application on his phone, but he wanted to make something that was simple and didn’t cause any distractions. A timer that was easy to start, reliable, and didn’t do anything extraneous. We’re not sure if looking like the product of a more advanced civilization was part of his official list of goals, but he managed to achieve it in any event.

The timer is broken up into two principle parts: the lower section which has the controls, USB port, a handful of passive components, and an ATmega328 microcontroller, and the top section which makes up the three digit LED display. The two sections are connected by a header on the rear side which makes it easy for [Paul] to take the timer apart if he needs to get back into it for any reason. Notably absent in the design is a RTC; the relatively short duration of the timer (up to a maximum of 95 minutes) means the ATmega328 can be trusted to keep track of the elapsed time itself with an acceptable amount of drift.

The display side of the timer is really a sight to behold, with the legs of each LED soldered to a pair of carefully bent copper wires so they match the angle of the front panel. The associated resistors have been artfully snipped so that their bodies sit flat on the PCB while their leads reach out to the perfect length. It looks like a maintenance nightmare in there, but we love it anyway.

As we near the half-way mark of the Circuit Sculpture Contest, there’s still plenty of time to submit your own piece of functional art. If you’ve got a project that eschews the printed circuit board for a chance to bare it all, write it up on Hackaday.io and be sure to send it in before the January 8th, 2019 deadline.

Continue reading “A Perfectly Orderly Way To Manage Your Time”

Decorative Light Box Lets You Guess The Time

Telling time by using the current position of the sun is nothing revolutionary — though it probably was quite the “life hack” back in ancient times, we can assume. On the other hand, showing time by using the current position of the sun is what inspired [Rich Nelson] to create the Day Cycle Clock, a color changing light box of the Philadelphia skyline, simulating a full day and night cycle in real time — servo-controlled sun and moon included.

At its core, the clock uses an Arduino with a real-time clock module, and the TimeLord library to determine the sunrise and sunset times, as well as the current moon phase, based on a given location. The sun and moon are displayed on a 1.44″ LCD which doubles as actual digital clock in case you need a more accurate time telling after all. [Rich] generally went out of his way with planning and attention to detail in this project, as you can see in the linked video, resulting in an impressively clean build surely worthy as gift to his brother. And if you want to build one for yourself, both the Arduino source code and all the mechanical parts are available on GitHub.

An interesting next iteration could be adding internet connectivity to get the current weather situation mixed into the light behavior — not that it would be the first time we’d see weather represented by light. And of course, simulating the northern lights is also always an option.

Continue reading “Decorative Light Box Lets You Guess The Time”

Epic Clock Clocks The Unix Epoch

Admit it: when you first heard of the concept of the Unix Epoch, you sat down with a calculator to see when exactly 2³¹-1 seconds would be from midnight UTC on January 1, 1970. Personally, I did that math right around the time my company hired contractors to put “Y2K Suspect” stickers on every piece of equipment that looked like it might have a computer in it, so the fact that the big day would come sometime in 2038 was both comforting and terrifying.

[Forklift] is similarly entranced by the idea of the Unix Epoch and built a clock to display it, at least for the next 20 years or so. Accommodating the eventual maximum value of 2,147,483,647, plus the more practical ISO-8601 format, required a few more digits than the usual clock – sixteen to be exact. The blue seven-segment displays make an impression in the sleek wooden case, about which there is sadly no detail in the build log. But the internals are well documented, and include a GPS module and an RTC. The clock parses the NMEA time string from the satellites and syncs the RTC. There’s a brief video below of the clock in action.

We really like the look of [Forklift]’s clock, and watching the seconds count up to the eventual overflow seems like a fun way to spend the next two decades. It’s not the first Epoch clock we’ve featured, of course, but it’s pretty slick.

Continue reading “Epic Clock Clocks The Unix Epoch”

The Tide Is High, And This Clock Lets You Know

In case you happen to have an ocean nearby, you’re probably familiar with its rising and falling tides. And if mudflat hiking is a thing in your area, you’re also aware of the importance of good timing and knowing when the water will be on its way back. Tide clocks will help you to be prepared, and they are a fun alternative to your usual clock projects. If you’re looking for a starting point, [rabbitcreek] put together an Arduino-based tide clock kit for educational purposes.

If you feel like you’re experiencing some déjà vu here, this indeed isn’t [rabbitcreek]’s first tide clock project. But unlike his prior stationary clock, he has now created a small and portable, coin-cell version to take with you out on the sea. And what shape would better fit than a 3D printed moon — unfortunately the current design doesn’t offer much waterproofing.

For the underlying tide calculation itself, [rabbitcreek] uses just like in his previous project [Luke Miller]’s location-based library for the ubiquitous DS1307 and DS3213 real-time clocks. Of course, if you also want to keep track of other events on your clock, why not set up calendar events for the next rising tide?

How To Run A Clock For A Century

What’s going to keep a clock running for a century, unattended? Well, whatever’s running it will have to sip power, and it’s going to need a power source that will last a long time. [Jan Waclawek] is looking into solar power for daytime, and capacitors for nighttime, to keep his clock running for a hundred years.

This project carries on from [Jan]’s previous project which looked at what kind of power source could power the gadgets around his house for a century without needing intervention – ie., no batteries to replace, no winding etc. [Jan] whittled his choices down to a combination of solar power and polypropylene film capacitors. Once the power had been sorted, a clock was chosen in order to test the power supply. The power consumption for a clock will be low during the night – it would only need a RTC circuit keeping track of the time – so a few low-leakage capacitors can be used. When daylight returns or a light is switched on, the solar circuit would power the clock’s display.

At the moment, [Jan] has a proof of concept circuit working, using the ultra-low-power microcontroller on a STM32L476 DISCOVERY board and a few 10 μF 0805 size capacitors, when fully charged by the solar panel, the clock’s display lasts for about two minutes.

Take a look at [Jan]’s project for more details, and check out his previous project where he narrowed down the components for a hundred-year power supply. [Jan]’s prototype can be seen in action after the break. Also take a look at this master clock that signals slave clocks and runs for a year on a single AA battery.

Continue reading “How To Run A Clock For A Century”