Semiconductor Simulator Lets You Play IC Designer

For circuit simulation, we have always been enthralled with the Falstad simulator which is a simple, Spice-like simulator that runs in the browser. [Brandon] has a simulator, too, but it simulates semiconductor devices. With help from [Paul Falstad], that simulator also runs in the browser.

This simulator takes a little thinking and lets you build devices as you might on an IC die. The key is to use the drop-down that initially says “Interact” to select a tool. Then, the drop-down below lets you select what you are drawing, which can be a voltage source, metal, or various materials you find in semiconductor devices, like n-type or a dielectric.

It is a bit tricky, but if you check out the examples first (like this diode), it gets easier. The main page has many examples. You can even build up entire subsystems like a ring oscillator or a DRAM cell.

Designing at this level has its own quirks. For example, in the real world, you think of resistors as something you can use with great precision, and capacitors are often “sloppy.” On an IC substrate, resistors are often the sloppy component. While capacitor values might not be exact, it is very easy to get an extremely precise ratio of two capacitors because the plate size is tightly controlled. This leads to a different mindset than you are used to when designing with discrete components.

Of course, this is just a simulation, so everything can be perfect. If, for some reason, you don’t know about the Falstad simulator, check it out now.

Atomic Clock Trades Receiver For An ESP8266

The advantage of a radio-controlled clock that receives the time signal from WWVB is that you never have to set it again. Whether it’s a little digital job on your desk, or some big analog wall clock that’s hard to access, they’ll all adjust themselves as necessary to keep perfect time. But what if the receiver conks out on you?

Well, you’d still have a clock. But you’d have to set it manually like some kind of Neanderthal. That wasn’t acceptable to [jim11662418], so after he yanked the misbehaving WWVB receiver from his clock, he decided to replace it with an ESP8266 that could connect to the Internet and get the current time via Network Time Protocol (NTP).

Continue reading “Atomic Clock Trades Receiver For An ESP8266”

Next time on Star Trek: EmptyEpsilon... (Credit: EmptyEpsilon project)

Build A Starship Bridge Simulator With EmptyEpsilon

Who hasn’t dreamed of serving on the bridge of a Star Trek starship? Although the EmptyEpsilon project isn’t adorned with the Universe-famous LCARS user interface, it does provide a comprehensive simulation scenario, in a multiplayer setting. Designed as a LAN or WAN multiplayer game hosted by the server that also serves as the main screen, four to six additional devices are required to handle the non-captain tasks. These include helm, weapons, engineering, science and relay, which includes comms.

Scenarios are created by the game master, not unlike a D&D game, with the site providing a reference and various examples of how to go about this.

The free and open source game’s binaries can be obtained directly from the site, but it’s also available on Steam. The game isn’t limited to just Trek either, but scenarios can be crafted to fit whatever franchise or creative impulse feels right for that LAN party.

Obviously building the whole thing into a realistic starship bridge is optional, but it certainly looks like more fun that way.

Simulating Embedded Development To Reduce Iteration Time

There’s something that kills coding speed—iteration time. If you can smash a function key and run your code, then watch it break, tweak, and smash it again—you’re working fast. But if you have to first compile your code, then plug your hardware in, burn it to the board, and so on… you’re wasting a lot of time. It’s that problem that inspired [Larry] to create an embedded system simulator to speed development time for simple projects.

The simulator is intended for emulating Arduino builds on iPhone and Mac hardware. For example, [Larry] shows off a demo on an old iPhone, which is simulating an ESP32 playing a GIF on a small LCD display. The build isn’t intended for timing-delicate stuff, nor anything involving advanced low-level peripherals or sleep routines and the like. For that, you’re better off with real hardware. But if you’re working on something like a user interface for a small embedded display, or just making minor tweaks to some code… you can understand why the the simulator might be a much faster way to work.

For now, [Larry] has kept the project closed source, as he’s found that it wouldn’t reasonably be possible for him to customize it for everyone’s unique hardware and use cases. Still, it’s a great example of how creating your own tools can ease your life as a developer. We’ve seen [Larry]’s great work around here before, like this speedy JPEG decoder library.
Continue reading “Simulating Embedded Development To Reduce Iteration Time”

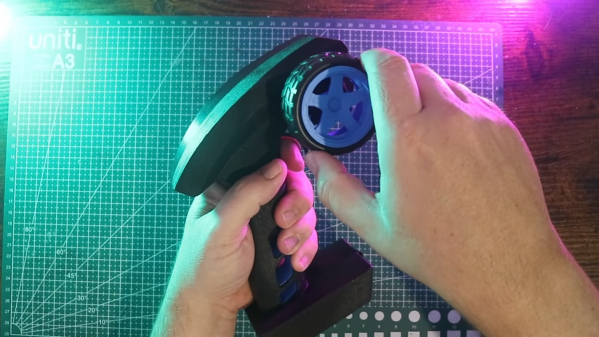
2024 Tiny Games Contest: Realistic Steering Wheel Joystick In Miniature

For racing games, flight simulators, and a few other simulation-style games, a simple controller just won’t do. You want something that looks and feels closer to the real thing. The major downsides to these more elaborate input methods is that they take up a large amount of space, requiring extra time for setup, and can be quite expensive as well. To solve both of these problems [Rahel zahir Ali] created a miniature steering wheel controller for some of his favorite games.

While there are some commercial offerings of small steering wheels integrated into an otherwise standard video game controller and a few 3D printed homebrew options, nothing really felt like a true substitute. The main design goal with this controller was to maintain the 900-degree rotation of a standard car steering wheel in a smaller size. It uses a 600P/R rotary encoder attached to a knob inside of a printed case, with two spring-loaded levers to act as a throttle and brake, as well as a standard joystick to adjust camera angle and four additional buttons. Everything is wired together with an Arduino Leonardo that sends the inputs along to the computer.

Now he’s ready to play some of his favorite games and includes some gameplay footage using this controller in the video linked below. If you’re racing vehicles other than cars and trucks, though, you might want a different type of controller for your games instead.

Continue reading “2024 Tiny Games Contest: Realistic Steering Wheel Joystick In Miniature”

Homebrew Reader Brings Paper Tape Programs Back To Life

We may be a bit biased, but the storage media of yesteryear has so much more personality than that of today. Yes, it’s a blessing to have terabyte SD cards smaller than your pinky nail and be able to access its data with mind-boggling speed. But there’s a certain charm to a mass storage device that can potentially slice off your finger.

We’re overstating the dangers of the venerable paper tape reader, of course, a mass storage device that [David Hansel] recreated a few years back but we only just became aware of. That seems a bit strange since we’ve featured his Arduino-based Altair 8800 simulator, which is what this tape reader is connected to. Mechanically, the reader is pretty simple — just a wooden frame to hold the LEGO Technic wheels used as tape reels, and some rollers to guide the tape through a read head. That bit is custom-made and uses a pair of PCBs, one for LEDs and one for phototransistors. There are nine of each — eight data bits plus the index hole — and the boards are sandwiched together to guide the paper tape.

The main board has an ATmega328 which reads the parallel input from the read head and controls the tape motor. That part is important thanks to Altair Basic’s requirement for a 100- to 200-ms delay at the end of each typed line. The tape reader, which is just being used as sort of a keyboard wedge, can “type” a lot faster than that, so the motor speed is varied using PWM control as line length changes.

Continue reading “Homebrew Reader Brings Paper Tape Programs Back To Life”

Arduino Gear Shift Indicator Finds ‘Em So You Won’t Grind ‘Em

Now, it’s been a shamefully long time since we’ve driven a car with a manual transmission, but as we recall it was pretty straightforward. It certainly didn’t require a lot of help with the shifting pattern, at least not enough to require a technical solution to know what gear you’re in. But then again, we suspect that’s not really the point of [upir]’s latest build.

Oh sure, it’s pretty cool to display your current gear selection on a little LCD screen using an Arduino. And [upir] promises a follow-up project where the display goes inside the shifter knob, which will be really cool. But if you take a look at the video below, you’ll see that the real value of this project is the stepwise approach he takes to create this project. [upir] spends most of the time in the video below simulating the hardware and the code of the project in Wokwi, which lets him make changes and tune the design up before committing anything to actual hardware.

That turned out to be particularly useful with this build since he chose to use analog Hall sensors to detect the shift lever position and didn’t know exactly how that would work. Wokwi let him quickly build a virtual prototype for one sensor (using a potentiometer as a stand-in, since the simulator lacked a Hall sensor model), then quickly expand to the four sensors needed to detect all six gear positions.

By the time his simulation was complete, the code was almost entirely written. [upir] also walks us through his toolchains for both designing the graphics and laying out the PCB, a non-trivial task given the odd layout. We particularly enjoyed the tip on making smooth curved traces around the oval cutout for the shift lever in the board.

The video below is on the longish side, but it’s chock full of great little tips. Check out some more of [upir]’s work, like his pimped-out potentiometer or his custom animations on 16×2 LCDs.

Continue reading “Arduino Gear Shift Indicator Finds ‘Em So You Won’t Grind ‘Em”