Image of the presenter on the podium, in front of the projector screen with graphs shown on it

Supercon 2022: [Alex Whittemore] On Treating Your Sensor Data Well

If you build your own devices or hack on devices that someone else has built, you know the feeling of opening a serial terminal and seeing a stream of sensor data coming from your device. However, looking at scrolling numbers gets old fast, and you will soon want to visualize them and store them – which is why experienced makers tend to have a few graph-drawing and data-collecting tools handy, ready to be plugged in and launched at a moment’s notice. Well, if you don’t yet have such a tool in your arsenal, listen to this 16-minute talk by [Alex Whittemore] to learn about a whole bunch of options you might not even know you had!

For a start, there’s the Arduino Serial Plotter that you get for free with your Arduino IDE install, but [Alex] also reminds us of the Mu editor’s serial plotter – about the same in terms of features, but indisputably an upgrade in terms of UX. It’s not the only plotter in town, either – Better Serial Plotter is a wonderful standalone option, with a few features that supercharge it, as [Alex] demonstrates! You don’t have to stop here, however – we can’t always be tethered to our devices’ debugging ports, after all. Continue reading “Supercon 2022: [Alex Whittemore] On Treating Your Sensor Data Well”

Replacing An ESP8266 Clone With The Real Thing

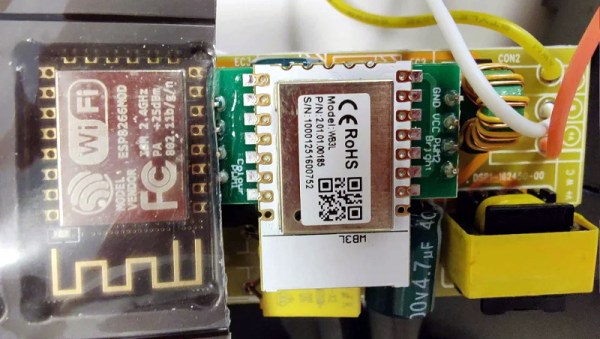
The first time [konbaasiang] ordered some ceiling LED lights from Tuya, he was pleased to find they contained an ESP-12F that could easily be flashed with a different firmware. So when he ordered 30 more of them at a cost of nearly $900 USD, you can understand his frustration to find that the popular WiFi-enabled microcontroller had been swapped out for a pin-compatible clone that Tuya developed called the WB3L.

Some people would have just chalked this one up to bad luck and used the Tuya-supplied software to control their new lights, but not [konbaasiang]. Since the new chip was outwardly identical to the ESP8266, he decided to take the nuclear option and replace them with the genuine article. With a comfortable spot to work from and a nice microscope, he started on his desoldering journey.

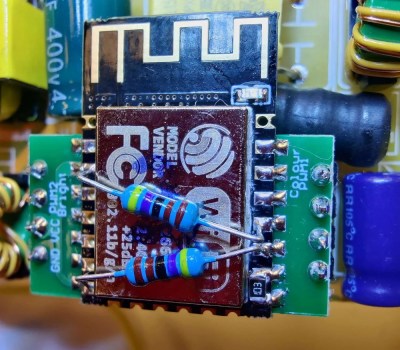
Now it would have been nice if he could have just dropped in a real ESP-12F and called it a day, but naturally, it ended up being a bit more complex than that. The WB3L apparently doesn’t need external pull up and pull down resistors, but [konbaasiang] needed them for the swap to work. He could have come up with some kind of custom adapter PCB, but to keep things simple he decided to run a pair of through hole resistors across the top of the ESP-12F for GPIO 1/2, and use a gingerly placed SMD resistor to hold down GPIO 15.

[konbaasiang] reports that all 30 of the lights survived the transplant and are now running his own  homebrew firmware. While this story had a happy ending, it’s still a cautionary tale. With a growing trend towards replacing the venerable ESP8266 with cheaper and less hacker-friendly silicon, buying IoT hardware with the intent to replace its firmware is likely to get riskier in the near future.

Making Smart Bulbs Smarter With The Power Of MQTT

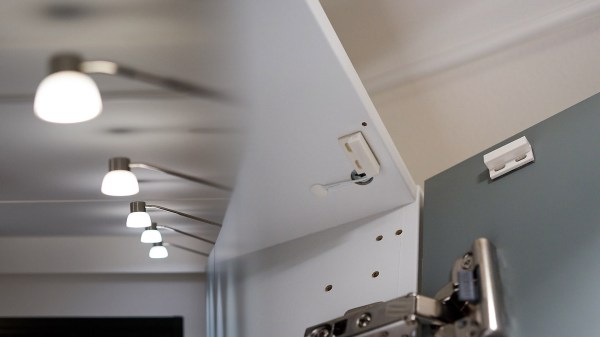
What’s the point of smart home automation? To make every day tasks easier, of course! According to [Tomasz Cybulski], that wasn’t the case when he installed IKEA smart lights in his closet. It’s handy to have them in a common switch, in this case a remote control, but having to look for it every time he needed the lights could use some improvement. Enter his project to make smart bulbs smarter, through the use of a simple ESP8266.

While hooking a door switch to the lights’ power supply could provide a quick solution, [Tomasz]’s wife wanted to keep the functionality of the remote control, so he had to look elsewhere. These light bulbs use the simple Zigbee protocol, so arranging for other devices was rather trivial. A USB dongle to interface with the protocol was configured for his existing Raspberry Pi automation controller, while an ESP8266 served as the real-world sensor by connecting it to reed switches installed in the closet doors.

With all the hardware sorted out, it’s a simple matter of making it all talk to each other. The ESP8266, using the Tasmota firmware, sends a signal to an MQTT server running on the Raspberry Pi, which in turn translates it to a remote trigger on the Zigbee frequency with the dongle. The lights turn on when the door opens, and off again once it closes. And since there were no further modifications to the lights themselves, the original IKEA controller still works as expected, which we’re sure [Tomasz]’s wife appreciates!

MQTT can be an interesting piece of software that goes beyond just home automation though, and if you already have a server in your home you can use it to transfer your clipboard’s contents to another device. If you are using it for home automation though, here’s an inspiration for a rather unusual dashboard to keep things interesting. Check out this hack in action after the break.

Continue reading “Making Smart Bulbs Smarter With The Power Of MQTT”

A Brain Transplant For An Uncommon Smart Bulb

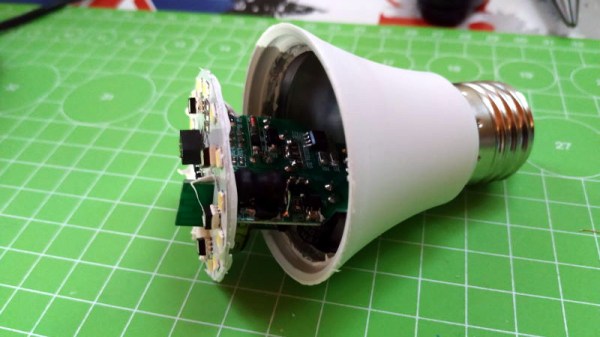
By now it’s a hardware hack that’s become common enough to be unremarkable, taking a smart light bulb or other mains switchable appliance and replacing its firmware with an open-source equivalent such as Tasmota. But what can be done when a new device is found to have a microcontroller unsupported by any open-source equivalents? If you are [Luca Dentella], you don’t throw in the towel and buy another one with a known processor, instead you reverse engineer it enough to give it a brain transplant of an ESP8266 module.

The Fcmila branded smart bulb in question was found to have a relatively unknown Chinese SoC, the Opulinks OPL1000. Since this couldn’t even raise a serial port it was more trouble than it was worth to write software for it, so instead he spent a while reverse engineering its schematic and electrical protocols, before grafting in a Wemos D1 ESP8266 board. He’s made a video about the project which you can see below the break.

Thankfully the majority of smart bulbs on the market seem to use more familiar hardware that can be flashed with relative ease.

Continue reading “A Brain Transplant For An Uncommon Smart Bulb”

Roll Your Own Automation With ESPHome

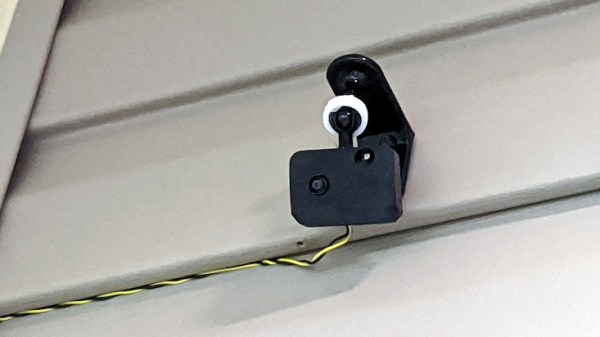
There are several different paths to a smart home, and [Marcus] eventually settled on using ESPHome and ESP8266/ESP32 based devices to create a complete DIY smart home solution which covers his garage door, sprinklers, LED strips, light bulbs, and outlets. There’s even an experimental (and very economical) ESP32-CAM based camera, shown here.

In fact, [Marcus]’s write-up could double as a sort of reference design. If you’re curious about ESPHome, be sure to read what he has to say because he explains exactly how he configured each device and any challenges he encountered in the process.

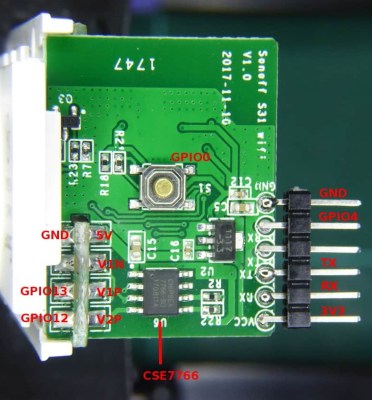
Beyond the software guidance, the post is also a great resource on how to flash a new firmware onto several different smart devices. [Marcus] provides nicely labeled images of the boards that show where you need to connect your programmer, which just might save you some trouble down the line. Though he did manage to set fire to one of the bulbs, so keep an eye out for that.

Tasmota is another open source option for controlling ESP8266-based devices, and if you’d like to explore that direction don’t forget that flashing Sonoff devices with Tasmota firmware recently got much, much easier.

Flashing Sonoff Devices With Tasmota Gets Easier

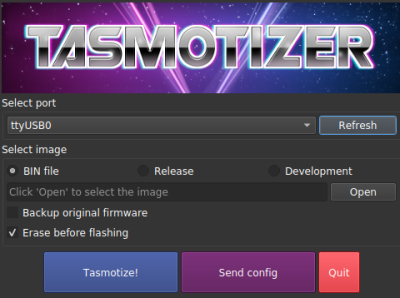
Tasmota is an alternative firmware for ESP boards  that provides a wealth of handy features, and [Mat] has written up a guide to flashing with far greater ease by using Tasmotizer. Among other things, it makes it simple to return your ESP-based devices, like various Sonoff offerings, to factory settings, so hack away!

Tasmotizer is a front end that also makes common tasks like backing up existing firmware and setting configuration options like, WiFi credentials, effortless. Of course, one can’t really discuss Tasmotizer without bringing up Tasmota, the alternative firmware for a variety of ESP-based devices, so they should be considered together.

Hacks based on Sonoff devices are popular home automation projects, and [Mat] has also written all about what it was like to convert an old-style theromostat into a NEST-like device for about $5 by using Tasmota. A video on using Tasmotizer is embedded below, so give it a watch to get a head start on using it to hack some Sonoff devices.

Continue reading “Flashing Sonoff Devices With Tasmota Gets Easier”

Hack My House: UL Certification And Turning The Lights On With An ESP8266

It’s hard to imagine a smart house without smart lighting. Maybe it’s laziness, but the ability to turn a light on or off without walking over to the switch is a must-have, particularly once the lap is occupied by a sleeping infant. It’s tempting to just stuff a relay in the electrical boxes and control them with a Raspberry Pi or micro-controller GPIO. While tempting, get it wrong and you have a real fire hazard. A better option is one of the integrated WiFi switches. Sonoff is probably the most well known brand, producing a whole line of devices based on the ESP8266. These devices are powered from mains power and connect to your network via WiFi. One disadvantage of Sonoff devices is they only work when connected to Sonoff’s cloud.

Light switches locked in to a cloud provider are simply not acceptable. Enter Tasmota, which we’ve covered before. Tasmota is an open source firmware, designed specifically for Sonoff switches, but supporting a wide range of ESP8266 based devices. Tasmota doesn’t connect to any cloud providers unless you tell it to, and can be completely controlled from within a local network.

Certifications, Liability, and More

We’re well acquainted with some of the pitfalls of imported electronics, but one of the lesser known problems is the lack of certification. In the United States, there are several nationally recognized testing laboratories: Underwriters Laboratories (UL) and Intertek (ETL) are the most prominent. Many  imported electronic devices, including Sonoff devices, do not have either of these certifications. The problem with this is liability, should the worst ever happen and an electrical fire break out. The Internet abounds with various opinions on the importance of the certification — a missing certification mark is somewhere between meaningless and a total hazard. The most common claim is that a house fire combined with non-certified equipment installed would result in an insurance company refusing to pay.

Rather than just repeat this surely sage advice from the Internet, I asked my insurance agent about uncertified equipment in the case of a fire. I discovered that insurance agencies avoid giving definite answers about claim payments. The response that came back was “it depends”: homeowner’s insurance covers events that are accidental and sudden. If a homeowner was aware that they were using uncertified equipment, then it could be categorized as “not an accident”. So far, the myth seems plausible. The final answer from the insurance agency: it’s possible that a non UL-certified device could result in denial of payment on a claim, but it depends on the policy and other details– why take the risk? Certification marks make insurance companies happier.

I also talked to my city’s electrical inspector about the issue. He commented that non-certified equipment is a violation of electrical code when it is hard-wired into a house. He echoed the warning that an insurance company could refuse to pay, but added that in the case of injury, there could be even further liability issues. I’ve opted to use certified equipment in my house. You’ll have to make your own decision about what equipment you’re willing to use.

There are some devices on Amazon that claim to have certification, but searching the certification database leads me to believe that not all of those claims are valid. If in doubt, there is a searchable UL database, as well as a searchable Intertek database.
Continue reading “Hack My House: UL Certification And Turning The Lights On With An ESP8266”