Restoring An HP LCZ Meter From The 1980s

We are fantastically lucky not only in the parts that are easily available to us at reasonable cost, but also for the affordable test equipment that we can have on our benches. It was not always this way though, and [NFM] treats us to an extensive teardown and upgrade of a piece of test equipment from the days when a hacker’s bench would have been well-appointed with just a multimeter and a 10MHz ‘scope.

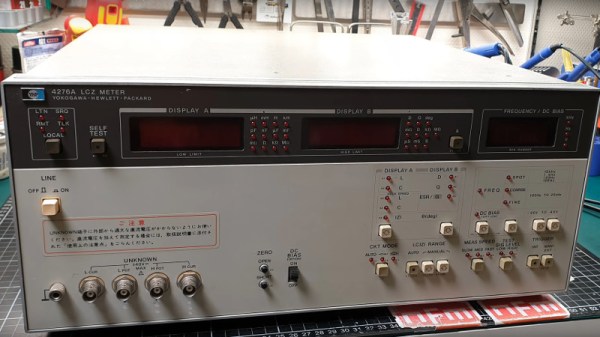
The Hewlett Packard 4276A LCZ meter is, or perhaps was, the king of component testers. A 19″ rack unit that would comfortably fill a shelf, it has a host of functions and a brace of red LED displays. This particular meter had clearly seen better days, and required a look inside just to clean up connectors and replace aged batteries.

In the case is a backplane board with a series of edge connectors for a PSU, CPU, and analogue boards. Aged capacitors and those batteries were replaced, and those edge connectors cleaned up again. The CPU board appears to have a Z80 at its heart, and we’re sure we spotted a 1987 date code. There are plenty of nice high-quality touches, such as the individual 7-segment digits being socketed.

An after-market option for this equipment included a DC offset board, and incredibly HP publish its full schematic and a picture of its PCB in their manual. It was thus a simple process and quick PCB ordering to knock up a modern replica, with just a few component substitutions and single resistors replacing an HP specific encapsulated resistor pack.

As a treat we get a ringside seat for the set-up and alignment of the machine. The DC offset board gives the wrong voltage, which he traces to a voltage reference with a different tolerance to the original HP part. [NFM] makes some adjustments to resistor values, and is able to pull the voltage to the correct value. Finally we see the instrument put through its paces, and along the way have a demonstration of how capacitance of a ceramic capacitor can vary with voltage close to its working voltage. Even if you never have the need for an LCZ meter or never see an HP 4276A, this should be worth a watch. And if you now have an urge to find a bench full of similar treasures, take a look at our guide to old test equipment.

Continue reading “Restoring An HP LCZ Meter From The 1980s”

Components Cut In Half Reveal Their Inner Beauty

We rarely take a moment to consider the beauty of the components we use in electronic designs. Too often they are simply commodities, bought in bulk on reels or in bags, stashed in a drawer until they’re needed, and then unceremoniously soldered to a board. Granted, little scraps of black plastic with silver leads don’t exactly deserve paeans sung to their great beauty – at least not until you cut them in half to reveal the beauty within.

We’ve seen a little of what [Tube Time] has accomplished here; recall this lapped-down surface-mount inductor that [electronupdate] did a while back. The current work is more extensive and probably somewhat easier to accomplish because [TubeTime] focused mainly on larger through-hole components such as resistors and capacitors. It’s not clear how the sections were created, but it is clear that extreme care was taken to lap down the components with enough precision that the inner structures are clearly visible, and indeed, carefully enough that some, most notably the LED, still actually work. For our money, though, the best looking cross-sections are the capacitors, especially the electrolytic, for which [Tube Time] thoughtfully provides both radial and axial sections. The little inductor is pretty cool too. Some of the component diagrams are annotated, too, which makes for fascinating reading.

Honestly, we could look at stuff like this all day.

Thanks to [Stuart Rogers] for the tip.

How Much Apple Does A Hamburger Get You?

A while ago, [Skippy] bought a cheap knock-off of the Apple USB mains charger from an AliExpress seller, for the British low, low price of 89p. Normally we’d give you a dollar conversion, but since that’s coincidentally the price of the basic McDonalds hambuger in the UK we’ll go with the hamburger as a unit of conversion. And as any self-respecting hacker would, he subjected it to a teardown and gave it a few tests.

Surprisingly though its pins were a little long it was just within the BS1363 pin spacing specification, probably due to its external dimensions copying the Apple original. The emissions test he performed might surprise readers, as it gave the little device its first pass. Radiated RF emissions were well below the test threshold, a welcome sight for anyone who has had to test a device. Sadly the same could not be said for conducted emissions, and it was happily spraying RF to all and sundry from its connections.

Taking a look inside revealed the usual litany of frightening safety fails. There was no insulation between the mains pins and the circuit board, and a secondary capacitor was even touching one of the pins. Meanwhile another capacitor connecting both sides of the circuit was not of the required Y rating. These and a raft of others make the device illegal for sale in Europe without further tests, but to give some numbers to it all he subjected it to a screen test applying 600 VAC common mode to its pins and checking for leakage current through the device. This it failed, and indeed it did not recover from the test.

So in this case, the price of a hamburger definitely does not get you an Apple, nor even does it get you an equivalent. But of course, you knew that, because we’ve talked about fake Apple chargers and power supplies many times before.

Lithium Jump Starter Disassembly Is Revealing

High-capacity lithium batteries tend to make everything in life better. No longer must you interact with your fellow human beings if your car battery goes flat in the carpark. You can jump the car yourself, with a compact device that fits in your glovebox. [Big Clive] decided to pull one apart and peek inside, and it’s quite the illuminating experience.

The first thing to note is there is almost no protection at all for the lithium battery inside. The output leads connect the lithium pack inside directly to the car battery, save for some diodes in series to prevent the car’s alternator backcharging the pack. [Clive] demonstrates this by short circuiting the pack, using a copper pipe as a test load to measure the current output. The pack briefly delivers 500 amps before the battery gives up the ghost, with one of the cells swelling up and releasing the magic smoke.

The teardown then continues, with [Clive] gingerly peeling back the layers of insulation around the cells, getting right down to the conductive plates inside. It’s a tough watch, but thankfully nothing explodes and [Clive]’s person remains intact. If you’ve never seen inside a lithium cell before, this is a real treat. The opened pack is even connected to a multimeter and squeezed to show the effect of the physical structure on output.

It would be interesting to compare various brands of jump starter; we imagine some have more protection than others. Regardless, be aware that many on the market won’t save you from yourself. Be careful out there, and consider jumping your car with an even more dangerous method instead (but don’t). Video after the break.

Continue reading “Lithium Jump Starter Disassembly Is Revealing”

[Leo] Repairs A MIDI Sequencer

We all have that friend who brings us their sad busted electronics. In [Leo’s] case, he had a MIDI sequencer from a musician friend. It had a dead display and the manufacturer advised that a driver IC was probably bad, even sending a replacement surface mount part.

[Leo] wasn’t convinced though. He knew that people were always pushing on the switches that were mounted on the board and he speculated that it might just be a bad solder joint. As you can see in the video below, that didn’t prove out.

The next step was to fire up a hot air gun. Instead of removing the chip, he wanted to reflow the solder anyway. He was a little worried about melting the 7-segment LEDs so he built a little foil shield to protect it. That didn’t get things working, either.

Continue reading “[Leo] Repairs A MIDI Sequencer”

Cutting Wit And Plastic

If you have ever used a scalpel to cut something tougher than an eraser, you can appreciate a hot knife or better yet, an ultrasonic cutter. Saws work too, but they have their own issues. [This Old Tony] uses a hobby store tool to cut some plastic and wood, then demos a commercial ultrasonic cutter to show how a blade can sail through with less brute force. The previous requires some muscle, finesse, and eventually a splash of Bactine antiseptic. The video can also be seen after the break.

This is more than a tool review, [Tony] takes it apart with a screwdriver and offers his snarky comments. On the plus side is that it cuts polystyrene well where a regular knife won’t do more than scratch or shatter it. Meanwhile in the negative category we don’t hear a definitive price, but they seem to cost half as much as his mini-lathe. If you need an estimated return on investment, consider the price of two-thousand X-acto blades, but you may also wish to factor in the reduced hand calluses. While you are shopping, maybe also think about a set of earplugs; when the video gets to 17:30 he tries to cut a ceramic fitting and manages to make a child-deafening screech instead. We warned you.

This is a fitting follow-up to his unsuccessful attempt to turn an ultrasonic cleaner into an ultrasonic cutter, but we have seen success converting a tooth scaler into a cutter.

Continue reading “Cutting Wit And Plastic”

1973: When Calculators Were Built Like Computers

Should you ever pick up [Steve Wozniak]’s autobiography, you will learn that in the early 1970s when his friend [Steve Jobs] was working for Atari, [Woz] was designing calculators for Hewlett Packard. It seems scarcely believable today, but he describes his excitement at the prospects for the calculator business, admitting that he almost missed out on the emerging microcomputer scene that would make him famous. Calculators in the very early 1970s were genuinely exciting, and were expensive and desirable consumer items.

[Amen] has a calculator from that period, a Prinztronic Micro, and he’s subjected it to an interesting teardown. Inside he finds an unusual modular design, with keyboard, processor, and display all having their own PCBs. Construction is typical of the period, with all through hole components, and PCBs that look hand laid rather than made using a CAD package. The chipset is a Toshiba one, with three devices covering logic, display driver and clock.

The Prinztronic is an interesting device in itself, being a rebadged 1972 Sharp model under a house brand name for the British retailer Dixons, and that Toshiba chipset is special because it is the first CMOS design to market. It was one of many very similar basic calculators on the market at the time, but at the equivalent of over 100 dollars in today’s money it would still have been a significant purchase.

Long-tern Hackaday readers will remember we’ve shown you at least one classic calculator rebuild in the past, the venerable 1975 Sinclair!