Custom Firmware For Cheap Bluetooth Thermometers

The Xiaomi LYWSD03MMC temperature and humidity sensor is ridiculously cheap. If you’re buying a few at a time, you can expect to pay as little as $5 USD a pop for these handy Bluetooth Low Energy environmental sensors. Unfortunately, that low price tag comes with a bit of a catch: you can only read the data with the official Xiaomi smartphone application or by linking it to one of the company’s smart home hubs. Or at least, that used to be the case.

Over the past year, [Aaron Christophel] has been working on a replacement firmware for these Xiomi sensors that unlocks the data so you can use it however you see fit. In addition, it allows the user to tweak various features and settings that were previously unavailable. For example, you can disable the little ASCII-art smiley face that usually shows on the LCD to indicate the relative comfort level of the room.

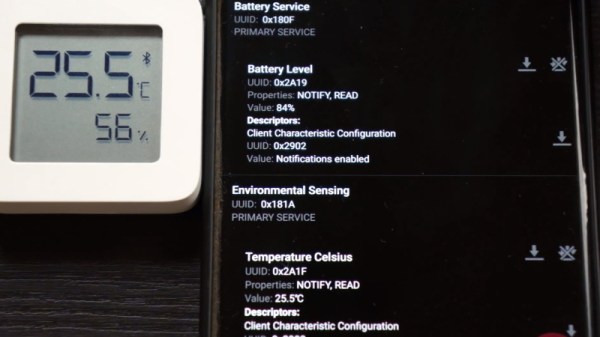
The new firmware publishes the temperature, humidity, and battery level every minute through a BLE advertisement broadcast. In other words, that means client devices can read data from the sensor without having to be paired. Scraping this data is quite simple, and the GitHub page includes a breakdown of what each byte in the broadcast message means. Avoiding direct connections not only makes it easier to quickly read the values from multiple thermometers, but should keep the device’s CR2032 battery going for longer.

But perhaps the most impressive part of this project is how you get the custom firmware installed. You don’t need to crack the case or solder up a programmer. Just load the flasher page on a computer and browser combo that supports Web Bluetooth (a smartphone is probably the best bet), point it to the MAC address of the thermometer you want to flash, and hit the button. [Aaron] is no stranger to developing user-friendly OTA installers for his firmware projects, but even for him, it’s quite impressive.

Continue reading “Custom Firmware For Cheap Bluetooth Thermometers”

A VFD Wall Thermometer

Want to build something using VFD tubes, but don’t need yet another clock project? In that case, this wall mounted temperature and humidity display created by [commanderkull] might be exactly what you’re looking for. With six IV-11 tubes, this display is a practical way to add some of that gorgeous blue-green glow to your home or office.

The USB powered display uses a XL6009 and an XL7015 to provide the 24 V and 1.8 V needed by the IV-11 tubes, respectively. Both of which can be disconnected with jumpers to shut down the tubes without powering off the entire device, a useful feature when programming and debugging the display’s ATmega328P microcontroller. Each tube is connected to the ATmega with an 74HC595 shift register and a UDN2981 driver. Temperature and humidity data is provided, perhaps unsurprisingly, by the exceptionally common DHT22 sensor.

If you are looking to build another clock with these style tubes, there’s certainly enough prior art out there to get you started. We’ve also seen faux VFDs that you could use for either project, just in case you aren’t looking to deal with the voltage requirements and relative rarity of the real thing.

Speaking The Same Language As A Wireless Thermometer

Temperature is a delicate thing. Our bodies have acclimated to a tight comfort band, so it is no wonder that we want to measure and control it accurately. Plus, heating and cooling are expensive. Measuring a single point in a dwelling may not be enough, especially if there are multiple controlled environments like a terrarium, pet enclosure, food storage, or just the garage in case the car needs to warm up. [Tim Leland] wanted to monitor commercially available sensors in several rooms of his house to track and send alerts.

The sensors of choice in this project are weather resistant and linked in his project page. Instead of connecting them to a black box, they are linked to a Raspberry Pi so your elaborate home automation schemes can commence. [Tim] learned how to speak the thermometer’s language from [Ray] who posted about it a few years ago.

The system worked well, but range from the receiver was only 10 feet. Thanks to some suggestions from his comments section, [Tim] switched the original 433MHz receiver for a superheterodyne version. Now the sensors can be a hundred feet from the hub. The upgraded receiver is also linked on his page.

We’ve delved into thermocouple reading recently, and we’ve featured [Tim Leland] and his 433MHz radios before.

Radiosondes: Getting Data From Upstairs

Ever since I first learned about radiosondes as a kid, I’ve been fascinated by them. To my young mind, the idea that weather bureaus around the world would routinely loft instrument-laden packages high into the atmosphere to measure temperature, pressure, and winds aloft seemed extravagant. And the idea that this telemetry package, having traveled halfway or more to space, could crash land in a field near my house so that I could recover it and take it apart, was an intoxicating thought.

I’ve spent a lot of time in the woods over the intervening years, but I’ve never seen a radiosonde in the wild. The closest I ever came was finding a balloon with a note saying it had been released by a bunch of schoolkids in Indiana. I was in Connecticut at the time, so that was pretty cool, but those shortsighted kids hadn’t put any electronics on their balloon, and they kind of left me hanging. So here’s a look at what radiosondes are, how they work, and what you can do to increase your chances of finding one.

Continue reading “Radiosondes: Getting Data From Upstairs”

Old Thermometer Gets New Eyes

As much as we’d like to have the right tools for the right job all of the time, sometimes our parts drawers have other things in mind. After all, what’s better than buying a new tool than building one yourself from things you had lying around? That’s at least what [Saulius] must have been thinking when he needed a thermometer with a digital output, but only had a dumb, but feature-rich, thermometer on hand.

Luckily, [Saulius] had a webcam lying around as well as an old thermometer, and since the thermometer had a LCD display it was relatively straightforward to get the camera to recognize the digits in the thermometer’s display. This isn’t any old thermometer, either. It’s a four-channel thermometer with good resolution and a number of other useful features (with an obvious lack of communications abilities), so it’s not something that he could just overlook.

Once the camera was mounted to an arm and pointed at the thermometer’s screen, an algorithm running on a computer detects polygons and reports its information into a CSV file. This process is made simpler by the fact that LCD screens like this are very predictable. From there, the data is imported into LibreOffice and various charts and graphs can be made.

Although perhaps not the most elegant of hacks, sometimes you have to work with the supplies that are on hand at the time. Sometimes the tools you need are too expensive, politically dangerous, or too impractical to obtain. To that end [Saulius]’s hack is a great example of what hacks are possible with the right mindset.

Nixie Thermometer Destined For Custom PC Case

There’s no denying the retro appeal of the warm glow of a set of Nixies, and when a friend was looking for a unique touch for the case of his new liquid-cooled PC, [Luca] pitched in with this sweet Nixie thermometer.

From the look of [Luca]’s detailed blog entries, he’s been at this build since the New Year. He starts with a list of requirements, including the oddly specific need for a round PC board. For the thermometer, three Nixies are enlisted for the display, two for the temperature and one for the units. Everything was prototyped on perf board before committing to a PCB design, but even with careful planning, the Nixie sockets on the final PCB came out a tiny bit too close together. Luckily the tubes still fit, even if they are snuggled together some. And yes, the tube bases all include the hated RGB LEDs – hey, it’s what the customer wanted. The specs are for the colors to change at the touch of a button; we’d like to see a color gradient linked to the temperature – blue for “nice and cool”, red for “leave the room.” You can see the finished thermometer in action below the break.

The recent run of Nixie projects continues unabated, and this one has a nice look that’s sure to complement the finished case. We’ve asked [Luca] to keep us up-to-date on the project, so hopefully we’ll get a look at why a round PCB is needed. While we wait for that, check out an earlier Nixie thermometer build with a bar graph twist.

Continue reading “Nixie Thermometer Destined For Custom PC Case”

BBQ Thermometers Get Serious

You can write with a fifty cent disposable pen. Or you can write with a $350 Montblanc. The words are the same, but many people will tell you there is something different about the Montblanc. Maybe that’s how [armin] feels about meat thermometers. His version uses a Raspberry Pi and has a lengthy feature list:

  • 8 Channel data logging
  • Plotting
  • Webcam (USB or Raspicam)
  • Alarms via a local beeper, Web, WhatsApp, or e-mail
  • Temperature and fan control using a PID
  • LCD display

You can even use a Pi Zero for a light version. There’s plenty of information on Hackaday.io, although the full details are only in German for the moment. As you can see in the video below, this isn’t your dollar store meat thermometer.

Even though a disposable pen does the same job as a Montblanc, most of us would rather have a Montblanc (although Hackday would have to hand out some pretty steep raises before we start using the Meisterstück Solitaire Blue Hour Skeleton 149).

We might have done more with an ESP8266 and then done more work on the client, but we have to admit, this is one feature-packed thermometer. We’ve seen simpler ones that use Bluetooth before, along with some hacks of commercial units.

Continue reading “BBQ Thermometers Get Serious”