Recreating Retrocomputers Hack Chat

Join us on Wednesday, August 12 at noon Pacific for the Recreating Retrocomputers Hack Chat with Mike Gardi!

Building the first commercial computers in the late 1950s and early 1960s was certainly a complex a task, but building the computer industry was even harder. Sure, engineers were already getting on board with designing in silicon and germanium instead of glass and tungsten, and all digital circuits are really just abstractions of analog designs most of them were already familiar with. But what about all the other people who would need to get up to speed on the workings of digital computers? What good is a tool if the only people who know how to use it art the ones who built it?

To make computers make money, companies needed legions of installers, operators, programmers, marketers, and salespeople, and all of them needed training. And so early computer companies put a lot of effort into building training devices to get people up to speed. These trainers helped teach everything from basic logic circuits and Boolean relationships to simple programming concepts, and each of them contributed in their own way to developing the computer industry that we know today.

Mike Gardi has a unique hobby: among other things, he builds faithful replicas of some of the nicer examples of these lost bits of computing history. His reproduction of Claude Shannon’s Minivac 601 trainer is a great example of the art, as is the DEC H-500 Computer Lab build he’s currently working on. Along the way, he’s explored some side alleys on the road to our computerized world, like Dr. Nim and the paperclip computer. All his builds are lovingly created from 3D-prints and really capture the essence of the toys and tools of the time.

Join us as we take a trip inside this niche realm of retrocomputing and find out why Mike finds it fascinating enough to devote the time it obviously takes to build such exacting replicas. We’ll talk about what projects he’s got going on right now, what he has planned for the future, and maybe even dive into some of his secrets for such great looking 3D prints.

join-hack-chatOur Hack Chats are live community events in the Hackaday.io Hack Chat group messaging. This week we’ll be sitting down on Wednesday, August 12 at 12:00 PM Pacific time. If time zones baffle you as much as us, we have a handy time zone converter.

Click that speech bubble to the right, and you’ll be taken directly to the Hack Chat group on Hackaday.io. You don’t have to wait until Wednesday; join whenever you want and you can see what the community is talking about.

Continue reading “Recreating Retrocomputers Hack Chat”

Reproduction 1960s Computer Trainer Really Pushes Our Buttons

If you were selling computers in the early 1960s you faced a few problems, chief among them was convincing people to buy the fantastically expensive machines. But you also needed to develop an engineering force to build and maintain said machines. And in a world where most of the electrical engineers had cut their teeth on analog circuits built with vacuum tubes, that was no easy feat.

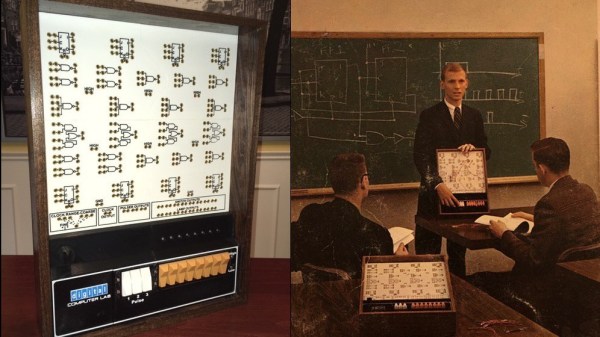
To ease the transition and develop some talent, Digital Equipment Corporation went all out with devices like the DEC H-500 Computer Lab, which retrocomputing wizard [Michael Gardi] is currently building a reproduction of. DEC’s idea was to provide a selection of logic gates, flip flops, and other elements of digital electronics that could be hooked together into more complicated circuits. We can practically see the young engineers in their white short-sleeve shirts and skinny ties laboring over the H-500 in a lab somewhere.

[Mike] is fortunate enough to have have access to an original H-500, but he wants anyone to be able to build one. His project page and the Instructables post go into great detail on how he made everything from the front panel to the banana plug jacks; almost everything in the build aside from the wood frame is custom 3D printed to mimic the original as much as possible. But the pièce de résistance is those delicious, butterscotch-colored DEC rocker switches. Taking some cues from custom switches he had previously built, he used reed switches and magnets to outfit the 3D printed rockers and make them look and feel like the originals. We can’t wait for the full PDP build.

Hats off to [Mike] for another stunning reproduction from the early years of the computer age. Be sure to check out his MiniVac 601 trainer, the Digi-Comp 1 mechanical computer, and the paperclip computer. If you’d like to pick [Mike’s] brain about this or any of his other incredible projects, he’ll be joining us for a Hack Chat in August.

Thanks to [Granzeier] for the tip!

Minivac 601 Replica Gets A Custom Motorized Rotary Switch

One of the joys of electronics as a hobby is how easy it is to get parts. Literally millions of parts are available from thousands of suppliers and hundreds of distributors, and everyone competes with each other to make it as easy as possible to put together an order from a BoM. If you need it, somebody probably has it.

But what do you do when you need a part that doesn’t exist anymore, and even when it did was only produced in small numbers? Easy – you create it yourself. That’s just what [Mike Gardi] did with this unique motorized rotary switch he needed to complete his replica of a 1960s computer trainer. We covered his build of the Minivac 601, a trainer from the early computer age that let experimenters learn the ropes of basic digital logic. It used mostly relays, lamps, and switches connected by jumpers, but it had one critical component – a rotary control that was used for input and, with the help of a motor, as an output indicator.

[Mike]’s version of the switch is as faithful to the original as possible, at least in terms of looks. The parts are mostly 3D-printed, with 16 reed switches embedded in the walls and magnets placed in the rotor. The motor to operate the rotor is a simple gear motor mounted to a hinged bracket; when the rotor needs to move, a solenoid pulls the motor’s friction drive wheel up against the rotor.

The unique control slots right into the Minivac replica and really completes the look and feel. Hats off to [Mike] for a delightful replica of a lost bit of computer history and the dedication to see it through to completion.

Continue reading “Minivac 601 Replica Gets A Custom Motorized Rotary Switch”

A Faithful Replica Of An Early Computer Trainer

Turn the clock back six decades or so and imagine you’re in the nascent computer business. You know your product has immense value, but only to a limited customer base with the means to afford such devices and the ability to understand them and put them to use. You know that the market will eventually saturate unless you can create a self-sustaining computer culture. But how does one accomplish such a thing in 1961?

Enter the Minivac 601. The brainchild of no less a computer luminary than Claude Shannon, the father of information theory, the Minivac 601 was ostensibly a toy in the vein of the “100-in-1” electronics kits that would appear later. It used electromechanical circuits to teach basic logic, and now [Mike Gardi] has created a replica of the original Minivac 601.

Both the original and the replica use relays as logic switches, which can be wired in various configurations through jumpers. [Mike]’s version is as faithful to the original as possible with modern parts, and gets an extra authenticity boost through the use of 3D-printed panels and a laser-cut wood frame to recreate the look of the original. Sadly, the unique motorized rotary switch, used for both input and output on the original, has yet to be fully implemented on the replica. But everything else is spot on, and the vintage look is great. Extra points to [Mike] for laboriously recreating the original programming terminals with solder lugs and brass eyelets.

We love seeing this retro replica, and appreciate the chance to reflect on the genius of its inventor. Our profile of Claude Shannon is a great place to start learning about his other contributions to computer science. We’ve also got a deeper dive into information theory for the curious.

Thanks to [Granz] for the tip.

Morse Code Keyboard 1939 Style!

If you want to learn Morse code and you don’t have a teacher, you’d probably just head over to a website or download a phone app. Before that, you probably bought a cassette tape or a phonograph record. But how did you learn Morse if you didn’t have any of that and didn’t know anyone who could send you practice? Sure, you could listen to the radio, but in 1939 that might be difficult, especially to find people sending slow enough for you to copy.

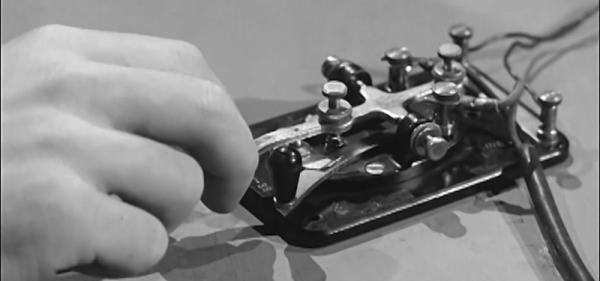
Wireless World for August 3rd, 1939, has the answer in an article by [A. R. Knipe] on page 109. While you probably wouldn’t use it today, it is a great example of how ingenious you can be when you don’t have an Arduino and all the other accoutrements we take for granted today.

Continue reading “Morse Code Keyboard 1939 Style!”

Boxing Trainer

Boxing Trainer Uses DIY Force Sensors

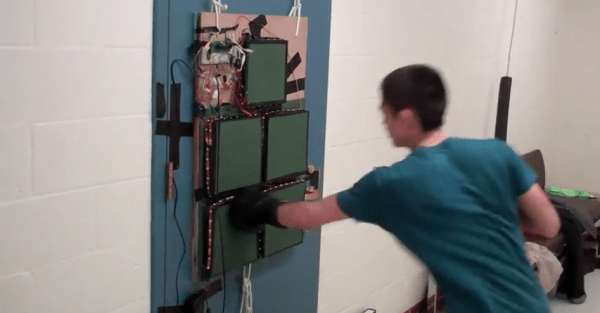
A team of Cornell students have designed and built their own electronic boxing trainer system. The product of their work is a game similar to Whack-A-Mole. There are five square pads organized roughly into the shape of a human torso and head. Each pad will light up based on a pre-programmed pattern. When the pad lights up, it’s the player’s job to punch it! The game keeps track of the player’s accuracy as well as their reaction time.

The team was trying to keep their budget under $100, which meant that off the shelf components would be too costly. To remedy this, they designed their own force sensors. The sensors are basically a sandwich of a few different materials. In the center is a 10″ by 10″ square of ESD foam. Pressed against it is a 1/2″ thick sheet of insulating foam rubber. This foam rubber sheet has 1/4″ slits cut into it, resulting in something that looks like jail bars. Sandwiching these two pieces of foam is fine aluminum window screen. Copper wire is fixed the screen using conductive glue. Finally, the whole thing is sandwiched between flattened pieces of corrugated cardboard to protect the screen.

The sensors are mounted flat against a wall. When a user punches a sensor, it compresses. This compression causes the resistance between the two pieces of aluminum screen to change. The resistance can be measured to detect a hit. The students found that if the sensor is hit harder, more surface area becomes compressed. This results in a greater change in resistance and can then be measured as a more powerful hit. Unfortunately it would need to be calibrated depending on what is hitting the sensor, since the size of the hitter can throw off calibration.

Each sensor pad is surrounded by a strip of LEDs. The LEDs light up to indicate which pad the user is supposed to hit. Everything is controlled by an ATMEGA 1284p microcontroller. This is the latest in a string of student projects to come out of Cornell. Make sure to watch the demonstration video below. Continue reading “Boxing Trainer Uses DIY Force Sensors”

DiY Bike Roller

DIY Bicycle Roller Helps Cure The Winter Blues

Winter’s a-brewing and that is a downer for the everyday cycling enthusiast. There are certainly ‘bike trainers’ out on the market that will let you ride in your living room but they clamp to (or require replacing the) the rear axle. These bike trainers hold the bike in an upright position so that the rider can’t tip the bike and might feel a little boring for some. There is another indoor biking solution called a bicycle roller which is, just as it sounds, a few rollers on the ground that the bike wheels rest on and is not attached to the bike by any mechanical means. When the rider pedals the bike, the bike wheels spin the rollers. Even with the lack of forward momentum the spinning of the wheels is enough for the rider to stay upright.

[Sky-Monkey] wanted to bike during inclement weather and felt that a bike roller was simple enough for him to try building one. He likes building things and already had all the necessary parts kicking around his shop. The rollers are standard 3″ PVC pipe with plywood discs pressed into each end. The discs are counter-bored to accept standard skate bearings. Off the shelf steel rod make up the axles. The 3 rollers and axle assemblies are mounted in a wood frame made from dimensional lumber. It’s important that the front bike wheel also spins so [Sky-Monkey] made a power transmission belt out of cloth strap that spins the front roller with the rear.

The result is a fully functional bike roller that only cost a few hours of time to make. Video of this puppy in action after the break….

Continue reading “DIY Bicycle Roller Helps Cure The Winter Blues”