A devboard with the CH32V003, with a few resistors and bodges, with a USB-C cable plugged into it, and a programmer plus an extra probe attached.

USB PD On CH32V003 Teaches You Everything

How do you talk USB Power Delivery (PD)? Grab a PHY? Use a MCU with one built-in? Well, if you’re hardcore enough, you can do it with just a few resistors and GPIOs. [eeucalyptus] shows you their implementation of USB-PD on a CH32V003, which has no PD peripheral. This includes building a PD trigger, completely open source, and walking you through the entire low-level PD basics, too!

It helps that CH32V003 is a 32-bit MCU with a good few resources and peripherals, for instance, an internal comparator. Other than that, you don’t need much in terms of hardware resources, but you do need a steady hand — parts of the firmware had to be written in assembly to keep up with PD timing. Want to tinker with the fruit of this research, perhaps, further build upon the code? There’s an example board on GitHub, too!

Want to try your own luck with this method? There’s a schematic, and logic analyzer captures, and a board to refer to. Again, more than enough information on every single low-level detail! Otherwise, grab an MCU pre-programmed to talk PD, maybe a trigger board chip, or maybe even a PD PHY and implement PD communications with it directly – it’s pretty easy!

We thank [Julianna] for sharing this with us!

The splitter with a 3D-printed case and three yellow cables coming out of it, powering two phones and one powerbank at the same time

Split A USB-C PD Port Into Three Port-ions

There’s no shortage of USB-C chargers in all sorts of configurations, but sometimes, you simply need a few more charging ports on the go, and you got a single one. Well then, check out [bluepylons]’s USB-C splitter, which takes a single USB-C 5V/3A port and splits it into three 5V/1A plugs, wonderful for charging a good few devices on the go!

This adapter does things right – it actually checks that 3A is provided, with just a comparator, and uses that to switch power to the three outputs, correctly signalling to the consumer devices that they may consume about 1A from the plugs. This hack’s documentation is super considerate – you get detailed instructions on how to reproduce it, every nuance you might want to keep in mind, and even different case options depending on whether you want to pot the case or instead use a thermal pad for a specific component which might have to dissipate some heat during operation!

This hack has been documented with notable care for whoever might want to walk the journey of building one for themselves, so if you ever need a splitter, this one is a wonderful weekend project you are sure to complete. Wonder what kind of project would be a polar opposite, but in all the best ways? Why, this 2kW USB-PD PSU, most certainly.

Design Review: USB-C PD Input For Yaesu FRG7700

Today is another board from a friend, [treble], who wants to convert a Yaesu FRG7700 radio to USB-C PD power. It’s yet another review that I’ve done privately, and then realized I’ve made more than enough changes to it, to the point that others could learn from this review quite a bit. With our hacker’s consent, I’m now sharing these things with you all, so that we can improve our boards further and further.
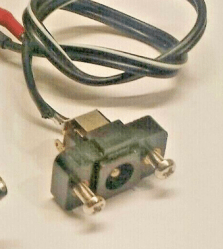
This board’s idea is thought-out and executed well – it replaces a bespoke barrel jack assembly, and is mechanically designed to fit the screw holes and the free space inside the chassis. For USB-PD, it uses a CH32V003 coupled with FUSB302 – I definitely did help pick the latter! For mechanical reasons, this board is split into two parts – one has the USB-C port, whereas the other has the MCU and the PD PHY.
In short, this board is a PD trigger. Unlike the usual PD triggers, however, this one is fully configurable, since it has a 32-bit MCU with good software support, plus, the PD PHY is also well known and easily controllable. So, if you want special behavior like charger-power-dependent profile selection for powering a static resistance load, you can implement it easily – or, say, you can do PPS for variable voltage or even lithium ion battery charging! With a bit of extra code, you could even do EPR (28 V = 140 W power) with this board, instantly making it into a pretty advanced PD trigger, beyond the ones available on the market.

Also, the board has some PCB art, and a very handy filter to get some of the USB-C charger noise out. Let’s take a look at all of these!

Current Flow Improvements

Continue reading “Design Review: USB-C PD Input For Yaesu FRG7700”

Freshening Up Google’s USB-C PD Sniffer

USB-C Power Delivery has definitely made the big mess of wires a bit smaller but not all cables are created equal — some of them can handle upwards of 100 W while the cheapest can handle only 10. To accommodate this, USB-C cables need to actively tell both ends what their capabilities are, which turns an otherwise passive device into a hidden chip in a passive looking cable.

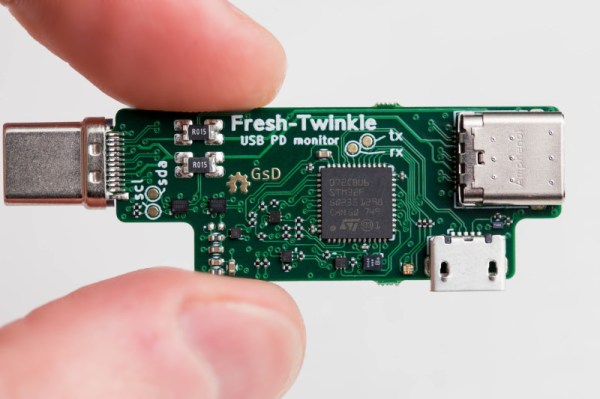
[Greg Davill] has decided to unravel the mystery of why your laptop isn’t charging by creating a USB-PD sniffer. Based on Google’s Twinkie sniffer, the FreshTwinkie makes the design more accessible by reducing the number of layers in the PCB and replacing the BGA variant of the STM32 for a more DIY-friendly QFN version. Interestingly, this isn’t the first time we’ve seen somebody try and simplify the Twinkie; back in 2021, the Twonkie from from [dojoe] hit a number of similar notes.

USB-C Power Delivery is just one of many protocols spoken over the CC pins, and the FreshTwinkie might be able to detect when some of those are enabled and why or why not. With future development, it could potentially provide useful information as to why a Thunderbolt 4 or tunneled PCIe device isn’t working correctly.

Running The Xbox Series S On A USB Powerbank

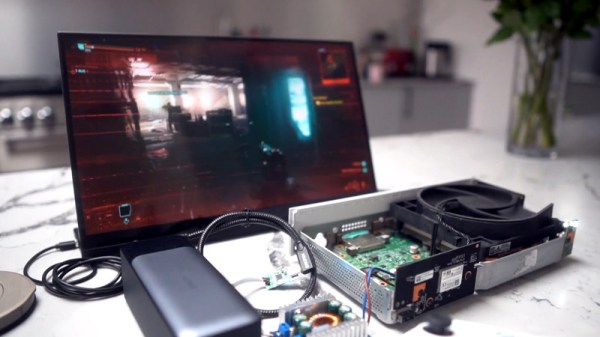
Home consoles were never intended to be made portable, though enterprising hackers have always pushed the boundaries with various tricks and innovative builds. [Robotanv] hasn’t built a fully handheld Xbox Series S, but he has demonstrated one neat trick: making one run on a USB powerbank.

The project starts with an Anker USB-C powerbank, chosen for its ability to deliver a mighty 140 watts. It’s hooked up to a ZY12PDN USB-C trigger board, which enables the powerbank and tells it which voltage to output. It’s set up to run at 20 volts, which is too much for the Xbox, which prefers 12 volts. The reason for this is that the only way to get the full power out of the powerbank is to run at its maximum voltage. A buck converter is used to step down the voltage to 12 volts.

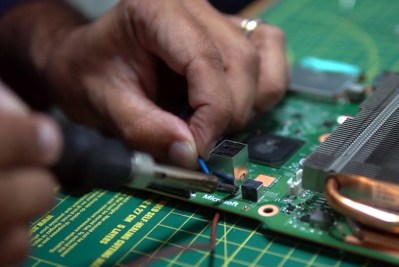
As for the console itself, a lot of disassembly is required, but minimal modifications. Just two wires connect the power supply to the Xbox’s motherboard. Subbing in your own 12 volt supply here is enough to run the console without any problems.

Running the Xbox off the powerbank, along with an external screen, [Robotanv] is able to play Cyberpunk 2077 for an about hour before the juice runs out. While we’d love to see the whole setup duct-taped together into a ersatz Xbox portable, it would probably be a little messy. [Robotanv] has big plans for the future of the project, though, and we can’t wait to see what those are. Continue reading “Running The Xbox Series S On A USB Powerbank”

A Plethora Of Power Delivery Potential

Here at the Hackaday we’ve been enjoying a peculiar side effect of the single-port USB-C world; the increasing availability of programmable DC power supplies in the form of ubiquitous laptop charging bricks. Once the sole domain of barrel jacks or strange rectangular plugs (we’re looking at you Lenovo) it’s become quite common to provide charging via the lingua franca of USB-C Power Delivery. But harnessing those delectable 100W power supplies is all to often the domain of the custom PCBA and firmware hack. What of the power-hungry hacker who wants to integrate Power Delivery in her project? For that we turn to an excellent video by [Brian Lough] describing four common controller ICs and why you might choose one for your next project.

A superb illustration from the TS100 Flex-C-Friend documentation

[Brian] starts off with a sorely-needed explainer of what the heck Power Delivery is; a topic with an unfortunate amount of depth. But the main goal of the video is to dive into the inscrutable hoard of “USB C trigger boards.” Typically these take USB on one side and provide a terminal block on the other, possibly with a button or LED as user interface to select voltage and current. We’ve seen these before as laptop barrel jack replacements and TS100 power supplies but it’s hard to tell which of the seemingly-identical selection is most suitable for a project.

The main body of the video is [Brian’s] detailed walkthrough of four types of trigger boards, based on the IP2721, FUSB302, STUSB4500, and Cypress EZ-PD BCR. For each he describes the behaviors of it’s particular IC and how to configure it. His focus is on building a board to power a TS100 (which parallels his TS100 Flex-C-Friend) but the content is generally applicable. Of course we also appreciate his overview of the products on Tindie for each described module.

For another angle on Power Delivery, check out this series of posts by [jason cerudolo], a perennial favorite. And don’t miss his classic project, the USB Easy Bake Oven.

Solder Ninja Dabbles In USB Power Arcana

USB first hit the scene in the 1990s, and was intended to simplify connecting peripherals to PCs and eliminate the proliferation of various legacy interfaces. Over 20 years later, it’s not only achieved its initial goals, but become a de facto standard for charging and power supply for all manner of personal electronic gadgets. If you asked someone back in 1995 whether or not you could build a USB-powered soldering iron, they’d have politely asked you to leave the USB Implementers Forum. But times change, and Solder Ninja is just that!

With a maximum power draw of 40 W, the Solder Ninja required careful design to ensure practicality. It supports a variety of USB power standards, including USB-BC 1.2, USB Quick Charge, and USB Power Delivery. This enables it to draw the large amounts of current required for the heating element. To make it easy to use with a variety of chargers out in the wild, it displays the current negotiated voltage and maximum current draw. This enables the user to understand the varying performance of the device, depending on the charger it’s plugged into.

Given the multitude of different USB power standards, we imagine [Nicolas] has the patience of a saint to perfect a project like this. We’ve seen similar builds before, too. Video after the break.

Continue reading “Solder Ninja Dabbles In USB Power Arcana”