Using Kick Assembler And VS Code To Write C64 Assembler

YouTuber [My Developer Thoughts], a self-confessed middle-aged Software Developer, clearly has a real soft spot for the 6502-based 8-bit era machines such as the Commodore 64 and the VIC-20, for which he has created several video tutorials while travelling through retro-computing. This latest instalment concerns bringing up the toolchain for using the Kick Assembler with VS Code to target the C64, initially via the VICE emulator.

The video offers a comprehensive tutorial on setting up the toolchain on Windows from scratch with minimal knowledge. While some may consider this level of guidance unnecessary, it is extremely helpful for those who wish to get started with a few examples quickly and don’t have the time to go through multiple manuals and Wikis. In that regard, the video does an excellent job.

VS Code is a great tool with a large user base, so it’s not surprising that there’s a plugin for using the Kick Assembler directly from the IDE. You can also easily launch the application onto the emulator with just a push of a button, allowing you to focus on learning and working on your application. Once it runs under emulation, there’s a learning curve for running it on native hardware, but there are plenty of tutorials available for that. While you could code directly on the C64 itself, it’s much more pleasant to use modern tools, revision control, and all the conveniences and not have to endure the challenges.

Once you’ve mastered assembly, it may be time to move on to C or even C++. The Oscar64 compiler is a good choice for that. Next, you may want to show off your new skills on the retro demo scene. Here’s a neat C64 demo with a twist. There is no C64.

Continue reading “Using Kick Assembler And VS Code To Write C64 Assembler”

Fractal Vise Holds Odd-Shaped Objects Tight

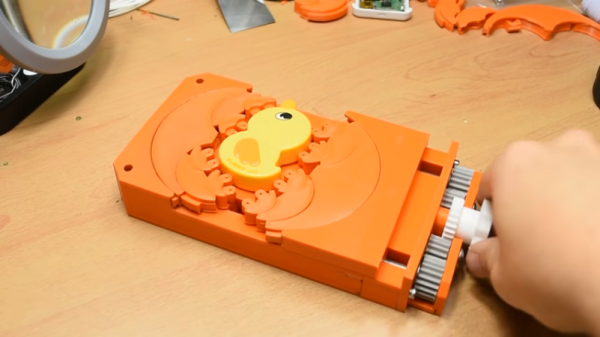
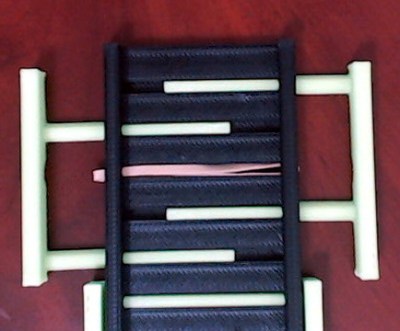
A regular vice is great if you want to clamp rectangular objects, but it can fall down a little with more complex shapes. Inspired by an ancient vise [Chris Borge] whipped up his own 3D-printed fractal clamping tool.

The inspiration for this one comes from the [Hand Tool Rescue] video that shows of the clever mechanism. The vice uses a series of interlocking parts that can freely articulate to grip the object of interest via several protruding fingers. In reproducing the design, [Chris] had some issues initially with the joints, but settling on a dovetail similar to that of the original metal vice which got things working nicely.

[Chris] notes that while the design works, it could still use some refinement. Silicone or rubber tips on the fingers could give the vice better grip, and there remain some flexural issues that could be improved. Overall, however, it’s a useful table vice for small jobs on weird shaped things. We’ve seen 3D-printed vices before, particularly in the PCB vice space, but the grip scheme user here is totally unique.

Continue reading “Fractal Vise Holds Odd-Shaped Objects Tight”

A Geared Bench Vise To Clamp All The Things

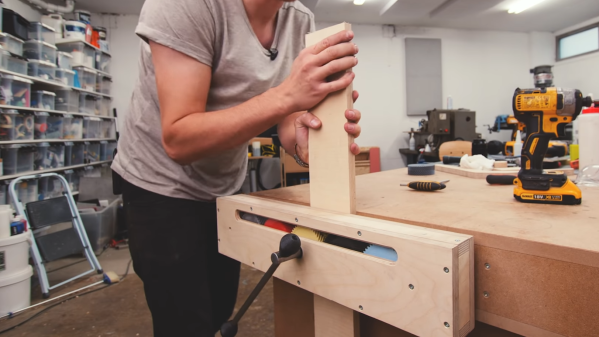
On the eternal quest of workshop upgrades, [Alexandre Chappel] has combined woodworking and 3D printing to add a versatile 0.5 m wide vise with some clever internals to his workbench.

The challenge with such a wide vise is that it requires two timed lead screws on either end of the vise to prevent if from pulling skew under force. This can be done with a chain, belt, or [Alexandre]’s choice, gears. Inside the moving part of the vise he fitted series of 5 herringbone gears. By turning the center gear with a lever, it rotates the gears on the end which are fixed to tow lead screws. The external surfaces of the clamp are made with plywood, and the gears are printed with PLA and high infill percentage. [Alexandre] does say that he is not sure durable the gears are, but they definitely aren’t flimsy. He added an acrylic inspection window to the box section, which we think looks superb with the colored gears peaking through. The back of the vise is mounted inside the workbench, which keeps the look clean and doesn’t take up any bench space.

[Alexandre] does a lot of filming in his workshop, so recently he also built a very impressive and practical camera arm to avoid having to move tripods the whole time. A vise is a must-have tool in almost any workshop, so we’ve seen a few DIY versions, like magnetic base vise and one with a hydraulic vise.

Restoring 100-year-old vice

Restoring A 100 Year Old Vice To Pristine Condition

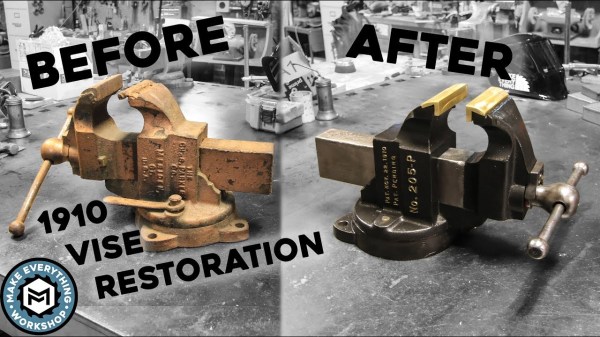
We love our vices. They hold pipes for us to saw away at, wood while we carve, and circuit boards so that we can solder on components. So we keep them in shape by cleaning and greasing them every now and then, [MakeEverything] went even further. He found a 100-year-old vice that was in very rough shape and which was going to be thrown out and did a beautiful restoration job on it.

It was actually worse than in rough shape. At some point, one of the jaws had been replaced by welding on a piece of rebar where the jaw would normally go. So he made entirely new jaws from solid brass as well as the pins to hold them firmly in place. We applaud his attention to detail. After removing all the old paint and corrosion, he painted it with a “hammered” spray paint to give it a nice hammered look. Though when he made the raised letters stand out by applying gold paint to them using an oil-based paint marker, we felt that was just showing off. The result is almost too gorgeous to use, but he assures us he will use it. You can see his process, as well as have a good look at the newly revived vice in the video below.

Continue reading “Restoring A 100 Year Old Vice To Pristine Condition”

3D Printed Vice Holds Dev Boards Beside Breadboard

The Stickvise has been a staple of the Hackaday community for a while now. If you need something held for soldering there’s no better low-cost helping hand. But if you’re just using a breadboard and a dev board of some sort, there’s another vice on the horizon that uses similar spring clamping to hold everything in place while you build something awesome.

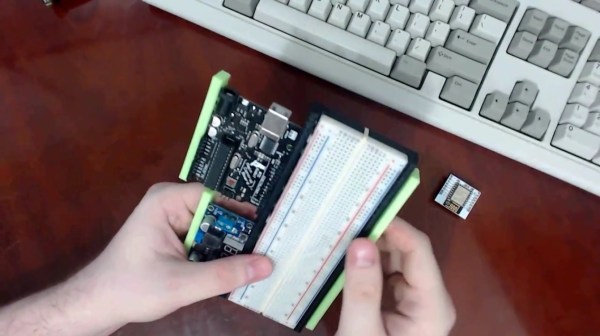
BreadboardVise1-croppedWhile [Pat]’s inspiration came from the aforementioned Stickvise, the new 3d-printed vice is just what you’ll need before you’re ready to do the soldering. The vice is spring-loaded using rubber bands. The base is sized to fit a standard breadboard in the center with clamping arms on either side to hold dev boards such as an Arduino. This innovative yet simple de”vice” grips boards well enough that you won’t be chasing them around your desk, knocking wires out of place, anymore.

There are some nuances to this board, so be sure to check out the video below to see it in action. As we mentioned, it uses rubber bands instead of springs to keep it simple, and it has some shapes that are easily 3d printed such as the triangular rails. If you want to 3d print your own, the files you’ll need are available on the project’s site. If you want to get even simpler, we’ve seen a few other vices around here as well.

The Stickvise is available for sale in the Hackaday Store.

Continue reading “3D Printed Vice Holds Dev Boards Beside Breadboard”

Hackaday Links: October 27, 2013

hackaday-links-chain

[Kyle] came across a project which he thinks is “simply elegant”. If you don’t already have a PCB vice, here’s an easy way to build one of your own.

This one’s so good but alas it’s not a hack. Check out the slideshow tour at UC Boulder’s Fiske Planetarium. You get a really cool look at the hardware that makes the dome and projector such a great experience. [via Reddit]

Here’s a schematic and a couple of snapshots of [Trax’s] CAN bus hacking rig. He plans on doing a tutorial but decided to share this link after reading the first part of our own CAN hacking series.

These strings of LEDs bump to the tunes. [Alex] is using GrooveShark as a frequency analyzer, then pushing commands via Node.js to the Arduino controlling the lights. It’s all planned for the back porch during his Halloween party.

We remember drilling holes in the 3.5″ floppy discs (we even made a wood jig for this) to double their capacity. A similar blast from the past was to punch a notch in the larger 5.25″ versions to make them double-sided.

If you’re trying to learn about FFT [Ronald] highly recommends this website. We didn’t do too much poking around because it’s kind of strange. But if you do get sucked in and have fun with it leave a comment to let others know it’s worth their attention.

We suppose that using 39 Raspberry Pi boards and their camera modules isn’t the worst way to build a huge 3D model capture rig. The results certainly are impressive. [Thanks Wouter]

Via Press Crushes Copper To Make A Mechanical Connection

via-press-in-action

[Jay] was looking for a way to make his own vias on homemade double-sided PCBs when he stumbled across this post from about five years ago. The technique shown here makes mechanical vias and was developed by [Retromaster]. There’s no soldering involved, instead he uses some solid core copper wire and a press to crush it tightly against the board.

The press is made from aluminum stock, with a couple of plates of stainless steel which come in contact with the board. The aluminum stock is easy to work with, but it’s relatively soft which is the reason for the addition of steel. He uses copper wire which already fits tightly in the hole through the substrate. After clipping off the excess as near to the board as possible a trip through the press leaves each side flat as shown in the inset image.

We looked through some of the other projects we’ve seen from [Retromaster] like the Atari 2600 in an FPGA and this emulated Amiga floppy drive. But we didn’t see any diy boards where he used this crushing technique.