Laser soldering

Solder Stencil Done Three Ways

This project, sent in by [Henk], goes through a few different ways to make a solder stencil using a vinyl cutter, a CO2 laser, and a fiber laser.

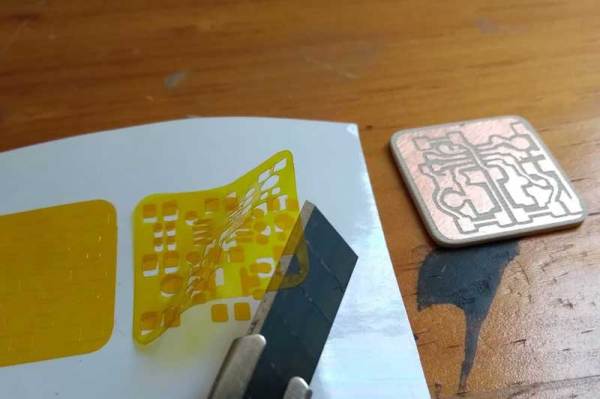
The project starts with identifying a method to convert the board’s Gerber files to a PNG, which is ultimately used to create a vector file for use with the laser. The first stencil, made with the CO2 laser, was cut out of masking tape. This worked fine for larger cutouts and is certainly a cheap option if you don’t have too many small components. A slightly better approach with the CO2 laser was using vinyl sheet release paper, which seemed to hold together better than the tape.

Laser-cut masking tape works, but not for long.

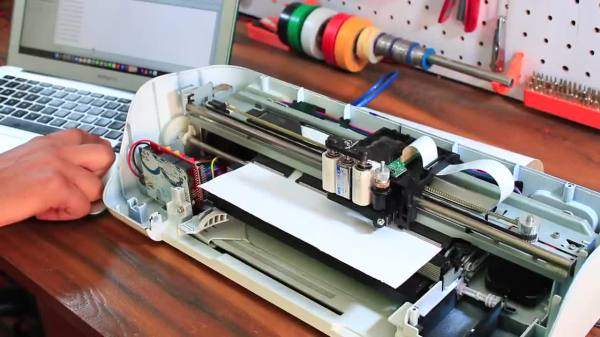
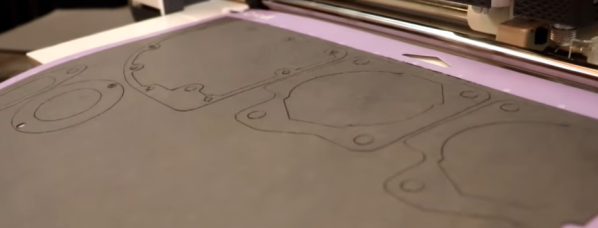
A vinyl cutter was also used as an experiment, but it didn’t perform as well as the CO2 laser, as expected, since the cutter uses a knife rather than light, leading to some tearing issues.

The final method utilized a fiber laser and an empty drink can to create a metal stencil. First, the can had to be cut open, heated, and flattened. The fiber laser was able to cut clean footprints in the aluminum, creating a stencil that would hold up to more use than the paper variations.

The finale of this exploration into laser stencil making was using the fiber laser to solder the board together. The stencil was used to spread paste on the pads, parts were placed on the board, and then the fiber laser heated the solder paste to solder them to the board. The board looked a bit toasty afterwards, but we imagine the process could be fine-tuned to reduce the collateral damage a bit.

Once you’ve got your stencil ready to go, you can combine it with a 3D printed jig to hold the PCB while you apply the solder paste.

Micro Jeep Model Kit Is Both Business Card And Portfolio

When finding work in product design and prototyping, two things are important to have at hand: a business card, and a sample of one’s work. If one can combine those, even better. Make it unique and eye-catching, and you’re really onto something. That seems to  have been the idea behind [agepbiz]’s 1:64 scale micro Jeep model kit that serves as an  “overcomplicated” business card.

Complete with box and labels in a shrink-wrapped package.

At its heart, the kit is a little print-in-place model kit that looks a lot like larger injection-molded model kits. Completing it is a custom-made box with custom labels, and it’s even shrink-wrapped. The whole thing fits easily in the palm of a hand.

There’s a lot of different tools effectively used to make the whole thing. The model card itself is 3D printed in multiple filament colors, and the box is constructed from carefully glued cardstock. The labels are custom printed, and a craft cutter (which has multiple uses for a hobbyist) takes care of all the precise cutting. It’s an awfully slick presentation, and the contents do not disappoint.

Get a closer look in the video, embedded just below. And if you like what you see, you’re in luck because we’ve seen [agepbiz]’s work before in this mini jet fighter, complete with blister pack.

Continue reading “Micro Jeep Model Kit Is Both Business Card And Portfolio”

Brass Plaque Honors Brother

Brass plaques are eye-catching because no one makes them on a whim. They are more costly than wood or plastic, and processing them is proportionally difficult. [Becky Stern] picked the medium to honor her brother, who enjoyed coffee, motorcycles, and making things by hand. She made some playing card-sized pieces to adorn his favorite brand of hot bean juice and a large one to hang at his memorial site.

The primary components are a vertical salt water bath, DC power supply, metal to etch, scrap steel approximately the same size, and a water agitator, which in this case is an air pump and diffuser stone. You could stir manually for two hours and binge your shows but trust us and take the easy route. The video doesn’t explicitly call for flexible wires, but [Becky] wisely selected some high-strand hook-up leads, which will cause fewer headaches as stiff copper has a mind of its own, and you don’t want the two sides colliding.

There are a couple of ways to transfer an insulating mask to metal, and we see the ole’ magazine paper method fail in the video, but cutting vinyl works a treat. You may prefer lasers or resin printers, and that’s all right too. Once your mask is sorted, connect the positive lead to the brass and the negative to your steel. Now, it’s into the agitated salt water bath, apply direct current, and allow electricity to immortalize your design.

Continue reading “Brass Plaque Honors Brother”

Ride DIY Or Die This Badge-Less Suzuki

A few years ago, [Charles] picked up a sweet Suzuki motorcycle that checked all the boxen: it was in good shape, bore a few useful upgrades and a box of spare parts, plus the price was right. Though he assumed that he had pored over every picture on the classified site before buying, it wasn’t until later that [Charles] realized that something was indeed missing from the bike — a piece of chrome that does little more than to cover the tee in the brake line and bear the Suzuki brand. Once he saw the problem, he couldn’t un-see it, you know? And at that point, he just had to have that little piece, even if he had to make it himself.

That wasn’t the original plan, of course, but bike parts are expensive to begin with and only get worse as size, condition, and rarity increase. [Charles]’ quest to find this piece was halfway successful; he found a reasonable-but-rusty facsimile of the right part, although the emblem portion was long gone. Then he remembered the wife’s vinyl cutter.

Now, let’s stop right there. If you know anything at all about these vinyl cutters, you know that they are basically glorified 2D plotters with a knife attached where a pen would be. Send it any 2D file and you’re good? No, no; of course not. These things are locked down by the manufacturers.

Fortunately, [Charles] found inkscape-silhouette, which makes light work of sending SVGs to the machine. After much back and forth and maybe a bit of coin-flipping, [Charles] settled on the classy, stylized ‘S’ version rather than the full-on Suzuki badge. We think it looks great, and we’ll never tell anyone.

While this isn’t quite the type of badge we’d normally talk about, it’s a great project nonetheless, and it’s always nice to hear about projects that open up otherwise closed-source hardware.

From Printer To Vinyl Cutter

Some might look at a cheap inkjet printer and see a clunky device that costs more to replace the ink than to buy a new one. [Abhishek Verma] saw an old inkjet printer and instead saw a smooth gantry and feed mechanism, the perfect platform to build his own DIY vinyl cutter.

The printer was carefully disassembled. The feed mechanism was reworked to be driven by a stepper motor with some 3D printed adapter plates. A solenoid-based push/pull mechanism for the cutting blade was added with a 3D printed housing along with a relay module. An Arduino Uno takes in commands from a computer with the help of a CNC GRBL shield.

What we love about this build is the ingenuity and reuse of parts inside the old printer. For example, the old PCB was cut and connectors were re-used. From the outside, it’s hard to believe that HP didn’t manufacture this as a vinyl cutter.

If you don’t have a printer on hand, you can always use your CNC as a vinyl cutter. But if you don’t have a CNC, [Abhishek] shares all the STL files for his cutter as well as the schematic. Video after the break.

Continue reading “From Printer To Vinyl Cutter”

Making PCBs With A Vinyl Cutter

You might assume that you need a lot of expensive stuff to make your own PCBs, but that isn’t the case: you can do it with a vinyl cutter and a few common chemicals and tools. [Emiliano Valencia] has laid out the entire process. While we’ve seen plenty of make your own PCB guides before, this one goes a bit further as it covers using the vinyl cutter to make solder masks, so you can use it for surface mount designs.

The end result of the process that [Emilano] lays out is the tinyDice, a cute little electronic die that can fit on a keyring. The whole process is very well written up, and even experienced PCB makers will probably find a few useful tricks here.

The really interesting part for us was using the vinyl cutter to make three parts of the process: the etching mask, the solder mask that protects the traces and the solder stencil that applies the solder to the pads for surface mounting. Continue reading “Making PCBs With A Vinyl Cutter”

Vinyl Cutter Migrates From Scrapbooks To Gaskets

We know it all too well: another smoothly-operating night in the garage easily halted by a broken component. In the late hours of the night, no hardware store will open its doors. And while waiting may reward the patient, creativity may reward those who act now. That’s exactly where [Justin] found himself one evening: with a torn gasket. Not to be dismayed, he turned to his fiancee [Amy] and the two of them managed to design and cut a perfectly fitting replacement gasket on [Amy’s] vinyl cutter in a  mere matter of minutes.

In the video after the break, the two step us through their process in detail. By starting with an image of the existing gasket, they capture a reference image. Some light work in photoshop cleans up everything except the resulting gasket they’re looking for. Finally, sizing “by eye” in the vinyl cutter’s software after measuring an existing dimension gives them sufficient precision to remake a duplicate gasket that’s eye-for-eye indistiguishable from the original.

It seems like we often hear about vinyl-cut gaskets in passing or in the comments, but it’s great to see a team post such a fabulous success story putting them to good use. And in case a plain old’ vinyl cutter blade wont do the trick, why not try running it at ultrasonic speeds?

Continue reading “Vinyl Cutter Migrates From Scrapbooks To Gaskets”