A Little Optical Magic Makes This Floating Display Pop

If there’s a reason that fancy holographic displays that respond to gestures are a science fiction staple, it’s probably because our current display technology is terrible. Oh sure, Retina displays and big curved gaming monitors are things of wonder, but they’re also things that occupy space even when they’re off — hence the yearning for a display that can appear and disappear at need.

Now, we’re not sure if [Maker Mac70]’s floating display is the answer to your sci-fi dreams, but it’s still pretty cool. And, as with the best of tricks, it’s all done with mirrors. The idea is to use a combination of a partially reflective mirror, a sheet of retroreflective material, and a bright LCD panel. These are set up in an equilateral triangle arrangement, with the partially reflective mirror at the top. Part of the light from the LCD bounces off the bottom surface of the mirror onto a retroreflector — [Mac] used a sheet of material similar to what’s used on traffic signs. True to its name, the retroreflector bounces the light directly back at the semi-transparent mirror, passing through it to focus on a point in space above the whole contraption. To make the display interactive, [Mac] used a trio of cheap time-of-flight (TOF) sensors to watch for fingers poking into the space into which the display is projected. It seemed to work well enough after some tweaking; you can check it out in the video below, which also has some great tips on greebling, if that’s your thing.

We suspect that the thumbnail for the video is a composite, but that’s understandable since the conditions for viewing such a display have to be just right in terms of ambient light level and the viewer’s position relative to the display. [Mac] even mentions the narrow acceptance angle of the display, touting it as a potential benefit for use cases where privacy is a concern. In any case, it’s very different from his last sci-fi-inspired volumetric display, which was pretty cool too.

Continue reading “A Little Optical Magic Makes This Floating Display Pop”

Make A Super Cute LiDAR Measurement Module

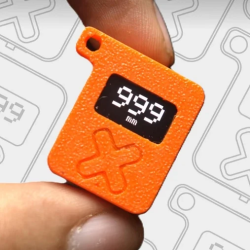
This ultra-cute tiny LiDAR rangefinder project by [gokux] can be thought of as a love letter to the incredible resources and components hobbyists and hackers of all types have access to nowadays. In fact, it all stemmed from coming across a miniscule half-inch 64×32 OLED display module that was simply too slick to pass up.

USB connector for charging on the bottom, hole for distance sensor out the top.

To use it, one simply powers it on and the display will read out the distance in millimeters. The VL53L0X time-of-flight sensor inside works by sending out a laser pulse and measuring how long it takes for the pulse to bounce back. We hope you’re curious about what such a sensor looks like on the inside, because here’s a nifty teardown of these fantastic devices. The device can technically measure distances of up to 2 m, but [gokux] says accuracy drops off after 1 m.

The main components besides the OLED display and VL53L0X sensor are an ESP32-C3 board (which handily integrates battery charging circuitry), 3D-printed enclosure, tiny rechargeable battery, and power switch. The whole thing is under one cubic inch. Not bad, and it even makes a passable keychain. Parts list, code, and 3D model files, including STEP format, are all available if you’d like to spend an afternoon making your own.

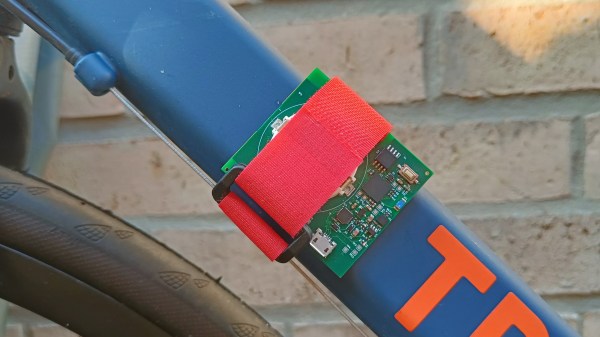
The Tracer board strapped to the frame of a bicycle with a red Velcro strap

Tracer, A Platform For All Things Movement Logging

[elektroThing] is building a lightweight, battery-powered board to track and measure movement of all kinds, called Tracer. Powered by an ESP32, it has a LSM6DSL 6DoF accelerometer & gyroscope sensor, and a VL53L0X Time-of-Flight sensor. A small Li-ion battery in a holder reportedly provides for 5 hours of streaming data over Bluetooth Low Energy (BLE) at 100 Hz. It’s essentially a wireless movement sensor platform to be paired with a more powerful computer for data logging and analysis. What’s such a platform good for?

They show it attached to a tennis racket, saying you could use the data to, for a start, count the strokes done in a given match. They’ve also strapped it to a bicycle’s crankshaft and used it as a cadence sensor – good for gauging your cycling efficiency! But of course, this can be used in more applications than sport. A device like this could be used for logging movement of any relatively nearby objects, be it your cat, an office chair, or a door someone might slam a bit too hard at times. Say, you wanted to develop a sleep tracker and were to collect some data for defining your algorithms and planning your hardware requirements – this would work wonders.

There’s already available example code for streaming data into the Phyphox data logging and graphing app, as well as schematics – hopefully, the full board files will be available soon. A worthy open-source opponent to commercial devices available for similar purposes, this platform is good news for any hacker that wants to do motion measurement projects without reinventing quite a few wheels at once. We are told this board might get to CrowdSupply soon, and we can’t wait! Platforms like these, if done well, can grow an offspring of new projects for us to have fun with, and our paid projects get all that much easier to work on.

We’ve shown projects with such sensors before – here’s one that helps your rifle aim by giving you data to debug your last-second rifle movements, and another that logs movement data from inside a football. There’s a million endpoints you could stream your data into, and we are told you could even use Google Sheets. Just a year ago, we held our Data Logging contest and the entries we received will surely point out quite a few under-explored areas in your daily life!

Fail Of The Week: How Not To Make A 3D Scanner

Sometimes the best you can say about a project is, “Nice start.” That’s the case for this as-yet awful DIY 3D scanner, which can serve both as a launching point for further development and a lesson in what not to do.

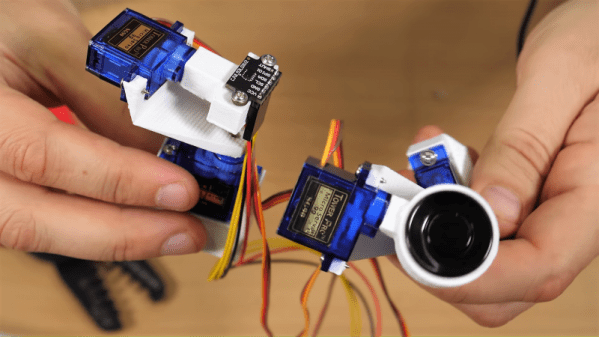
Don’t get us wrong, we have plenty of respect for [bitluni] and for the fact that he posts his failures as well as his successes, like composite video and AM radio signals from an ESP32. He used an ESP8266 in this project, which actually uses two different sensors: an ultrasonic transducer, and a small time-of-flight laser chip. Each was mounted to a two-axis scanner built from hobby servos and 3D-printed parts. The pitch and yaw axes move the sensors through a hemisphere gathering data, but unfortunately, the Wemos D1 Mini lacks the RAM to render the complete point cloud from the raw points. That’s farmed out to a WebGL page. Initial results with the ultrasonic sensor were not great, and the TOF sensor left everything to be desired too. But [bitluni] stuck with it, and got a few results that at least make it look like he’s heading in the right direction.

We expect he’ll get this sorted out and come back with some better results, but in the meantime, we applaud his willingness to post this so that we can all benefit from his pain. He might want to check out the results from this polished and pricey LIDAR scanner for inspiration.

Continue reading “Fail Of The Week: How Not To Make A 3D Scanner”

XLIDAR Is A Merry-Go-Round Of Time-Of-Flight Sensors

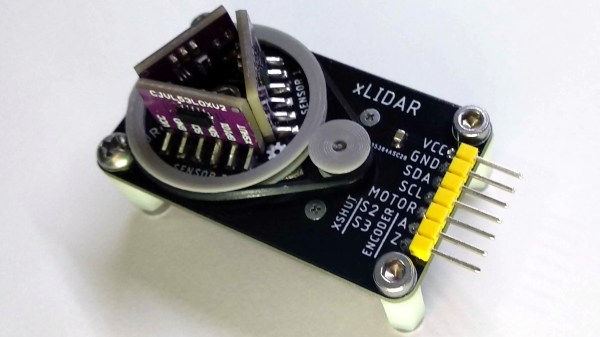
[JRodrigo]’s xLIDAR project is one of those ideas that seemed so attractively workable that it went directly to a PCB prototype without doing much stopping along the way. The concept was to mount a trio of outward-facing VL53L0X distance sensors to a small PCB disk, and then turn that disk with a motor and belt while taking readings. As the sensors turn, their distance readings can be used to paint a picture of the immediate surroundings (at least within about 1 meter, which is the maximum range of the VL53L0X.)

The hardware is made to be accessible and has a strong element of “what you see is what you get.” The distance sensors are on small breakout boards, and the board turns the sensor disk via a DC motor and 3D printed belt drive. Even the method of encoding the disk’s movement and zero position has the same WYSIWYG straightforwardness: a spring contact and an interrupted bare copper trace on the bottom of the sensor disk acts as a physical switch. In fact, exposed copper traces in concentric circular patterns and spring pins taken from an SD card socket are what provide power and communications as the disk turns.

The prototype looks good and sounds like it should work, but how well does it hold up? We’ll find out once [JRodrigo] does some testing. Until then, the board designs are available on the project’s GitHub repository if anyone wants to take a shot at their own approach without starting from scratch.

Touchless Shop Doors Over-Engineered To A Blissful Level

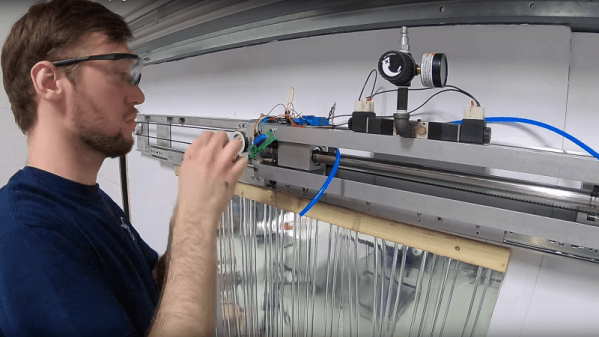
When [John Saunders] wanted an automatic door for his shop, rather than settle for a commercial unit, he designed and built a proximity-sensing opener to ease his passing. Sounds simple, right?

Fortunately for us, there are no half-measures at Saunders Machine Works, thanks to the multiple Tormach workcells and the people who know how to use them. The video below treats us to quite a build as a result; the first part is heavy on machining the many parts for the opener, so skip ahead to 8:33 if you’re more interested in the control electronics and programming.

The opener uses time-of-flight distance sensors and an Arduino to detect someone approaching, with a pneumatic cylinder to part a plastic strip curtain. [John] admits to more than a little scope creep with this one, which is understandable when you’ve got easy access to the tools needed to create specialized parts at will.

In the end, though, it works well for everyone but [Judd], the shop dog, and it certainly looks like it was a fun build to boot. [John]’s enthusiasm for mixing machining and electronics is infectious; check out his automated bowl feeder for assembly line use.

Continue reading “Touchless Shop Doors Over-Engineered To A Blissful Level”

Hackaday Prize Entry: MappyDot, A Micro Smart LiDAR Sensor

[Blecky]’s entry to the Hackaday Prize is MappyDot, a tiny board less than a square inch in size that holds a VL53L0X time-of-flight distance sensor and can measure distances of up to 2 meters.

MappyDot is more than just a breakout board; the ATMega328PB microcontroller on each PCB provides filtering, an easy to use  I2C interface, and automatically handles up to 112 boards connected in a bus. The idea is that one or a few MappyDots can be used by themselves, but managing a large number is just as easy. By dotting a device with multiple MappyDots pointing in different directions, a device could combine the readings to gain a LiDAR-like understanding of its physical environment. Its big numbers of MappyDots [Blecky] is going for, too: he just received a few panels of bare PCBs that he’ll soon be laboriously populating. The good news is, there aren’t that many components on each board.

It’s great to see open sourced projects and tools in which it is clear some thought has gone into making them flexible and easy to use. This means they are easier to incorporate into other work and helps make them a great contestant for the Hackaday Prize.