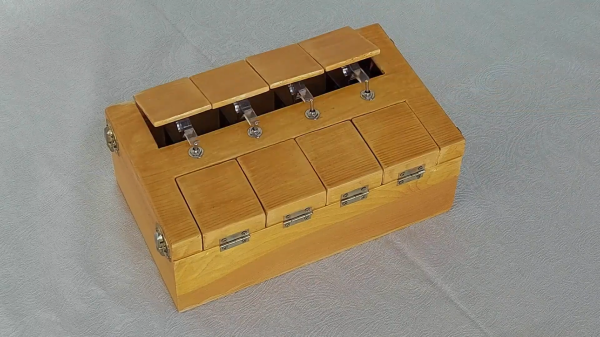
Home-based 3D printing is getting pretty unremarkable. Sure, printers aren’t as ubiquitous as, say, PCs. But you wouldn’t be any more surprised if your neighbor had a 3D printer than if you found out they had a drill press. In fact, sometimes the real value of 3D printing something isn’t to make a working part, but to make up something that helps you create other things using methods other than printing. That’s exactly what [iqless] does when he uses his printer to make some jigs to help him easily build shelves. (Video, embedded below.)
The issue is making dowel joints for the shelve’s feet. Sure, you could just drill a piece of scrap wood as a template, but with a 3D printer you can do better. Using OpenSCAD, it is possible to create a parameterized jig that fits exactly the job at hand.
While the days of audio cassette tapes are long over for almost everyone, magnetic tape still enjoys extensive use in some other realms such as large-scale data backup. Those that are still using it to store their tunes are a special subset of audio enthusiasts. [Frank] still has a working tape deck, and enthusiasm for classic non-vinyl sound. His homage to audio tape? Building a working cassette made (almost) entirely of wood.
The cassette is modeled on the formerly popular Maxell XL-II and the first versions of this build were modeled in paper. Once the precise dimensions of the enclosure were determined, [Frank] got to work building the final version from wood in a decidedly 2D process. He used a plotter to cut layers out of a wood veneer and glued them together one-by-one. The impressive part of this build is that the tape reel bearings are also made from wood, using a small piece as a race that holds the reels without too much friction.
Once everything was pieced together and glued up, [Frank] had a perfect working cassette tape made entirely from wood with the exception of the magnetic tape and a few critical plastic parts that handle the tape directly. The build is an impressive piece of woodworking, not unlike the solid wood arcade cabinet from a few days ago.
Having an arcade cabinet of one’s own is a common dream among those who grew up during the video game arcade heyday of the 80s and early 90s. It’s a fairly common build that doesn’t take too much specialized knowledge to build. This cabinet, on the other hand, pulled out all of the stops for the cabinet itself, demonstrating an impressive level of woodworking expertise.
The cabinet enclosure is made with red oak boards, which the creator [Obstreperuss] sawed and planed and then glued together to create the various panels (more details are available on his Imgur album). The Mario artwork on the sides and front aren’t just vinyl stickers, either. He used various hardwoods cut into small squares to create pixel art inlays in the oak faces. After the fancy woodwork was completed, the build was finished out with some USB arcade controllers, a flat-panel screen, and a Raspberry Pi to run the games.
While the internals are pretty standard, we have to commend the incredible quality of the woodworking. It’s an impressive homage to classic arcade machines and we wouldn’t mind a similar one in our own homes. If you’re lacking the woodworking equipment, though, it’s possible to get a refined (yet smaller) arcade cabinet for yourself with a 3D printer instead.
A plane is a tool familiar to all woodworkers, used to shape a workpiece by hand by shaving away material. Regular planes are two-handed tools available at all good hardware stores. For finer work, a finger plane can be useful, though harder to find. Thankfully, [Daniel] put together a video showing how to make your own.
[Daniel]’s build relies on stabilized wood, useful for its density and consistent quality, though other woods work too. A 6″ pen blank is enough to make a pair of matching finger planes. A block and two side panels are cut out from the material, with attention paid to making sure everything remains square for easy assembly. The parts are glued together with a block set at the desired cutting angle for the plane. With the assembly then tidied up on the bandsaw and sander, [Daniel] installs the cutting blade. This can be made from a larger standard plane blade, or a cutdown chisel can be pressed into service. The blade is held in place with a wooden wedge beneath a metal pin. The pin itself is crafted from an old drill bit, cut down to size.
It’s a useful tool for doing fine plane work, for which a full-size tool would be ungainly. We can imagine it proving particularly useful in producing accurate scale models in smaller sizes. If you’re big into woodworking, consider giving your tools a good sharpen on the cheap, too. Video after the break.
Most infinity mirrors are just minor variations on the same old recipe. Take a frame, add a normal mirror in the back, a one-way mirror on the front, and put some LEDs between them. [Stevens Workshop] took a slightly different approach and built an escape tunnel coffee table that really caught our attention.
To create the tunnel and ladder illusion, [Steven] kept the mirrors, but made a deeper wood frame, installed a light bulb in an industrial-looking socket instead of the usual LEDs, and added a single ladder rung. The end result makes for a very interesting conversation piece, and some of us prefer it to the multicolored LED look. Though he added his own touches, the idea was actually borrowed from from [asthhvdrt36] and [BreezleSprouts] on Reddit who used slightly different light and ladder designs.
While there’s nothing groundbreaking here, it’s certainly a case of “why didn’t I think of that”. Sometimes the old and familiar just needs a different perspective to create something fascinating. One of the advantages of the classic infinity mirror is the thin profile, which we’ve seen integrated into everything from guitars to coasters.
Artfully-crafted wooden joints that fit together like puzzle pieces and need neither glue nor nails is fascinating stuff, but to call the process of designing and manufacturing them by hand “time-consuming” would be an understatement. To change that, a research team from the University of Tokyo presented Tsugite, a software system for interactively designing and fabricating complex wooden joints. It’s named after the Japanese word for joinery, and aims to make the design and manufacture of glue and fastener-free joints much easier than it otherwise would be.
Three-way joint that requires no glue or fasteners.
It looks like the software is so far only a research project and not something that can be downloadedThe software is available on GitHub and the approach it takes is interesting. This downloadable PDF explains how the software deals with the problem of how to make such a task interactive and practical.
The clever bit is that the software not only provides design assistance for the joints themselves in a WYSIWYG (what you see is what you get) interface, but also generates real-time feedback based on using a three-axis CNC tool as the manufacturing method. This means that the system understands the constraints that come from the fabrication method, and incorporates that into design feedback.
The two main limitations of using a three-axis CNC are that the cutting tool can only approach the material from above, and that standard milling bits cannot create sharp inner corners; they will have a rounded fillet the same radius as the cutting bit. Design can be done manually, or by selecting joints from a pre-defined gallery. Once the design is complete, the system generates the toolpaths for manufacture.
Currently, Tsugite is limited to single joints meant for frame structures, but there’s no reason it couldn’t expand beyond that scope. A video to accompany the paper is embedded below, it’s short and concise and shows the software in action, so be sure to give it a look.
On the eternal quest of workshop upgrades, [Alexandre Chappel] has combined woodworking and 3D printing to add a versatile 0.5 m wide vise with some clever internals to his workbench.
The challenge with such a wide vise is that it requires two timed lead screws on either end of the vise to prevent if from pulling skew under force. This can be done with a chain, belt, or [Alexandre]’s choice, gears. Inside the moving part of the vise he fitted series of 5 herringbone gears. By turning the center gear with a lever, it rotates the gears on the end which are fixed to tow lead screws. The external surfaces of the clamp are made with plywood, and the gears are printed with PLA and high infill percentage. [Alexandre] does say that he is not sure durable the gears are, but they definitely aren’t flimsy. He added an acrylic inspection window to the box section, which we think looks superb with the colored gears peaking through. The back of the vise is mounted inside the workbench, which keeps the look clean and doesn’t take up any bench space.
[Alexandre] does a lot of filming in his workshop, so recently he also built a very impressive and practical camera arm to avoid having to move tripods the whole time. A vise is a must-have tool in almost any workshop, so we’ve seen a few DIY versions, like magnetic base vise and one with a hydraulic vise.