Jet tools air scrubber

It’s A Hack: Air Scrubber Controlled Using The Room Lighting

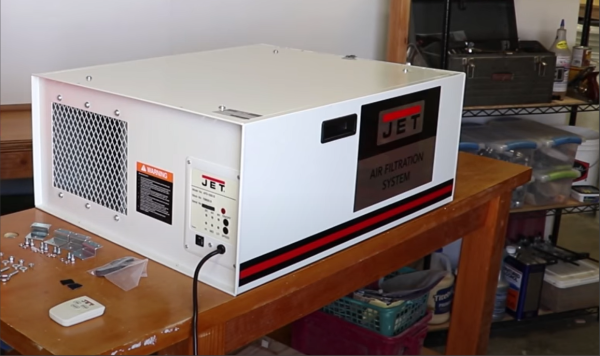
Some products just seem to be designed to be annoying. [hardmar] discovered the air filtration system installed in his son’s basement woodshop was orientated for the best airflow, but rather poorly positioned to actually turning the thing on and off. For some reason the unit has its single line-of-sight IR receiver on one side, which when mounted in some positions, forces the user to be the completely wrong position to use the supplied remote.

We find it a little unhelpful sometimes that devices specifically designed to be mounted with varying orientations don’t come fitted with IR receivers in different locations to ensure good controllability. It would get annoying really fast to have to contort oneself into some specific position just to turn something on, and some people just might not bother at all.

Proper control of dust is paramount for continued good health, and essential in any workspace or shared area. When you work wood, it produces a lot of dust. It cannot be avoided and gets into everything, your lungs included. PPE is not enough.  Even in your own shop you still really should manage dust production as best you can. Options are varied from centralised extraction, per machine solutions, and often augmented with air scrubbers mounted on the ceiling to grab those fine particulates.

Instead of solving the IR placement issue, [hardmar] wanted to have the unit tied to the lighting system so that it would power on as soon as someone turned on the appropriate light and would then stay on for a fixed amount of time after the user left in order to continue scrubbing the air some more. His simple hack was to first record and analyse the IR protocol used by the remote, and program an Arduino to be able to send it on/off commands. Next, he hooked up a phototransistor aimed at the light, in order to provide the necessary ‘user present’ trigger to tell the Arduino when to activate the scrubber. Super simple and effective. We love this non-invasive approach of adapting off-the-shelf equipment to our specific requirements, without even showing it a screwdriver.

As [hardmar] admits, the hack is not elegantly implemented, it’s just enough to make it work, and that’s just fine, sometimes you just have a job to do and no more.

How To Get Good With Wood

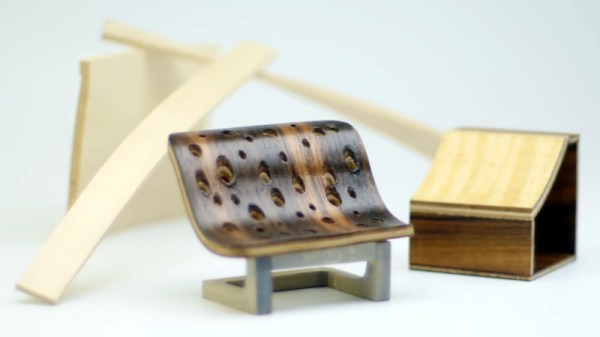
It’s perhaps unsurprising that we don’t see much in the way of woodworking here at Hackaday; after all, this is a plastics and metal community if there ever was one. But that doesn’t mean you’ll never come across a situation where a dead tree needs to be cut or shaped to your will, so we appreciate [Eric Strebel] demonstrating some tips and best practices for working with this exceptionally versatile building material.

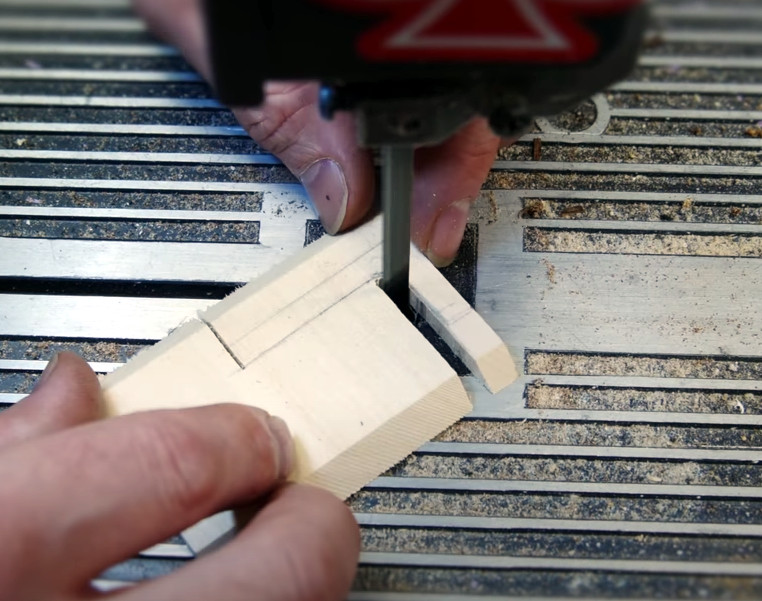
The first video assumes you’re a lumber neophyte, and goes over topics such as the different species of wood you’re likely to find at the hobby shop, proper sanding technique, and the differences between cutting with and against the grain. Some of the different cutting tools you can use are also covered, ranging from the humble hobby knife to the band saw. As always, [Eric] sprinkles the video with tips and tricks gained from his considerable professional experience, such as using some glue and a bit of sawdust to fill in any gaps left behind by an uneven joint.

In the second video, things start getting more advanced. [Eric] demonstrates how you can create custom laminates, and how wood can be permanently bent into arbitrary shapes with sufficient steam and clamping pressure. By combining these new techniques with the basic concepts covered in the first video, surprisingly complex shapes can be formed with minimal effort.

[Eric] previously put together a similar series of videos on working with acrylic, a material that’s arguably far more familiar to the Hackaday readership. But whatever material you use, the takeaway message from this series is clear: get the right tools, learn the techniques, and professional results are well within your reach.

Continue reading “How To Get Good With Wood”

One Wood Ring To Rule Them All

[Olivier Gomis] did not have access to the fires of Mount Doom to forge a large replica of the One Ring, so he had to settle for patience, maple, and a wood lathe. It does have the added convenience of not needing to fire to expose its true nature, just angry pixies from a wall socket.

[Olivier] made the ring in separate inner and outer sections from 72 blocks of maple. The blocks were glued together in 12-sided rings, and stacked in layers to achieve the desired width. The surfaces were cut smooth and thinned out on a wood lathe, and an internal channel was created for LED strips. The Black Speech was cut through the walls of both the inner and outer surfaces using a manual router. Using the ring itself as a former, he made a wooden base for the router to allow it to slide across the surface without wobbling.

The inside wall was cut into sections and glued into a recess in the external portion. The inscriptions were covered with a maple veneer, which still allows it to be visible when the internal LEDs are switched on. The wiring runs from the base of the stand through an S-shaped stem that was made from layers of veneer clamped in a former. A total of 53 hours of painstaking effort went into this work of art, but the end product would make any hardcore Lord of the Rings fan envious.

For more LOTR-themed hacks, check out the secret door to the Mines of Moria secret door, and a sword that glow blue in the presence of unsecured WiFi.

Continue reading “One Wood Ring To Rule Them All”

Wooden Keyboard With Scrabble Tiles Goes The Extra Mile

[Steve M. Potter] loves and respects a good, solid keyboard as much as we do and wanted to build an heirloom-level battleship to grace their home office. Well, you couldn’t ask for a better donor keeb. [Steve] used a Unicomp, the modern Model M. The cases on them are nowhere near as nice as a real model M, but hey, where else are you going to find a keyboard with new buckling spring switches? You’re not. (If anyone has a line on new buckling spring switches by themselves, please let us know.)

Although it has those wonderful buckling spring switches, this body is made of solid cherry. After dialing in the general shape of the case, [Steve] carefully routed out all the key cluster holes using a plunge router. This appears to have been the easy part, because making the keycaps looks terribly tedious.

The alphas a number row are all made from 3/4″ maple dowel rod cut down into cylinder nuggets and topped with Scrabble tiles. The F keys and modifiers are cut out of square poplar rod with bird’s eye maple veneer for a unique look. We particularly like the colored F keys — they look like candy or whisky stones, and just happen to be in resistor color code order. But our favorite part has to be the Caps Lock light. We’ll never understand why in situ lock lights went out of fashion.

Like the look of this keyboard but don’t have this much time to invest? Macropads look good in wood, too.

Guitar With Hot-Swappable Pickups Lights Our Fire

There’s a story that goes something like this: Chet Atkins was playing his guitar when someone remarked, ‘that guitar sounds great!’ Mr. Atkins immediately stopped playing and asked, ‘how does it sound now?’ While it’s true that the sound ultimately comes from you and your attention to expression, we feel that different pickups on the same guitar can sound, well, different from each other.

However, this is merely speculation on our part, because changing pickups is pretty serious surgery, and there’s only one company out there making guitars with hot-swappable pickups. Since their low-end model is out of most people’s price range, [Mike Lyons] took one for the team and decided to build a guitar from scratch to test out various pickups of any size, from lipstick to humbucker. [Mike] can swap them out in under a minute, and doesn’t need any tools to do it.

[Mike] modeled the swapping system on that one company’s way of doing things, because why reinvent the wheel? The pickups are inserted through the back and held in place with magnets and a pair of cleverly-designed printed pieces — one to mount the pickup to, and the other inside the pickup cavity.

As far as actually connecting the things up, [Mike] went with a commercially-available quick-connect pickup solution that uses a mini four-conductor audio plug and jack. The body is based on the Telecaster, while the headstock is more Stratocaster — the perfect visual combination, if you ask us.

We are particularly fond of [Mike]’s list of caveats for this project, especially the requirement that it had to be built using only hand tools and a 3D printer. Although a drill press would have been nice to use, [Mike] did a fantastic job on this guitar. Whether you’re into guitars or not, this is a great story of an awesome build.

What, you don’t even have hand tools? You could just print the whole guitar instead.

The Beat Goes On With This ESP32 Page Turner

Looking for a hands-free way to page through sheet music on an iPad, [The_Larch] came up with this simple Bluetooth input device based on the ESP32. The microcontroller just needed to have two switches wired into the GPIO pins, in this case the same heavy-duty plungers you’d find on a guitar pedal, and a USB bulkhead pass-through to provide power. Thanks to the excellent ESP32-BLE-Keyboard library, it only took a few lines of code to fire off the appropriate key strokes when the left or right button was pressed.

While undeniably a simple project from an electronics standpoint, the wooden enclosure [The_Larch] built is an interesting change of pace from the 3D printed fare we normally see around these parts. It started life as strips of oak reclaimed from an old kitchen table, which were laminated together to make a solid block. A large spade bit was then used to bore into the block to make a void for the electronics, and a second flat piece of oak was fashioned into a front panel.

Creating Bluetooth input devices with the ESP32 is so incredibly straightforward that we’re honestly a little surprised we don’t see the trick used more often. Especially when you consider all of the custom made keyboards that have graced these pages over the last couple of years. The tools are available for anyone who wants them, so you have to wonder if hackers just aren’t fond of using Bluetooth for something as important as a keyboard?

Machinist’s Accuracy Vs. Woodworker’s Precision

There are at least two ways of making parts that fit together exactly. The first way is the Cartesian way, and the machinists way. Imagine that you could specify the size of both the hole and the peg that you’d like to put into it. Just make sure your tolerances are tight enough, and call out a slightly wider hole. Heck, you can look up the type of fit you’d like in a table, and just specify that. The rest is a simple matter of machining the parts accurately to the right tolerances, and you’re done.

The machinist’s approach lives and dies on that last step — making the parts accurately fit the measure. Contrast the traditional woodworker’s method, or at least as it was taught to me, of just making the parts fit each other in the first place. This is the empirical way, the Aristotelian way if you will. You don’t really have to care if the two parts are exactly 30.000 mm wide, as long as they’re precisely the same length. And woodworkers have all sorts of clever tricks to make things the same, or make them fit, without measuring at all. Their methods are heavy on the jigs and the clever set-ups, and extraordinarily light on the calipers. To me, coming from a “measure carefully, and cut everything to measure” background, these ways of working were a revelation.

This ends up expressing perfectly the distinction between accuracy and precision. Sometimes you need to hit the numbers right on, and other times, you just need to get the parts to fit. And it’s useful to know which of these situations you’re actually in.

Of course, none of this is exclusive to metal or wood, and I’m actually mentioning it because I find myself using ideas that I learned in one context and applying them in the other. For instance, if you need sets of holes that match each other perfectly, whether in metal or wood, you get that precision for free by drilling through two sheets at one time, or by making a template — no measuring needed. Instead of measuring an exact distance from a feature, if all you care about is two offsets being the same, you can find a block of scrap with just about the right width, and use that to mark both distances. Is it exactly 1.000″ wide? Nope. But can you use this to mark identical locations? Yup.

You can make surprisingly round objects in wood by starting with a square, and then precisely marking the centers of the straight faces, and then cutting off the corners to get an octagon. Repeat with the centers and cutting until you can’t see the facets any more. Then hit it with sandpaper and you’re set. While this won’t make as controlled a diameter as would come off a metal lathe, you’d be surprised how well this works for making round sheet-aluminum circles when you don’t care so much about the diameter. And the file is really nothing other than the machinist’s sandpaper (or chisel?).

I’m not advocating one way of working over the other, but recognizing that there are two mindsets, and taking advantage of both. There’s a certain freedom that comes from the machinist’s method: if both parts are exactly 25.4 mm long, they’re both an accurate inch, and they’ll match each other. But if all you care about is precise matching, put them in the vise and cut them at the same time. Why do you bother with the calipers at all? Cut out the middle-man!